You want one page on your WordPress site to look different from the rest: a landing page without the sidebar, a full-width sales page, or a contact page with a map above the content. In a classic theme you would have copied page.php and added a template header. In a block theme there is no PHP file to copy, and the option you need is hidden inside the Site Editor.
This tutorial shows four ways to create a custom page template in a block theme, how to assign it to a page, and how to keep it safe when the theme updates. The steps follow the current WordPress documentation, which was updated for WordPress 7.0, and use the default labels you will see in the editor.
What a custom page template is (and what it is not)
Every page in a block theme is rendered by a template: a layout made of blocks that wraps the page content. Most themes ship with a general Pages template that every page uses. A custom template is an additional layout that does nothing until you pick it for a specific page or post. That is the key difference from the other template types WordPress offers:
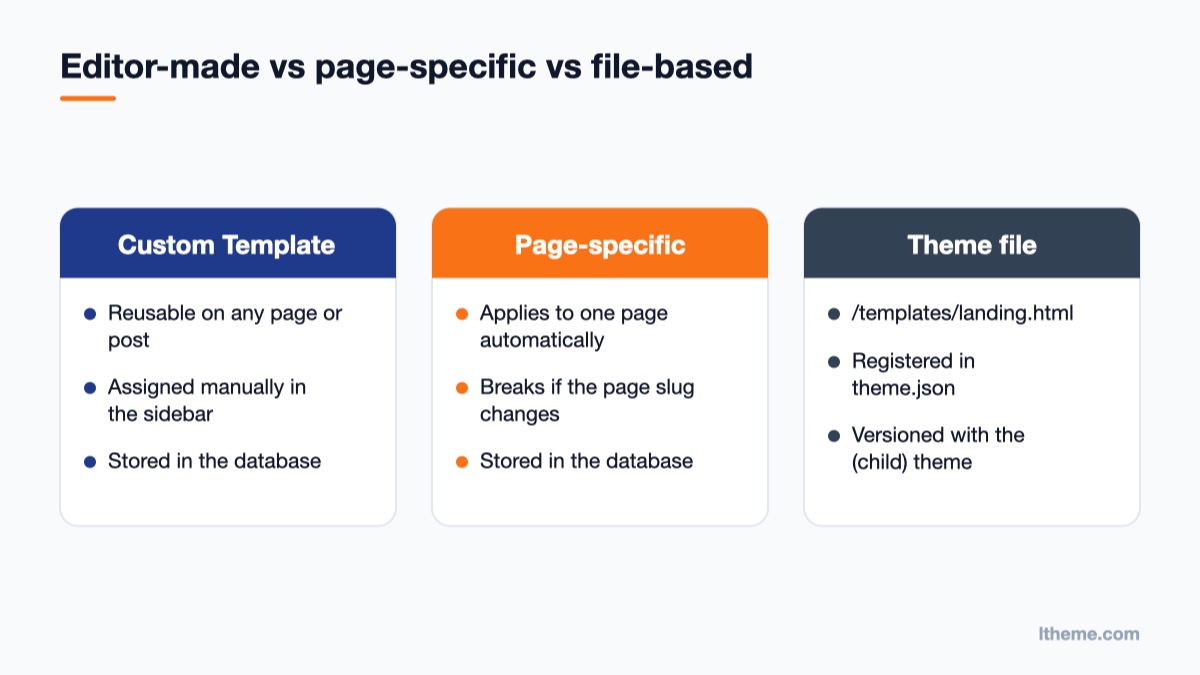
Custom Template – created once, then chosen manually for any page, post or custom post type entry. Good for “Landing page”, “Full width”, “Page with sidebar”.
Page-specific template – created for one named page (for example the “Pricing” page) and applied to it automatically through the template hierarchy.
Template part – a reusable piece such as the header or footer that lives inside templates. If you only want to change the header, edit the template part instead.
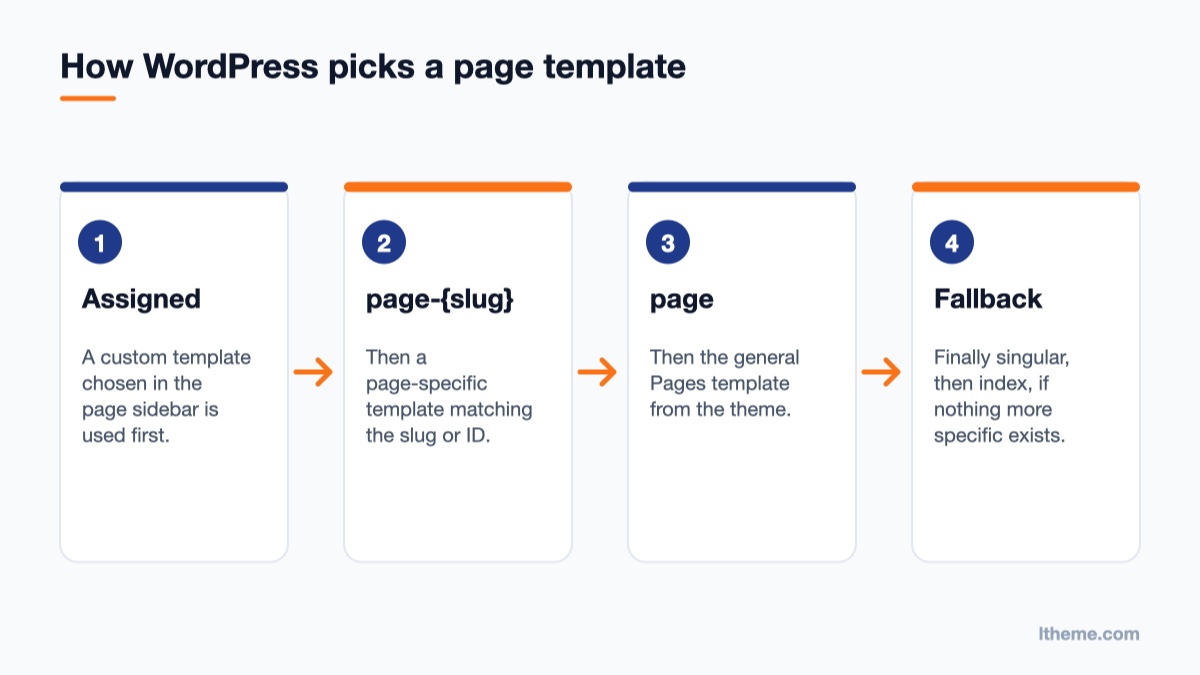
WordPress decides which template to use for a page in a fixed order, so it helps to know where your custom template sits in it.
An assigned custom template wins; otherwise WordPress walks down the template hierarchy.
According to the template hierarchy, a template assigned to the page wins first. If none is assigned, WordPress looks for page-{slug}, then page-{id}, then the general page template, then singular, and finally index. Block themes use the same order with .html files in the /templates folder instead of .php files. That is why an assigned custom template always overrides the theme’s default page layout, and why removing the assignment instantly sends the page back to the default.
Before you start
The Template Editor only appears when your site uses a block theme, or a classic theme that has enabled template editing. Check under Appearance → Themes: if you see Appearance → Editor in the menu, you are on a block theme and can follow every method below. If you only see Customize and Widgets, jump to the classic theme section near the end.
Two more things are worth doing first:
Take a backup or work on a staging copy. Template changes apply to every page that uses the template, so a mistake can affect more than one page. Our list of free WordPress staging plugins covers quick ways to get a test copy.
Decide whether you need a reusable layout or a one-page layout. If only the “Pricing” page should ever look this way, a page-specific template (Method 3) is simpler than a custom template.
Method 1: Create a custom template from the page editor
This is the fastest route when you are already editing the page that needs the new layout.
Go to Pages and open the page (or click Pages → Add New).
Open the Page tab in the settings sidebar on the right.
In the Summary section, click the name of the current template (usually “Pages” or “Default template”). A popup appears.
Click the add template icon in the top right corner of the popup.
Give the template a descriptive name such as “Landing page – no sidebar” and click Create.
The editor switches to template editing mode. Add, move or remove blocks to build the layout. Keep the Content block (Post Content) in place, because that is where the page’s own text appears.
Click the Back link at the top left to return to the page, then click Publish (or Save). WordPress asks you to confirm saving both the page and the new template. Click Save.
The new template is now assigned to this page and is also available for any other page. The add template icon only appears when the active theme allows custom templates; almost every block theme does, including the default Twenty Twenty-Five.
Method 2: Create a custom template in the Site Editor
Use the Site Editor when you want to design the layout first and assign it to pages later, or when several people will reuse it.
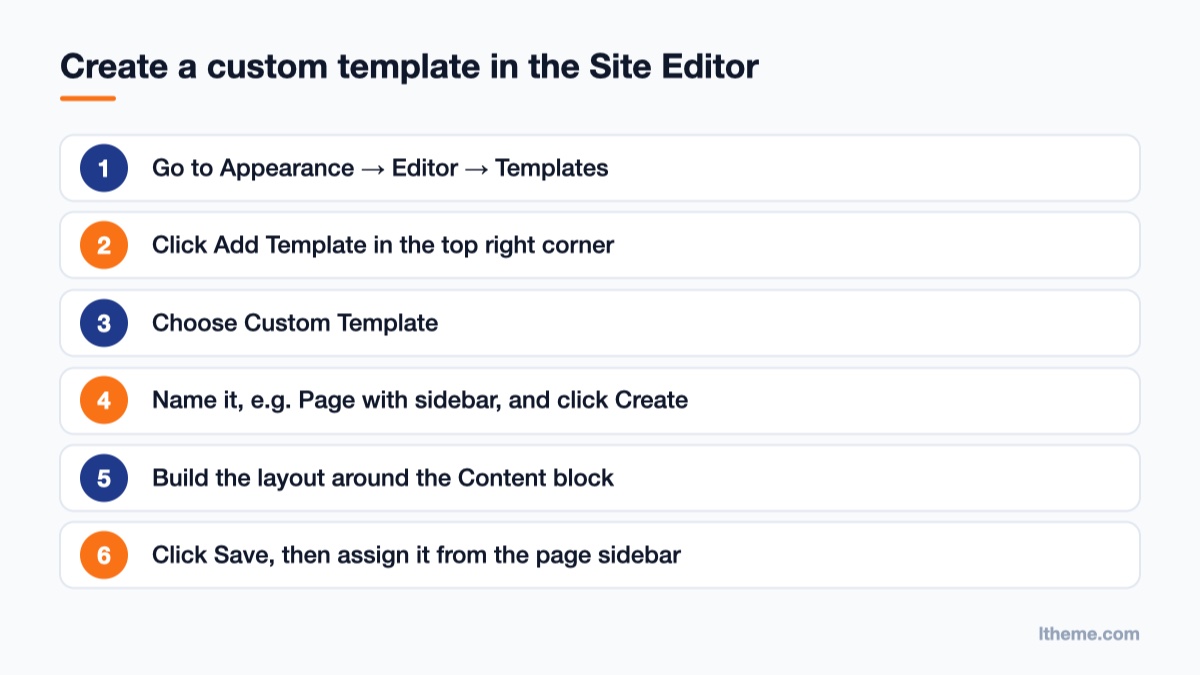
The Site Editor route creates a reusable layout you assign to pages later.
Go to Appearance → Editor and click Templates.
Click the Add Template button in the top right corner.
Choose Custom Template from the list of template types.
Enter a name that describes the purpose, for example “Page with sidebar”, and click Create.
WordPress opens the new template pre-populated with content (you may be offered a pattern to start from). Build the layout with blocks: header template part, a Group or Columns block for structure, the Content block, and the footer template part.
Click Save.
A template created this way is not attached to anything yet. The official Template Editor guide is explicit about this: a new custom template stays unassigned until you choose it for a post or page. Assigning it is covered below.
Design tips for the layout
Never delete the Content block. Without it, every page using the template shows the same fixed blocks and none of its own content.
Use the Group block’s layout settings for width. Set the inner Group to Full width for edge-to-edge sections, or keep it constrained to match the theme’s content width.
Reuse template parts for header and footer instead of rebuilding them. If you later change the header part, every template that includes it updates too.
Remove the Title block on landing-page templates if the page content already has its own hero heading, so you do not end up with two H1-style titles. Our guide to the Gutenberg Cover block shows how to build that hero section inside the page content.
Method 3: Create a template for one specific page
If the layout belongs to exactly one page, let WordPress attach it automatically:
Go to Appearance → Editor → Templates and click Add Template.
Choose Pages.
Select the page the template should apply to (for example “Pricing”).
Design the layout in the Template Editor and click Save.
Behind the scenes this creates a page-{slug} template, so it follows the hierarchy shown earlier. The trade-off: if someone changes the page’s slug, the template no longer matches it. A custom template assigned through the sidebar does not have that problem, because the assignment is stored on the page itself.
Method 4: Ship the template inside your theme (for developers)
Templates created in the editor live in the database. If you build sites for clients or maintain a child theme, you can put the template in the theme files instead, so it is versioned and travels with the theme. The Theme Handbook describes two steps.
Step 1: Create the template file. Add /templates/landing.html to your theme (or child theme) with block markup like this:
The easiest way to get valid markup is to build the layout in the Site Editor first, then open the editor’s Code editor view and copy the result into the file.
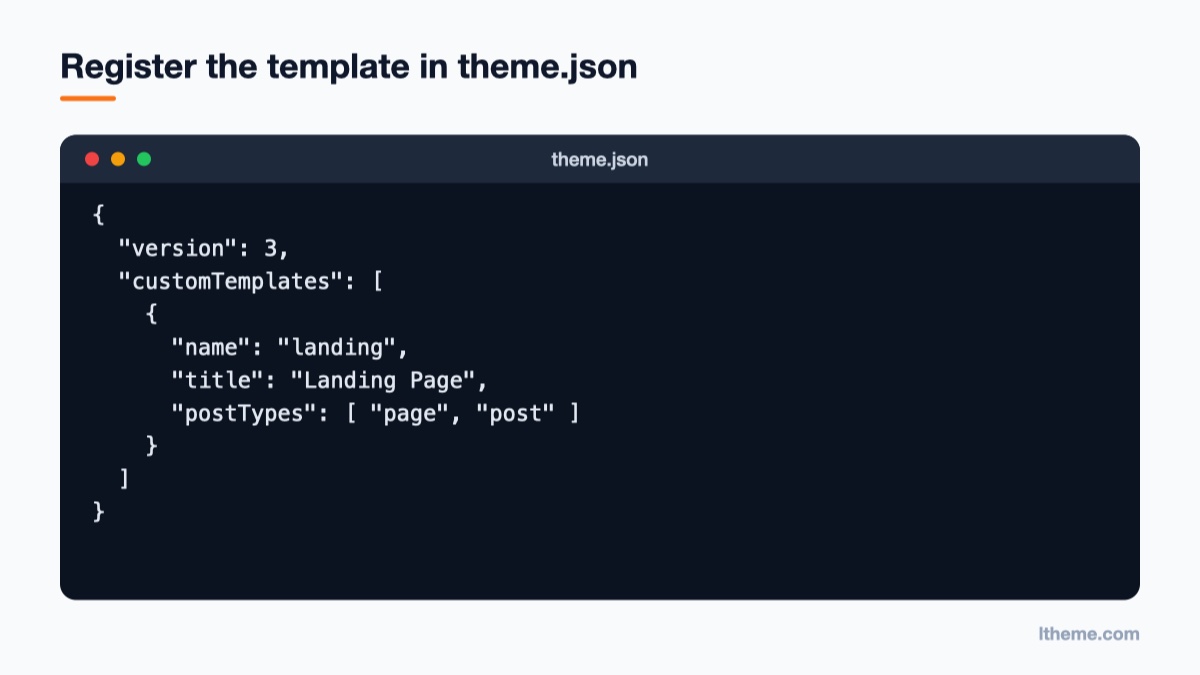
Step 2: Register it in theme.json. Custom templates need an entry in the top-level customTemplates array, otherwise WordPress treats the file as an unknown template and it will not show in the page sidebar:
The name must match the template file name without the .html extension.
Merge this into your existing theme.json rather than replacing the file. name is the file name without .html, title is the label editors see in the template picker, and postTypes is optional; when it is left out the template is offered for pages only. Add a custom post type slug to the array if the template should be available there too.
In the Page settings tab, find the Summary section and click the current template name.
Choose Change template (or open the drop-down list in the popup) and pick your custom template.
Click Save or Update.
Changing a page’s template affects that page only. To preview how the template wraps the content while editing, click View at the top right of the editor and choose Show template.
Which method should you use?
Pick the method by how the template will be reused and where it should live.
Situation
Best method
Where it is stored
You are editing a page and need a new layout now
Method 1, from the page editor
Database
A reusable layout for several pages
Method 2, Site Editor custom template
Database
One page should always look different
Method 3, page-specific template
Database
Client sites, version control, child themes
Method 4, file plus theme.json
Theme files
Keep editor-made templates when you switch or update themes
Templates you create or edit in the Site Editor are saved in the database and are tied to the active theme. They survive normal theme updates, because an update replaces the theme files, not your database entries. They do not follow you if you activate a different theme.
If you want those templates written into the theme as files, the official Create Block Theme plugin from WordPress.org can do it. After you install it, a panel opens from an icon next to the Save button in the Site Editor. Its Save Changes option writes your editor changes into the active theme’s files, and Create Theme → Create Child Theme generates a child theme that includes them. The plugin warns that these actions permanently change theme files, so use it on a child theme or your own theme and keep a backup.
Classic themes: the PHP way
If your site runs a classic theme (most themes built for Elementor or WPBakery are classic), the Site Editor is not available. Custom page templates are still possible: create a PHP file in your child theme, for example template-landing.php, start it with a comment such as <?php /* Template Name: Landing Page */ ?>, add the markup you need, and the template appears in the page’s Template drop-down. If your goal is only to adjust styling on one page, adding scoped CSS is often enough; see how to add custom CSS to a Gutenberg block.
Common mistakes and how to fix them
The new template does not appear in the page sidebar
For editor-made templates, check that you chose Custom Template and not a page-specific template, which is never offered in the picker. For file-based templates, the usual cause is a missing or misspelled customTemplates entry: the name must exactly match the file name without .html. Also check postTypes; if you list only "post", the template will not show on pages.
The page shows the layout but not its content
The Content block was removed from the template. Open the template under Appearance → Editor → Templates, add the Content block back where the page text should appear, and save.
Edits to the theme file have no effect
Once a template has been customized in the Site Editor, the database copy takes precedence over the theme file. To return to the file version, open Appearance → Editor → Templates, click the three-dot menu next to the template and choose Reset. This clears your editor changes, so copy anything you need first.
Changing the template changed other pages too
Editing a template updates every page that uses it. If one page needs a variation, create a second custom template for it rather than editing the shared one.
The template disappeared after switching themes
Editor-made templates belong to the theme that was active when you created them. Switch back to that theme to recover them, and use Create Block Theme or Method 4 next time so the layout lives in theme files.
Start from a layout that already fits
Building a custom template is worth it when a page truly needs its own structure. If you mainly need a polished one-page marketing site, a ready-made landing layout can save hours: LT Paste Onepage is a free single-page theme for content marketing, and LT Foto Onepage is built around an app landing page. You can browse the rest of the collection on the WordPress themes page.
Wrap-up
For most site owners, the quickest path is Method 1: open the page, click the template name in the Summary panel, add a template, build the layout around the Content block and save. Use the Site Editor’s Add Template → Custom Template when the layout will be reused, a page-specific template when only one page needs it, and a file plus a customTemplates entry in theme.json when the template should ship with your theme. Your next step: create one custom template on a staging copy, assign it to a test page, and check it on mobile before you roll it out to live pages.
Welcome to LT Digital Team. We make daily blogs for Joomla! and WordPress CMS, support customers and everyone who has issues with these CMSs and solve any issues with blog instruction posts, trusted by over 1.5 million readers worldwide.
Latest posts by LT Digital Team (Content & Marketing) (see all)
We use cookies to improve your experience on our website. By browsing this website, you agree to our use of cookies.
Functional
Always active
The technical storage or access is strictly necessary for the legitimate purpose of enabling the use of a specific service explicitly requested by the subscriber or user, or for the sole purpose of carrying out the transmission of a communication over an electronic communications network.
Preferences
The technical storage or access is necessary for the legitimate purpose of storing preferences that are not requested by the subscriber or user.
Statistics
The technical storage or access that is used exclusively for statistical purposes.The technical storage or access that is used exclusively for anonymous statistical purposes. Without a subpoena, voluntary compliance on the part of your Internet Service Provider, or additional records from a third party, information stored or retrieved for this purpose alone cannot usually be used to identify you.
Marketing
The technical storage or access is required to create user profiles to send advertising, or to track the user on a website or across several websites for similar marketing purposes.





Recent Comments