
Have you known how to create a multilingual WordPress site yet? If not yet, don’t ignore this blog, we provide you step by step guides to make your site multilingual. First and foremost, go over the reason why creating a multilingual site is important.
Why should you create a multilingual WordPress site?
It is obvious that although you provide rich and valuable content, it was only displayed in one language instead of multiple languages. As a result, there are a lot of international visitors who can not understand what you want to convey in their native language. It is an important reason why your website never reaches readers worldwide. In addition, creating a multilingual WordPress site brings your website a wide range of following great benefits.
- Improve SEO: To create a successful website, running a multilingual WordPress site plays a crucial role in improving your site ranking on Google search results. For example, in most countries, they often search keywords by using their native language. In this case, with multilingual website and SEO efforts, your website will display on their search results which means your website has chances to access a new market and expand your business.
- Expand your reach: with a multi-language site, you can approach a much wider audience even international markets. In addition, your readers can easily share your site with their friends or co-workers who are the same purpose. It is a great way to gain a place for your brand in various markets.
- Build trust: when your website is displayed in multiple languages, your customers will read and comprehend your website content in their native language without effort. Thanks to that, it increases the customers’ trust in your website. Moreover, this shows that you are caring and focusing on your customers.
For these reasons, today we write this blog to help you make your site multilingual without effort.
How to create a multilingual WordPress site?
There are several plugins that you can use to translate your WordPress site into different languages. However, In this tutorial, we picked out the two best tools to help you create and manage translations with ease including TranslatePress and Polylang. Now, let’s dive into the detailed methods.
Solutions
Method 1: using TranslatePress
TranslatePress is the first remarkable plugin and one of the most popular Translation Plugins that we would like to introduce. This plugin is not only easy to use but also offers you a wide range of powerful features to help you translate your site into other languages quickly. By using this plugin, you can translate the full-page content directly from the front end. One of the impressive things about this plugin is that you can use the machine and human translations.
To learn how to use this tool, let’s go through the step-by-step instructions below
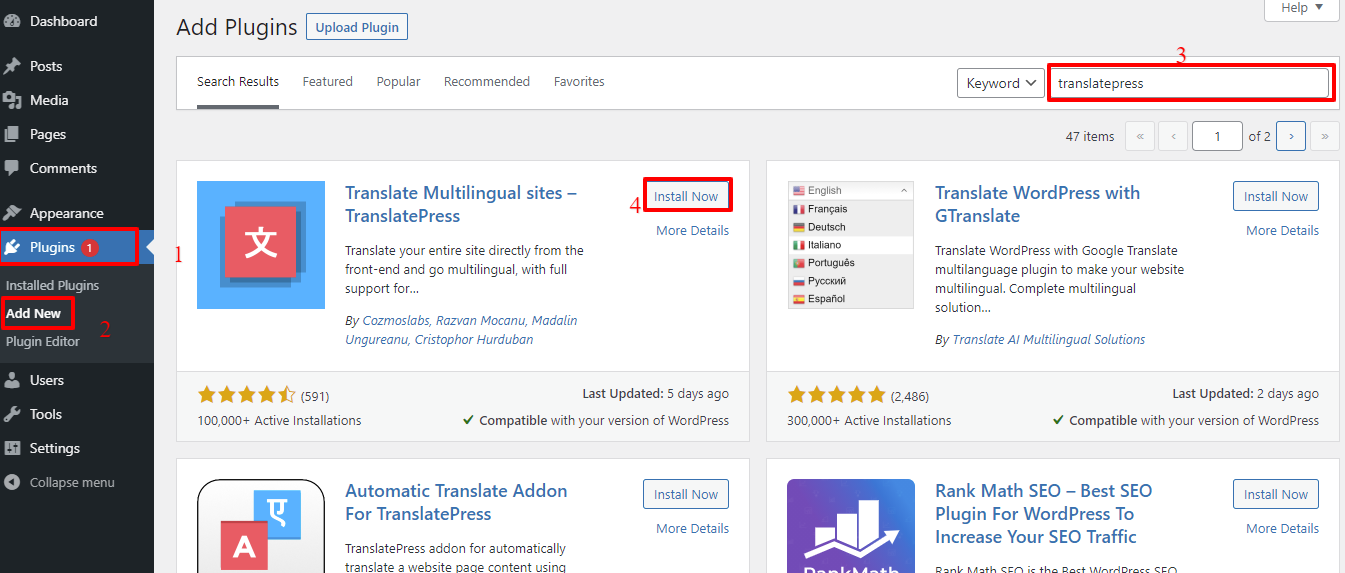
- Step 1: Installing and activating the plugin
Just like other plugins. You only need to go to the Plugins section on your dashboard, reach to add plugins option, and then click on add new button. Now, you can search for the TranslatePress plugin on the search bar and install it. When completing the installation, easily activate it.
- Step 2: Configure your settings
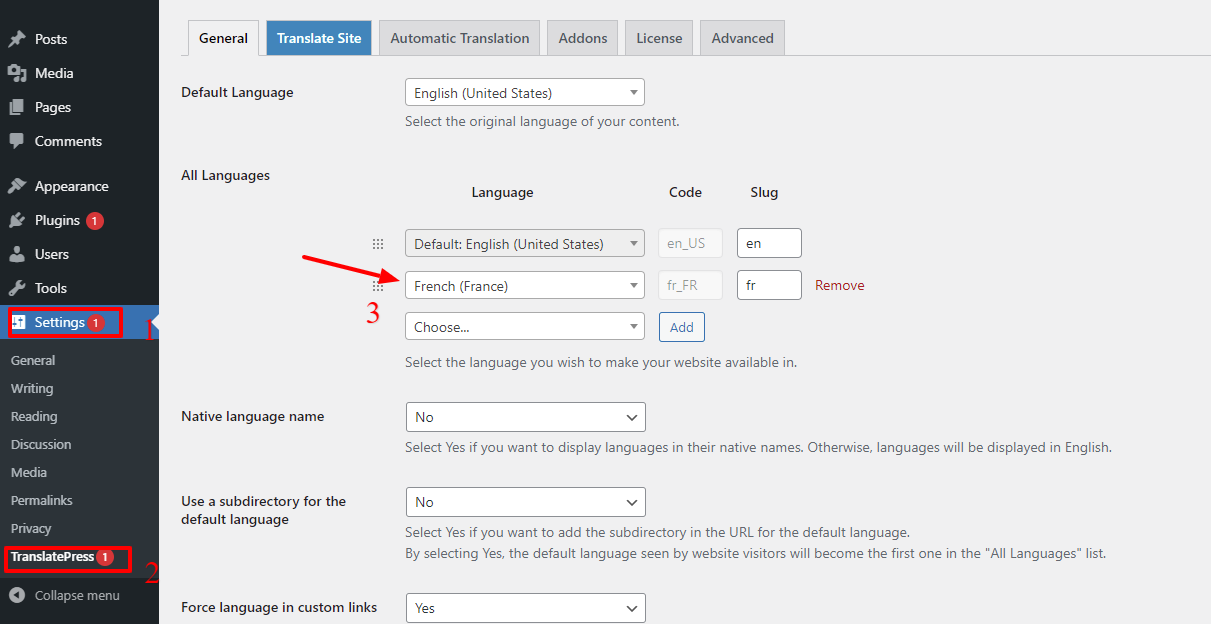
After you have installed and activated yet, you have to visit Settings > TranslatePress to configure the plugin settings.
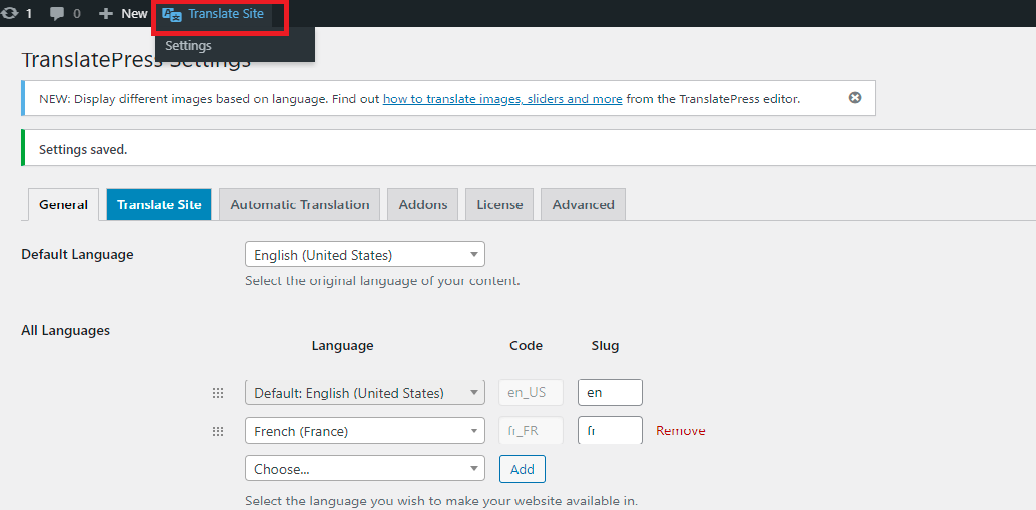
The free version of TranslatePress only supports up to two languages including The default language of the site and the language which you want to add. For example, we choose French as the secondary language.
In case, if you want to add more than one language, you need to install the ” Extra Languages” add-on first. You can download this addon directly under your account after logging in TranslatePress website.
Next, at Native language name, you can optionally display languages in their native names, or you can also leave this option if you want the language name will be shown in English.
The next option, you can select “Yes” whether you want to present the default language name in the URL as a subdirectory. For example https://ltheme.com/en/. However, at this option, you should maintain the default choice to have a better result for SEO.
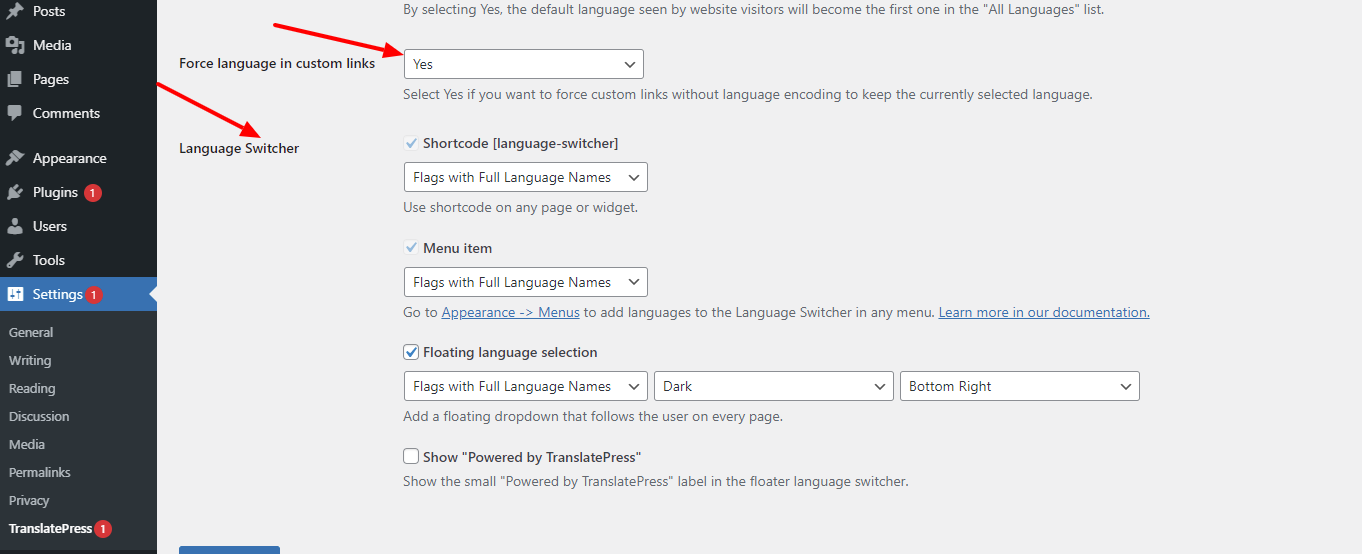
For Force language in custom links option, the recommended option is ” Yes”, since it will adjust custom links according to the currently selected languages. Thanks to that, the URLs are more SEO-friendly.
And the final option is language switcher, at here there are three ways that help you add a language switcher to your website including using a shortcode, adding a language switcher to your navigation menu, or adding a floating dropdown menu.
After that, don’t forget to click on the ” Save Changes” button to store your settings.
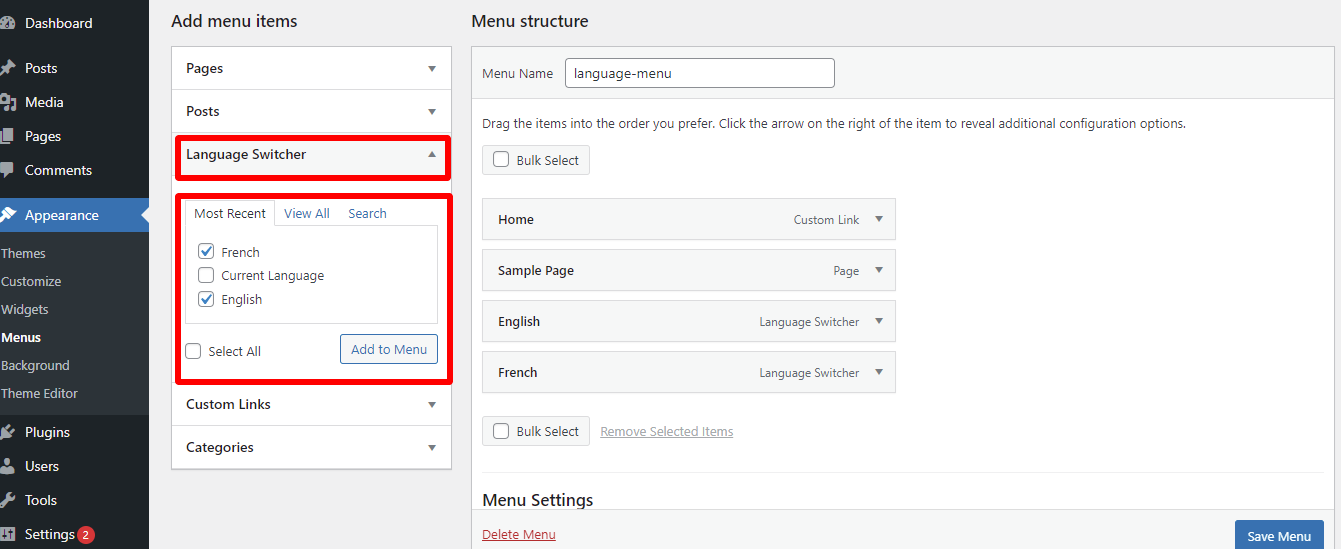
However, to add a language switcher to your WordPress navigation menu, you need to go to Appearance > Menus and then click on the” Language Switcher” tab as in the image below. Choose the languages which you want to show and add them to the menu button. At Menu settings, you can freely choose any location to display the language switcher. And click on the “save menu” button.
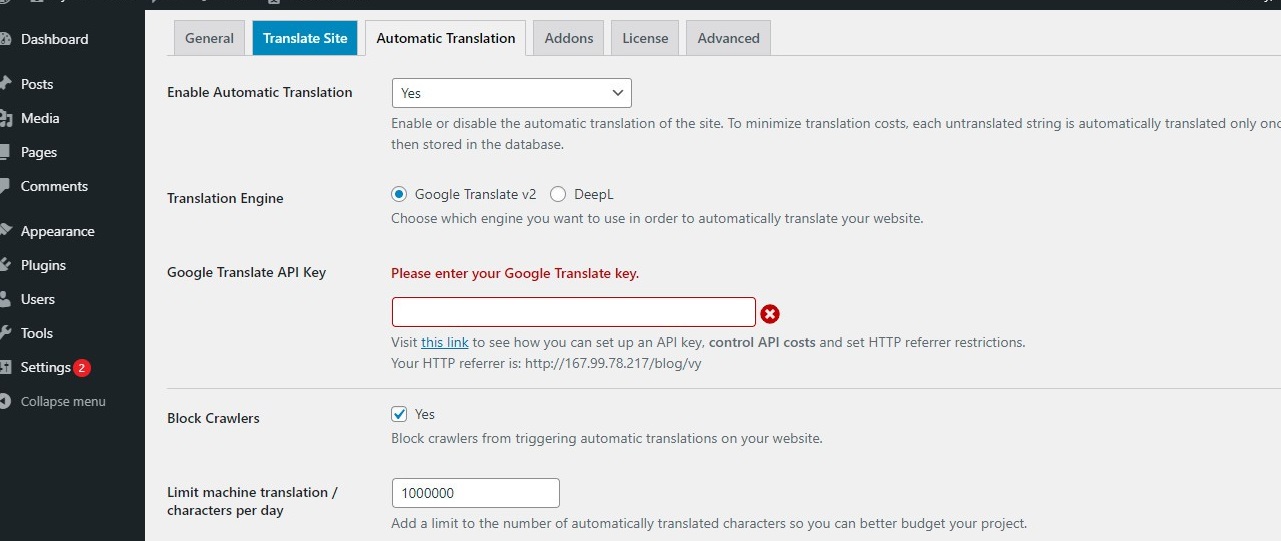
In the “Automatic Translation” Tab, you can choose how you want to translate your content. Whether you want your content automatically translated, you can choose the “Yes” option, and otherwise, you can leave this tab and keep the “No” option.
In case that you select ” Yes”, you need to generate a Google Translate API key to connect to the service. Another option is that you have to upgrade to the premium version to use Deepl Automatic Translation. And you also need to save all the settings before moving to the next steps.
- Step 3: Translating your WordPress pages
Firstly, you need to open the front-end editor by clicking the “Translate Site” tab on the settings page or the button on the top bar menu. The front-end editor will help you see how your page looks like in the realtime whenever you make a change.
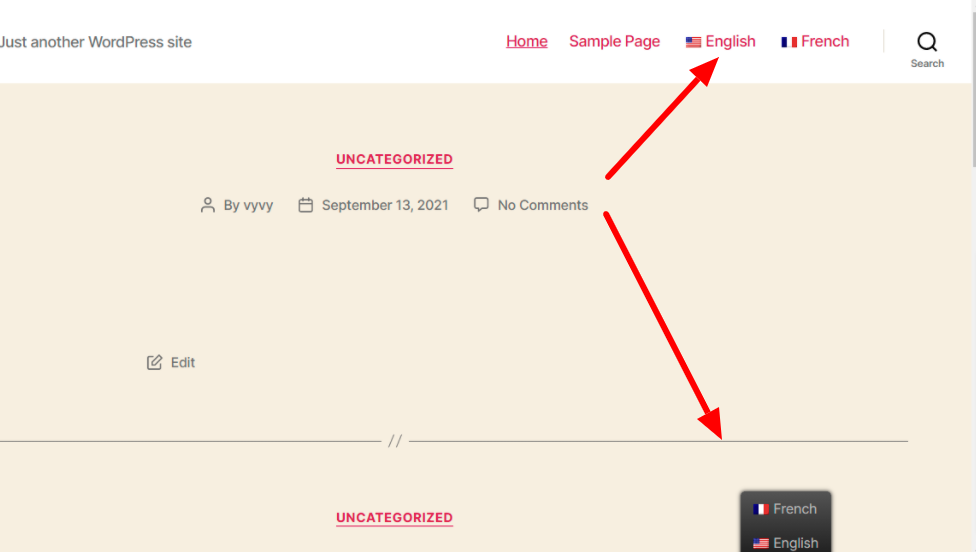
After opening the front-end editor, the language switcher menu is displayed at the bottom of the page and at the desktop horizontal menu. Thanks to that, your website visitors can quickly switch between the currently selected languages.
Additionally, TranslatePress allows you to display a language switcher anywhere on your site including inside your sidebar as in the image below.
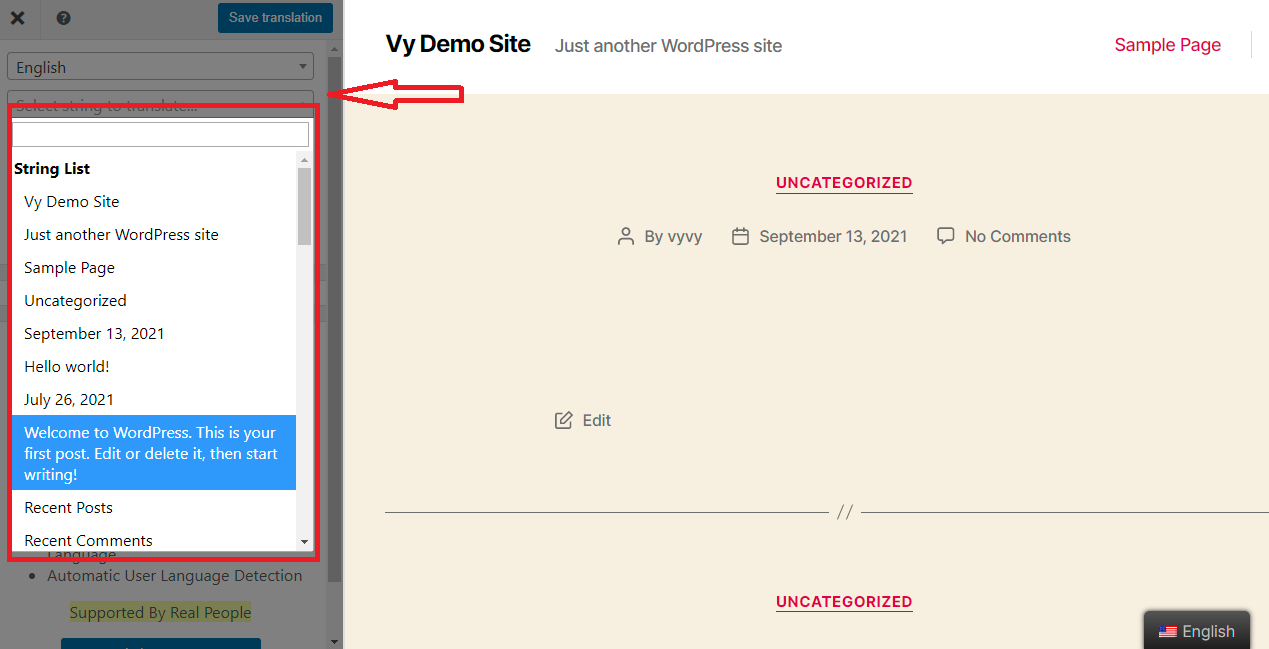
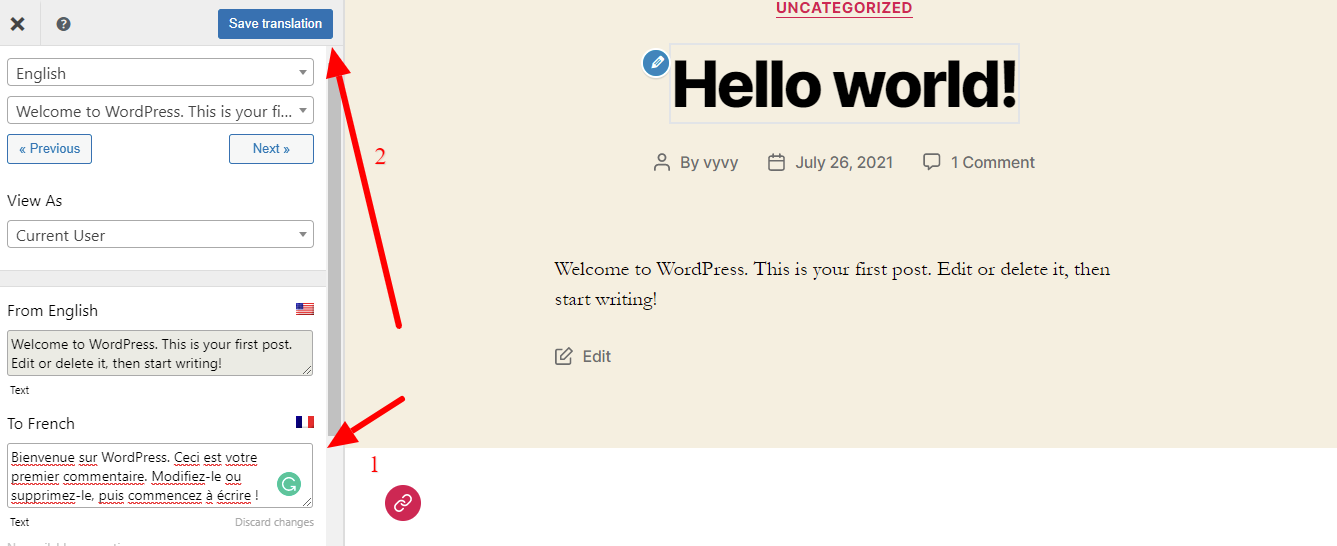
From here, you can see a set of strings presented on the page inside a useful dropdown list. You can freely choose any string which you want to translate and then it will be shown in the box under the string list. In our case, we select a long string. Now, let’s see the result below.
After the previous step, TranslatePress will allow you to translate the string into your added language by entering the translation on the French Translation box as shown in the example below. And then, you need to click on the ” Save Translation” button to save the translated string into the database.
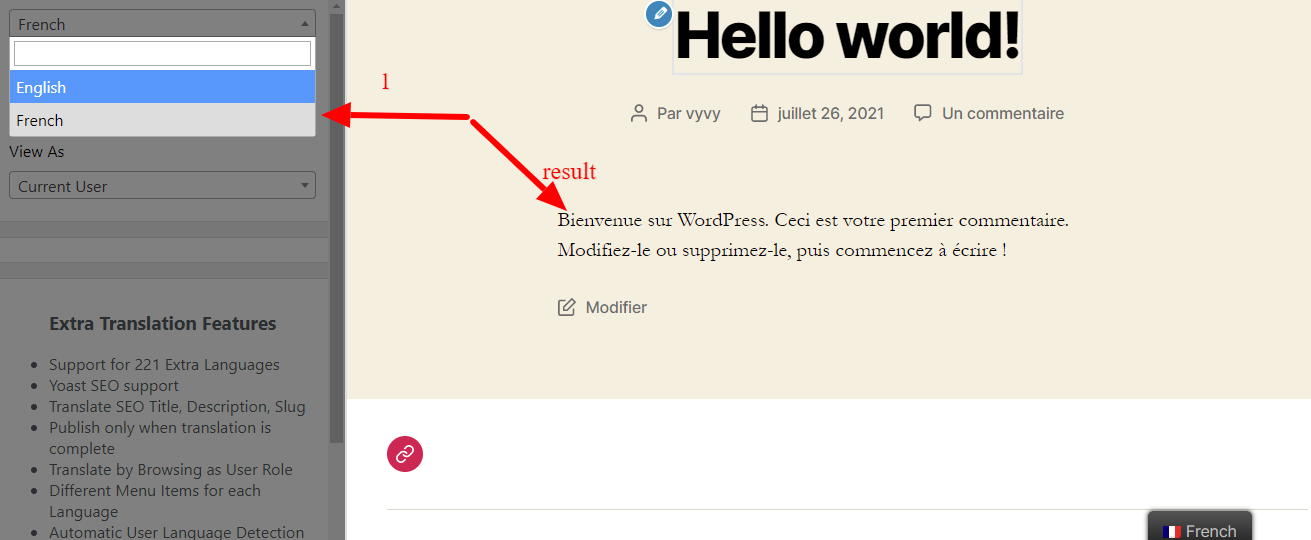
Now, let’s see the result once we switch to the French version of my page, the translated string will be shown on the site immediately.
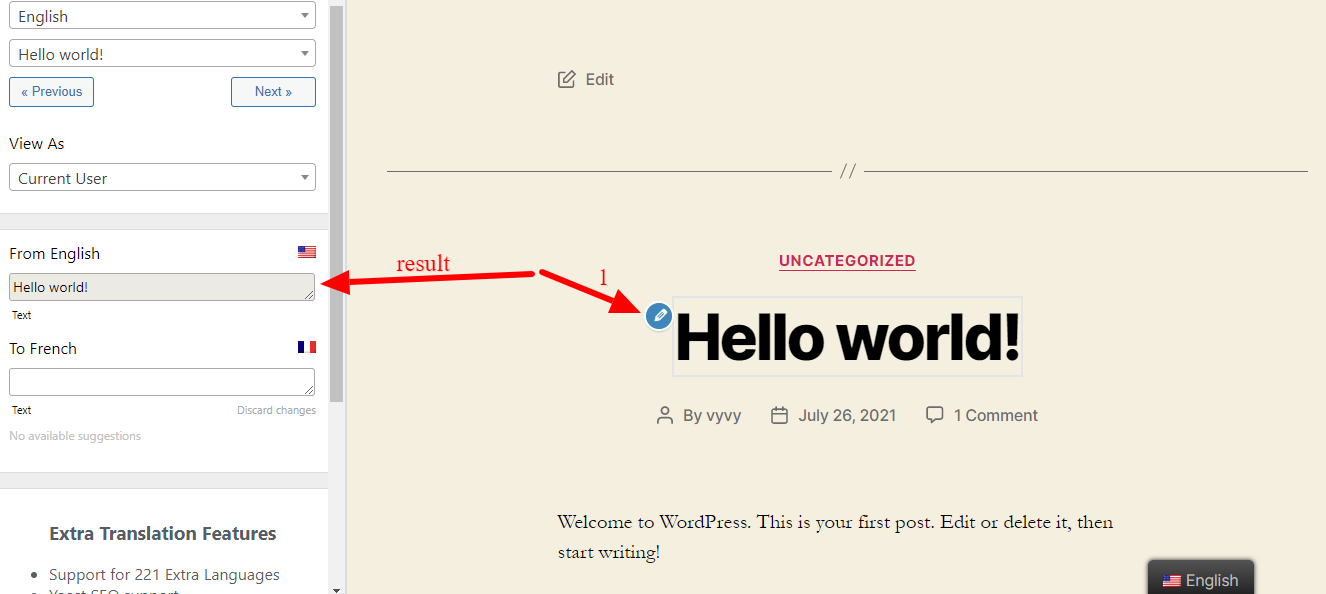
In addition to the translation sidebar, you can choose the string which you want to translate by clicking the pencil icon, and later, it will appear inside the translation box in the sidebar panel. From that, you can proceed to the next steps as in the previous steps to create a translation for any string.
Method 2: Using Polylang
Polylang is one of the most prevalent multilingual plugins developed by WP SYNTEX. This plugin has recorded over 600.000 active installations. It allows you to generate a bilingual or multilingual WordPress site without effort. You can translate your post, page, widget, media, post tags, and much more into other languages. This plugin also offers 2 versions including the free version and the Pro version.
For this tutorial, we will use the free version of this plugin. Now let’s start.
The installation and activation process of Polylang is also similar to the TranslatePress, so we don’t mention it again. Now we will go on the detailed steps to create a multilingual WordPress site with Polylang Plugin.
- Step 1: Configure the settings
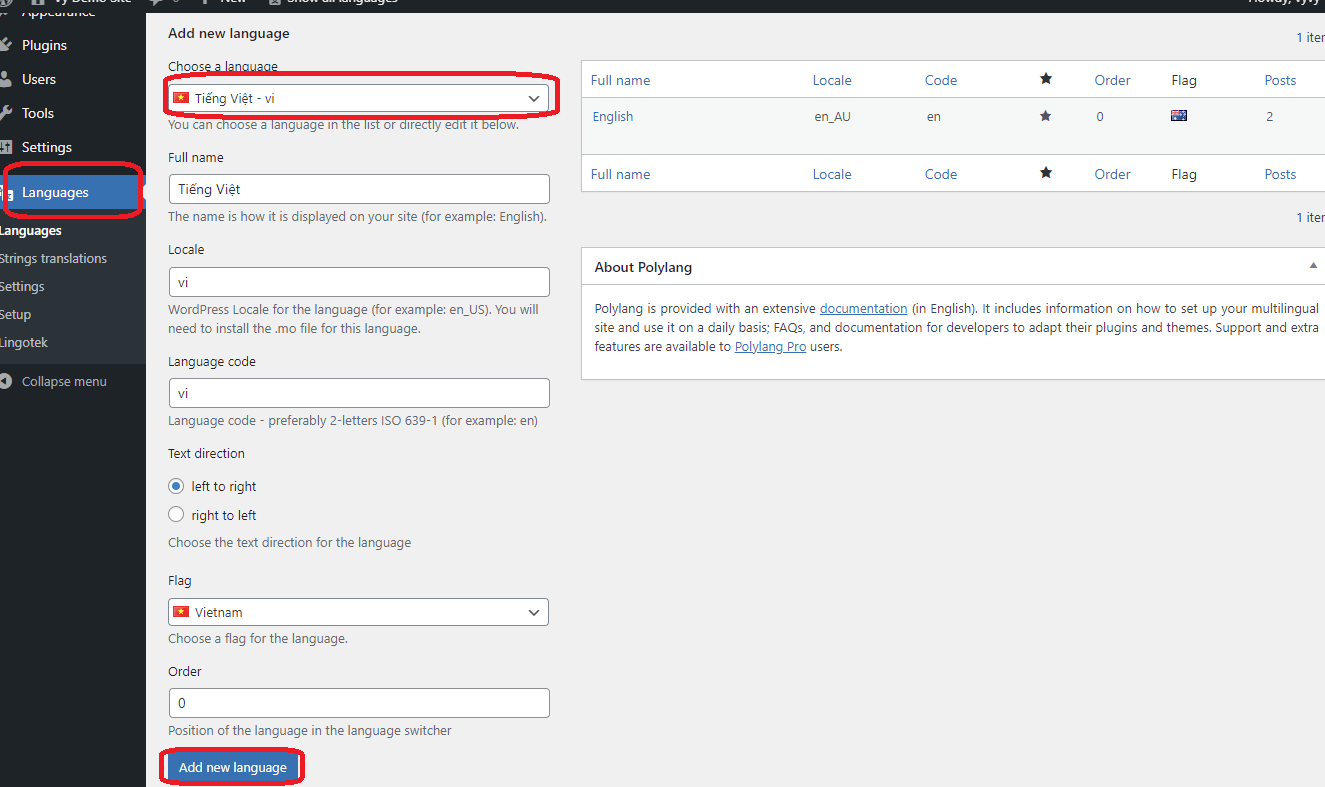
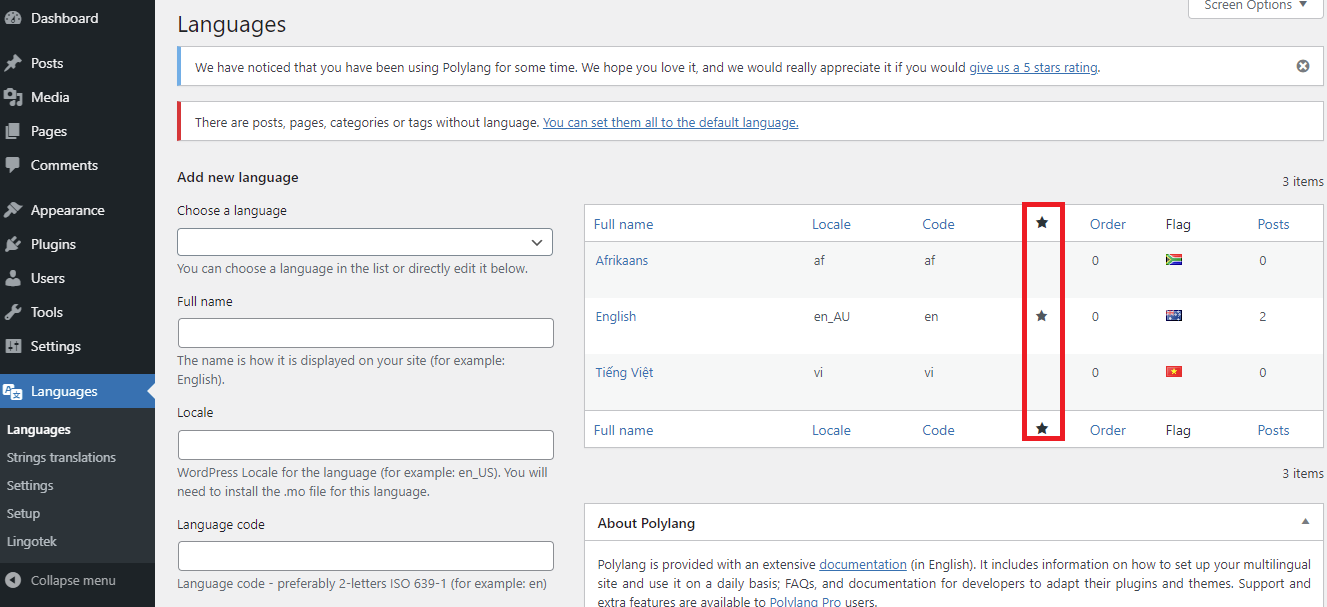
Firstly, Go to the Languages > languages tab on your dashboard. It will open add new language sections. At here, you only need to choose any language which you want to add and it will automatically fill in the following fields: full name, locale, language code, text, and flag. Then, let’s click the “Add New Language” button.
In order to set the default language, it is easy for you to click on the star icon in the language row you want to select.
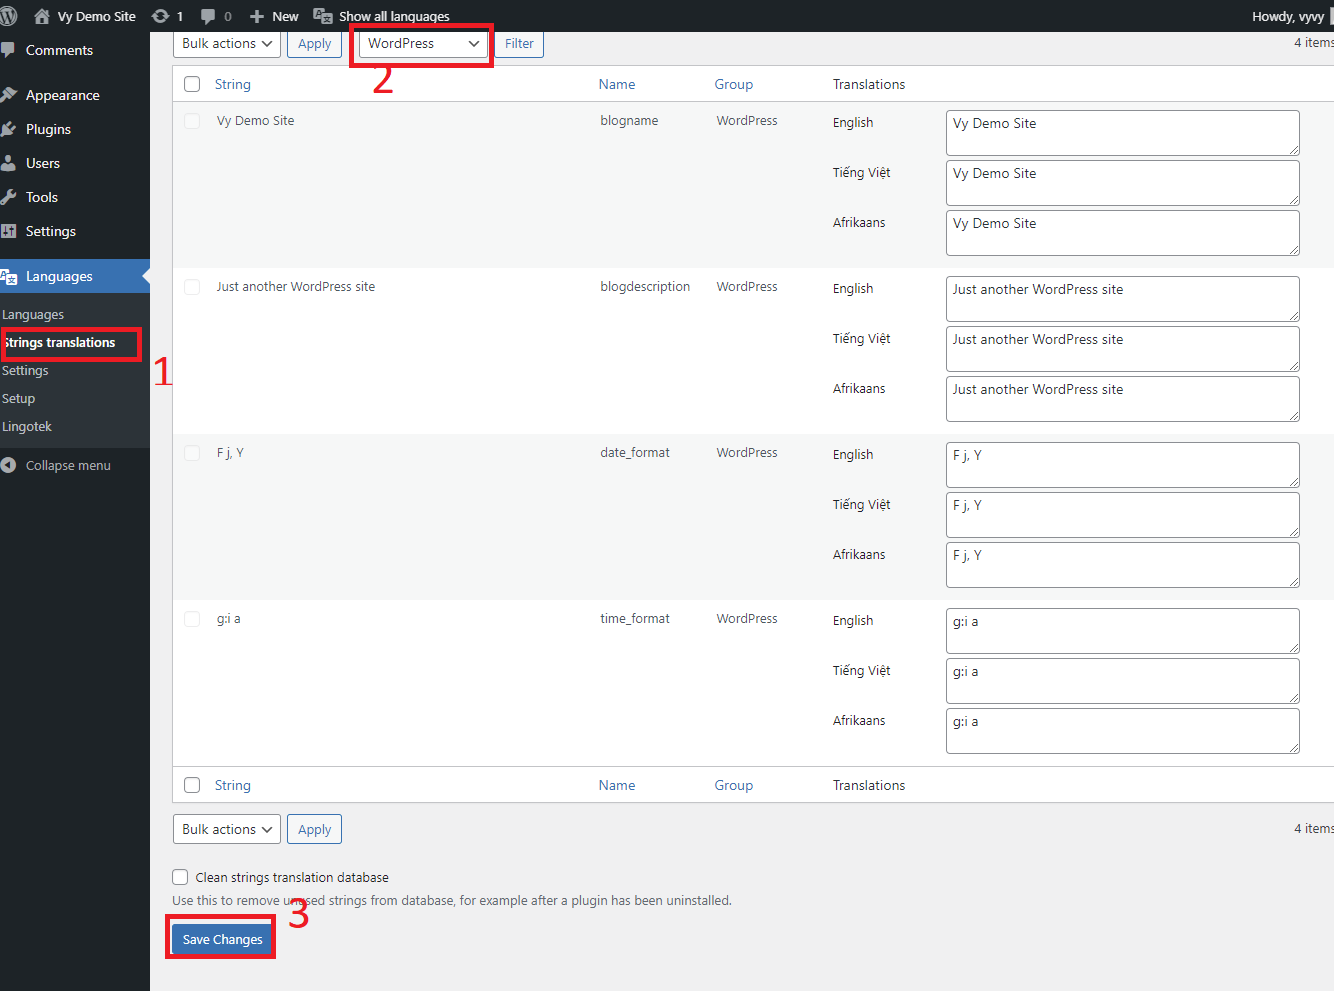
Secondly, switch to the “Strings translation” tab, at the area, you can optionally set translation for a lot of elements on your site such consisting of WordPress times( title, tagline, date format, and time format) and Widget items( in the sidebar, footer).
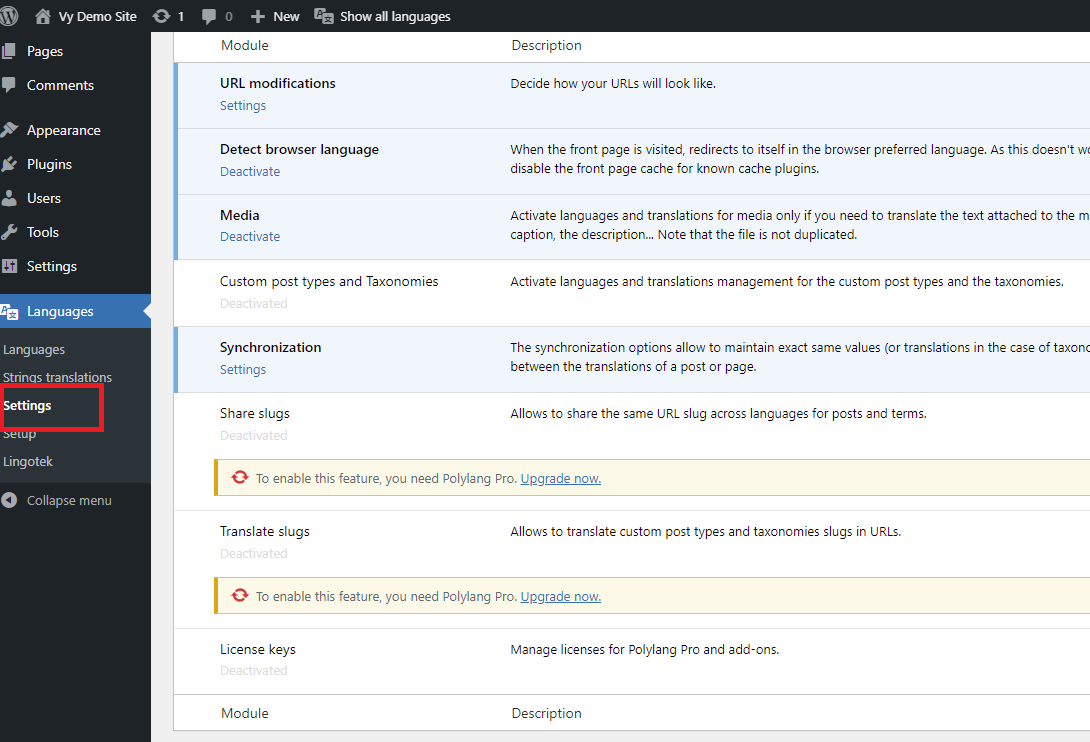
Thirdly, move to the “Settings” tab. Here, there are 3 important options that you should consider including
- URL modifications: you can adjust the appearance of your URLs
- Detect browser languages: If you click on “Active” under the Detect browser language. This option ensures that once anyone visits our website for the first time, they are redirected to the homepage in the language based on the language settings in their browser. In case, the language on their browser is different from the languages on your website, as a result, the default language will be displayed.
- Media: If you activate this option, Polylang can help you translate the media item information for each language. It is also a great way to optimize your images for SEO. On the order hand, you can deactivate it.
- Step 2: Translating your WordPress content
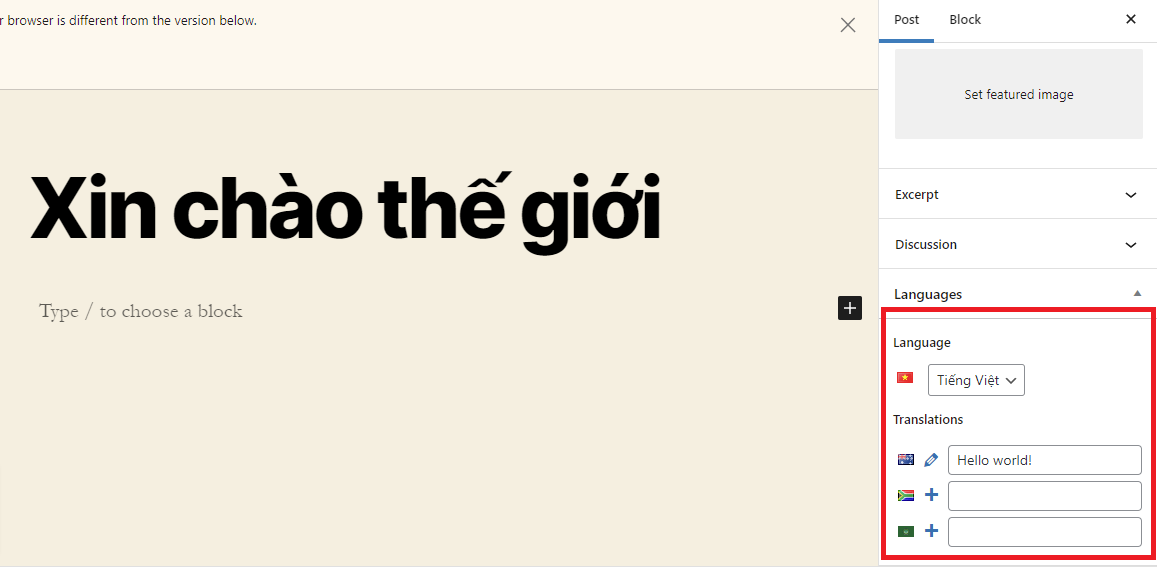
Firstly, we will start translating a post on the WordPress site. Go to the menu Posts> All posts on your dashboard. Now, you can view all blogs on your site.
For example, you can see on the screenshot below, we have 2 two blogs including one blog in English and another one that was translated into Vietnamese.
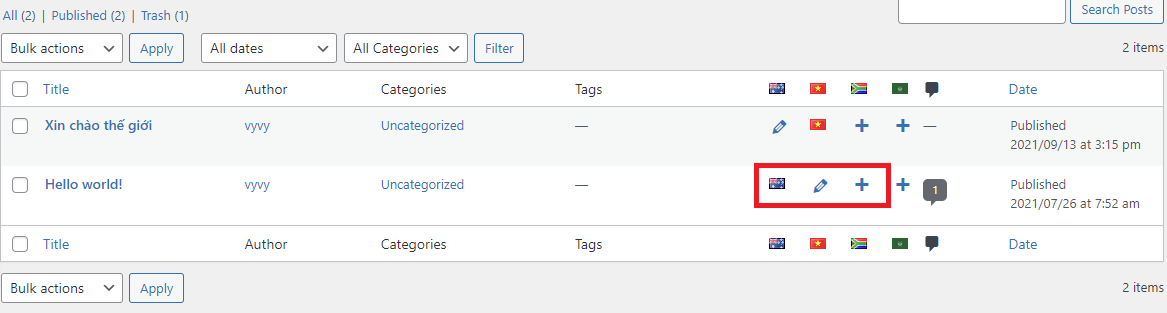
Let’s take a look at the little icons on the screenshot, each icon comes with various functions:
- The flag icon means that a blog/page is available in this language. You can also click on it to adjust it.
- The pencil icon implies that a translation exists. It allows you to modify by clicking on it.
- The “+” icon enables you to add a new translation.
In addition, you can also translate your post into different languages on the post edit screen. You can click on the “+” symbol to generate translated content and publish it after that.
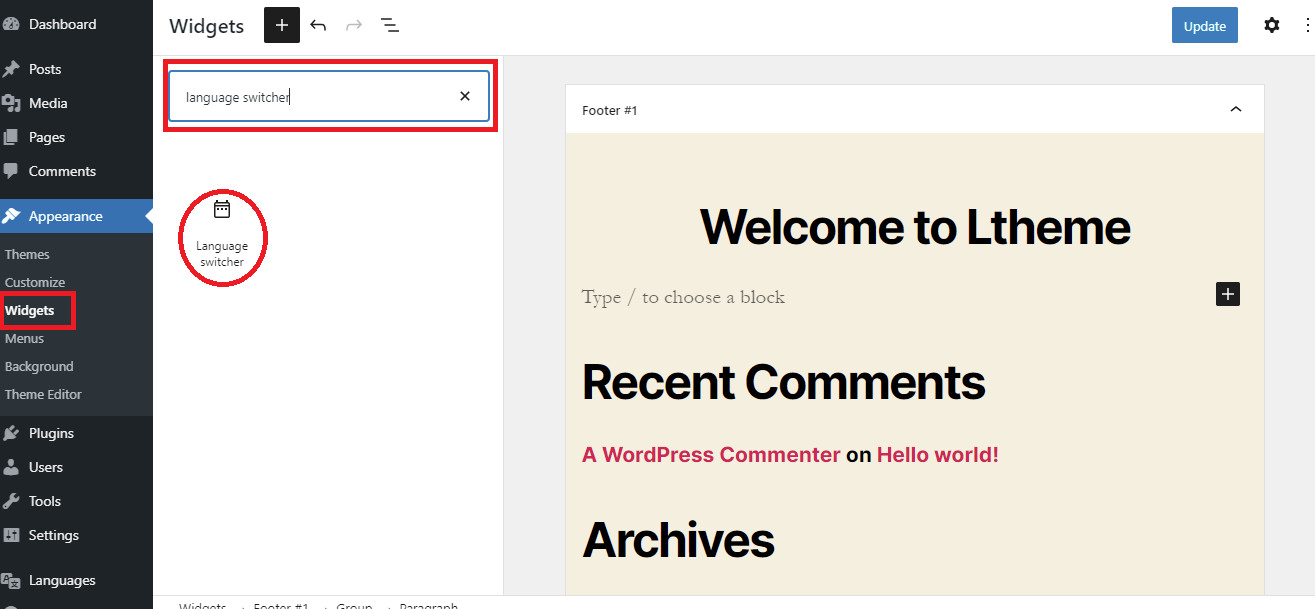
- Step 3: Adding language switcher on your site
Polylang allows you to add language switcher in menus widgets and other areas on your website. This function will help your visitor quickly switch your site into a language that they can understand. Below, we provide you with an example to add a language switcher to your widgets.
Let’s go to Appearance > Widgets. Simply find Language switcher on the search bar. And then you can drag and drop this widget to another place on your page.
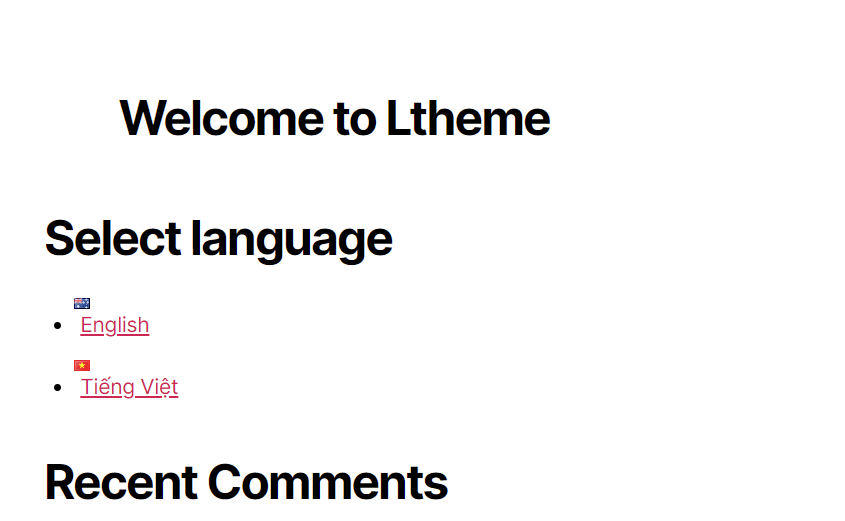
Let’s view the result below.
Conclusion
We have just provided 2 ways to create and make your site multilingual by using plugins. If you are wondering which WordPress Multilingual Plugin is better, Don’t worry, we wrote a blog to compare the two plugins to help you easily make the right decision for your website. You can access Polylang vs TranslatePress comparison to learn more.
Hopefully, this tutorial can assist you to create a multilingual WordPress site without effort. Whether you can any questions about the matter above or need our assistance, don’t hesitate to mention it in the comment section below. We will support you as soon as possible.
Whenever you want to refer to other options, please visit WordPress Multilingual Plugin which also contains a lot of useful plugins for your site.

- Resolving the “Class JFactory Not Found” Error in Joomla When Upgrading to J6 - December 19, 2025
- The Utility Of VPNs For Site Authors And Admins - November 24, 2025
- Joomla! 6: What’s New and How to Upgrade from Joomla! 5 - October 23, 2025


Recent Comments