
You have three people writing for your Joomla site, and one of them just published a half-finished article with a typo in the headline. Joomla’s classic Published/Unpublished switch can’t stop that: anyone allowed to change the state can push an article live. Joomla Workflows solve this by adding an approval process to articles. Writers submit their work, an editor reviews it, and only a publisher can make it live.
This tutorial builds a complete editorial approval workflow in Joomla 5 and Joomla 6, using the core user groups so you don’t need extensions. It covers enabling workflows, designing stages and transitions, setting permissions that actually hold, assigning the workflow to a category, and fixing the problems people usually hit along the way.
How Joomla Workflows Work
Without workflows, an article has one of four static states: unpublished, published, trashed or archived. Workflows add a layer on top of these states. Joomla stores the workflow position separately from the publishing state, so you can turn workflows on or off without changing whether any existing article is published.
Joomla’s own documentation uses four terms:
- Workflow: a named set of stages and transitions, for example “Editorial Review”. You can create several, but each category uses one.
- Stage: a position an article sits in, such as “Draft” or “In Review”. A stage doesn’t publish anything by itself; it only records where the article is.
- Transition: a move from a current stage to a target stage. Transitions are where the actions happen. They can change the publishing state, change the featured flag and send notifications.
- Default workflow: the workflow used by any category that has no workflow of its own. On a fresh site this is the built-in Basic Workflow, which has one stage and transitions that mirror the classic Publish, Unpublish, Archive, Trash and Feature buttons.
The key point is that permissions sit on transitions. Each transition has an “Execute Transition” permission, so you decide exactly which user group can perform each move. That is how an author can submit an article for review but never publish it.
Plan the Workflow Before You Click Anything
The official Joomla workflow scenarios stress planning first, and it’s good advice. Decide who does what before you open the admin panel. This tutorial uses Joomla’s built-in groups, which already sit in a useful hierarchy (Registered → Author → Editor → Publisher):
| Who | Joomla group | Can do |
|---|---|---|
| Writer | Author | Create articles, submit them for review |
| Reviewer | Editor | Edit any article, send it back for changes |
| Approver | Publisher | Approve and publish, unpublish later |
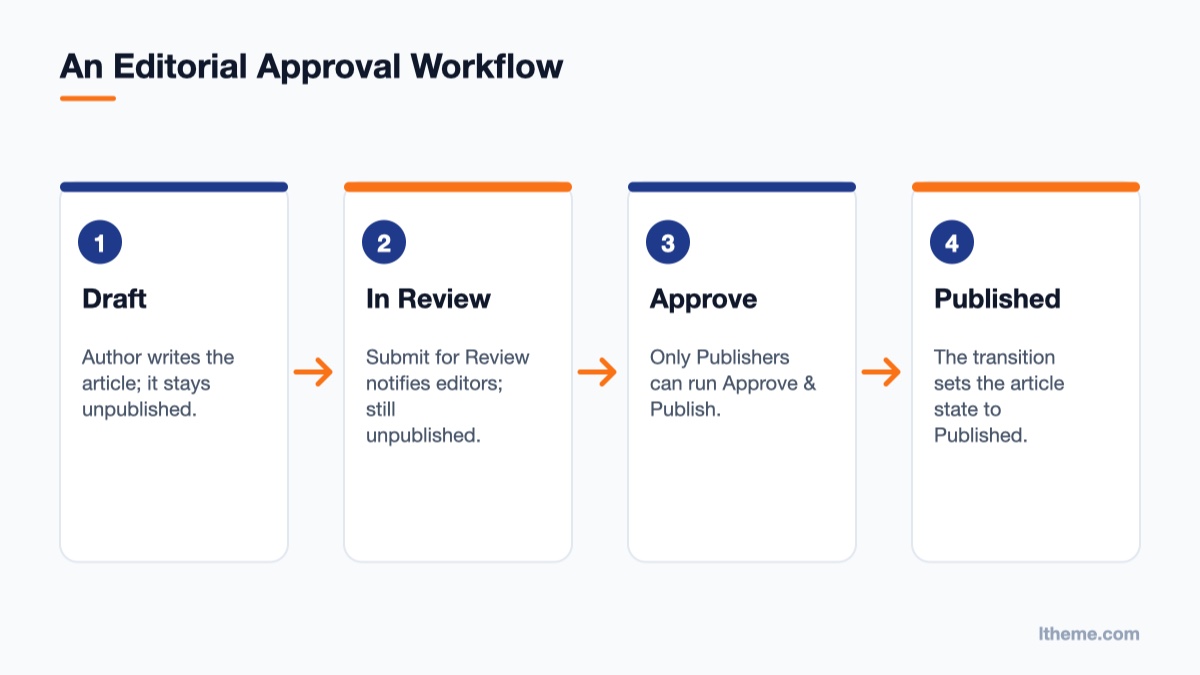
The stages are Draft, In Review and Published. The transitions are:
- Submit for Review: Draft → In Review (article stays unpublished)
- Request Changes: In Review → Draft (article stays unpublished)
- Approve & Publish: In Review → Published (sets the article to Published)
- Unpublish: Published → Draft (sets the article to Unpublished)
If you don’t have the accounts yet, create them first. Our guide on creating and managing user accounts in Joomla walks through adding users and putting them in groups. The screens are the same in Joomla 5 and 6.
Step 1: Enable Workflows
Workflows are off by default. To turn them on:
- Go to Content → Articles in the Administrator.
- Click Options in the toolbar.
- Open the Integration tab and scroll to Enable Workflow.
- Set it to Yes and click Save & Close.
A new Workflows item now appears under the Content menu. Existing articles keep their current published state, and anything in a category without its own workflow is handled by the default (Basic) workflow.
Step 2: Create the Workflow and Its Stages
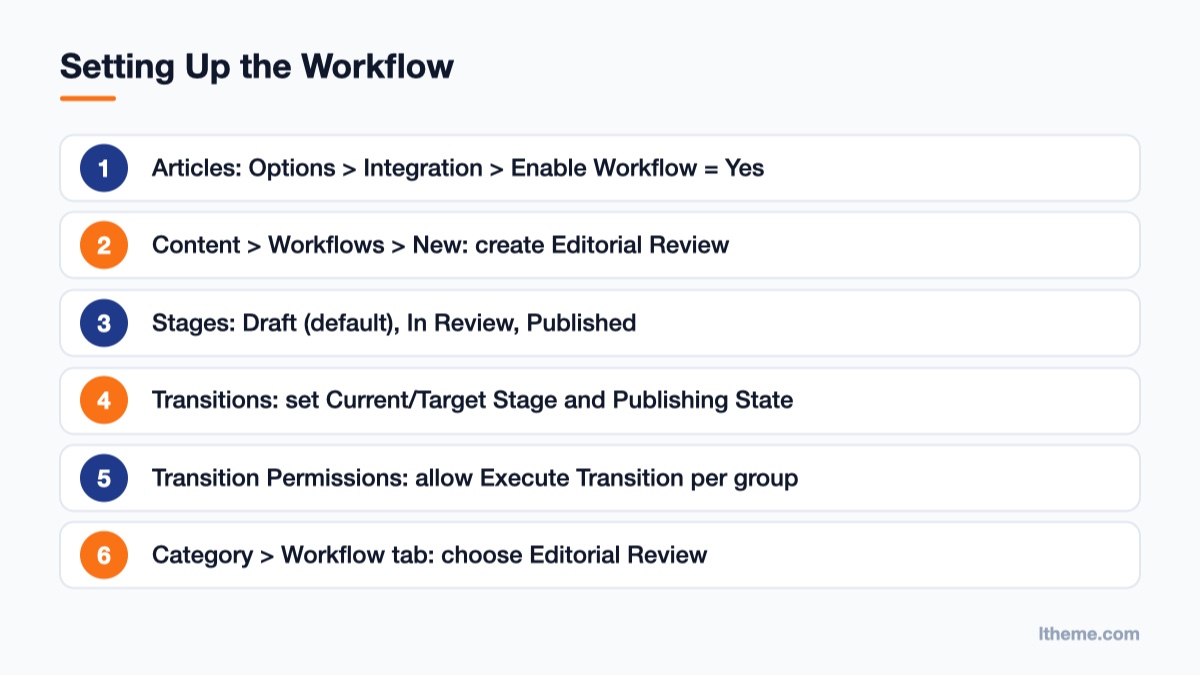
- Go to Content → Workflows and click New.
- Enter the title Editorial Review and, optionally, a description. Leave Default off unless you want every category without a workflow to use it.
- Click Save & Close. The workflow appears in the list with buttons showing its stage and transition counts.
- Click the Stages button for Editorial Review. A new workflow starts with one stage. Open it, rename it Draft and save it. Keep it as the default stage, because new articles start in the default stage.
- Click New and create In Review, then Published. Each one only needs a name. The description field is a good place to note what the stage means for your team.
Stages are labels. Don’t expect an article to go live because it sits in a stage called “Published”. The publishing state only changes when a transition sets it, which is the next step.
Step 3: Build the Transitions
Back in the Workflows list, click the Transitions button for Editorial Review, then click New for each transition. Every transition form has the same tabs.
Transition tab
Enter the name, choose the Current Stage (where the move starts) and the Target Stage (where it ends). For Submit for Review, that is Draft → In Review. You can also choose “All” as the current stage, which is handy for an emergency “Unpublish” that works from anywhere.
Actions tab
This tab holds Publishing State and Featuring State. Set them per transition:
- Submit for Review: Publishing State = Unpublished
- Request Changes: Publishing State = Unpublished
- Approve & Publish: Publishing State = Published
- Unpublish: Publishing State = Unpublished
Leave Featuring State unselected unless a transition really should feature or unfeature the article. The official example also suggests leaving an action unselected when the group running the transition isn’t allowed to change that state anyway.
Notifications tab
Set Send Notification to Yes on Submit for Review, then choose the Editor and Publisher groups under Usergroups. You can add Additional Message Text such as “A new article is waiting for review.” Do the same on Request Changes so writers learn their article came back. Notifications go through Joomla’s private messaging. Recipients see them in the Administrator, and whether they also get an email depends on their messaging settings and the site’s mail configuration.
Step 4: Set Permissions That Actually Hold
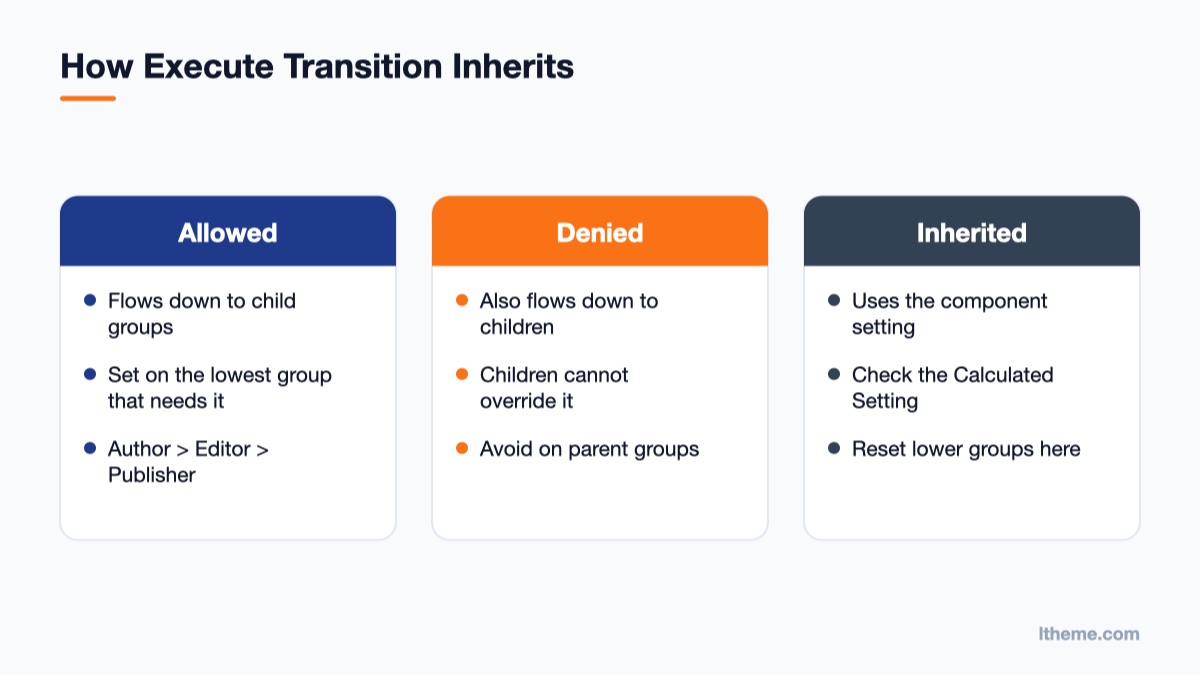
Most workflow setups go wrong at this step. Each transition has a Permissions tab with an Execute Transition action. By default it inherits from Content → Articles → Options → Permissions, and Joomla’s group hierarchy passes it down from parent to child groups.
Two rules of Joomla’s access control decide the result:
- Allowed flows down from a parent group to its children. Allow Execute Transition for Author and Editor and Publisher inherit it too.
- Denied also flows down, and a child group can’t override it. If you explicitly deny Author on “Approve & Publish”, Editor and Publisher lose it too, even if you allow them.
So build permissions from the bottom up:
- Submit for Review: set Execute Transition to Allowed for Author. Editor and Publisher inherit it.
- Request Changes: set Allowed for Editor. Publisher inherits it, and Author has no rights here.
- Approve & Publish and Unpublish: set Allowed for Publisher only.
After saving, check the Calculated Setting column for each group. If Author shows “Allowed (Inherited)” on Approve & Publish, the permission is coming from the component level. Open Articles: Options → Permissions, find Execute Transition, and set the lower groups back to Inherited so the transition-level settings decide. Super Users can always run every transition.
Authors also need the usual article rights: Create and Edit Own on the category. Leave Edit State to Publishers. If your writers work in the Administrator rather than the frontend, they also need Administrator Login in System → Global Configuration → Permissions, plus Access Administration Interface in the Articles options.
Step 5: Assign the Workflow to a Category
A workflow does nothing until a category uses it:
- Go to Content → Categories and open the category your writers use, for example “News”.
- Open the Workflow tab and choose Editorial Review from the dropdown. The other choices let the category use the default workflow or inherit from its parent category.
- Click Save & Close.
When an article is saved for the first time, it takes the workflow of its category, and it keeps that workflow from then on. Moving the article to another category later doesn’t switch its workflow. Set up categories before writers start adding content.
Step 6: Run a Transition
Writers and reviewers don’t need a new screen. Open the article, go to the Publishing tab, and use the Workflow Stage dropdown. It shows the current stage and a list of the transitions the logged-in user may run, for example “Submit for Review”. Pick one and click Save or Save & Close.
That is the whole daily loop. The Author writes and submits. The Editor gets a message, reviews the article and either fixes it or sends it back with Request Changes. The Publisher runs Approve & Publish and the article goes live. If you’re new to the article form itself, our guide on creating and managing articles in Joomla covers every tab.
A Super User can move many articles at once. Tick them in Content → Articles, open Actions → Batch, choose Change Stage, select the workflow and stage, and click Process. This is also the only way to move an existing article to a different workflow.
Troubleshooting Joomla Workflows
“The transitions don’t appear in the Workflow Stage dropdown”
Either the user lacks Execute Transition for that transition, or no transition starts from the article’s current stage. Check the transition’s Current Stage first, then the Calculated Setting for the user’s group.
“The transition ran but the article didn’t publish”
Check three things. Is Publishing State set on the transition’s Actions tab? Does the group have the Edit State permission? Are the workflow plugins enabled? Go to System → Manage → Plugins and filter the type to workflow: Workflow – Publishing, Workflow – Featuring and Workflow – Notification must be enabled for those actions. According to Joomla’s documentation, if the user isn’t allowed to change the state, the publishing step fails with a message but the stage change still goes through.
“Old articles are stuck in the wrong workflow”
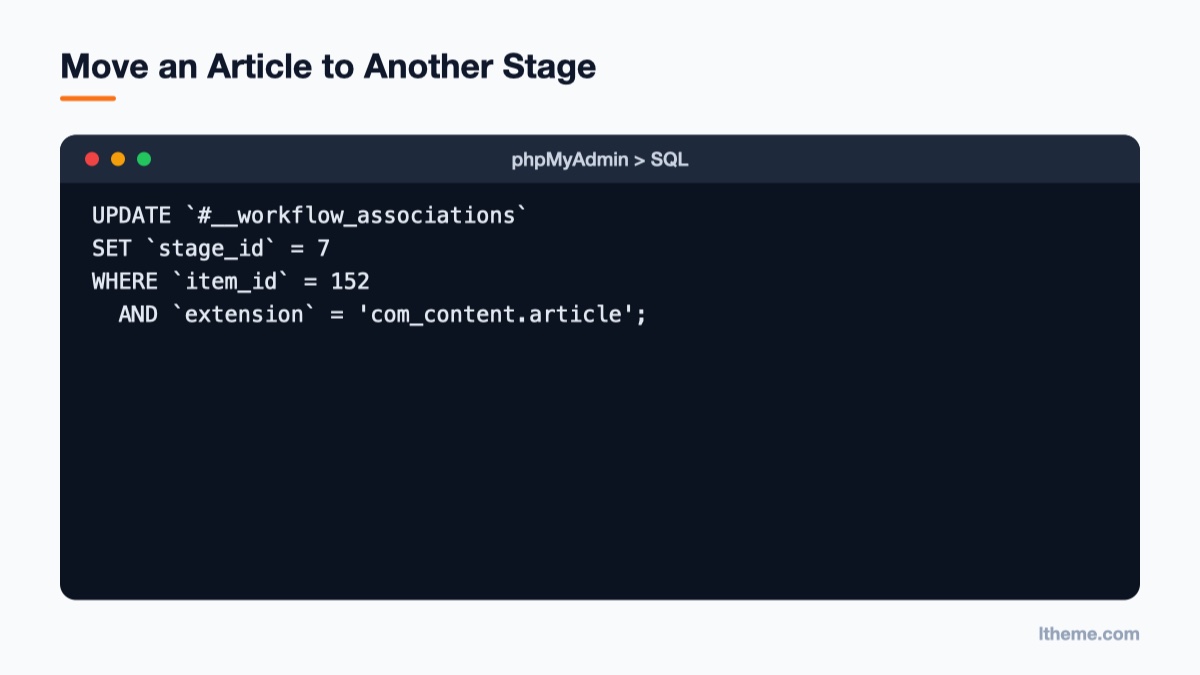
Articles created before you assigned the category workflow stay on the Basic Workflow. Use Batch → Change Stage to move them. If Batch is not an option, the Joomla guide describes a database fallback: back up the database first, find the stage ID in the last column of the Stages list and the article ID in the Articles list, then update the association row in phpMyAdmin. Replace #__ with your real table prefix:
UPDATE `#__workflow_associations`
SET `stage_id` = 7
WHERE `item_id` = 152
  AND `extension` = 'com_content.article';
“Subcategories still use the Basic Workflow”
Subcategory inheritance hasn’t behaved consistently across versions. Joomla’s issue tracker has reports of subcategories keeping the default workflow after the parent changed. Open each subcategory and set its Workflow tab explicitly rather than relying on “Inherit”.
“Article versions don’t show state changes”
This is expected. When workflows are enabled, the fields they manage (state and featured) are excluded from content versioning, so restoring an old version won’t republish or unpublish an article.
Workflows and Your Template
Workflows run entirely in the content layer, so they work with any Joomla 5 or 6 template. They pay off most on multi-author sites: news portals, magazines and club or company blogs where several people publish every day. If you’re building that kind of site, LT News is a Joomla news template with category-driven layouts that suit a desk of writers and editors. LT Sport brings the same structure to fast-moving sports coverage, where a review step stops wrong scores going live. You can browse more on our Joomla templates page.
Planning a move to Joomla 6 first? Read what’s new in Joomla 6 and how to upgrade from Joomla 5. Your workflows, stages and transitions carry over, because they are core features.
Wrap-Up
A working Joomla approval workflow comes down to six moves: enable workflows in the Articles Integration options, create a workflow with clear stages, give each transition a publishing action, grant Execute Transition from the lowest group upward without explicit Denies, assign the workflow to the category, and run transitions from the article’s Publishing tab. Start with one category and three stages, test it with a real Author account in a private browser window, and add stages such as “Legal Check” or “Scheduled” only when your team actually needs them.
For the full reference, see the official Joomla Publishing Workflow guide, the worked Newsletter Workflow example and the workflow scenarios tutorial on docs.joomla.org.

- Joomla Workflows: Set Up an Article Approval Process - October 13, 2026
- How to Create a Custom Page Template in the WordPress Site Editor - October 12, 2026
- Fix a Slow LCP Hero Image in WordPress and Joomla - October 11, 2026







Recent Comments