Why do you need to add a border around an image in WordPress?
Unluckily, sometimes it is difficult for you to see images in WordPress posts/pages because they can blend into the background color. Therefore, adding a border around an image is the best way to make it easier for your visitors to separate images from the background color. Moreover, styling a border for images in WordPress also makes them more attractive. For this reason, in today’s tutorial, we will demonstrate some useful methods to help you create a border around an image in WordPress easily.
How to Add a Border Around an Image in WordPress?
There are a lot of ways to easily add a border around an image in WordPress. For example, you can use photoshop tools to create a border for your image before uploading it to your post. This may take you a lot of time, so we are going to share with you some ways by using plugins and HTML code. Now, let’s check the following methods.
Method 1: Using WP Image Borders plugin
The first method is suitable for those who don’t touch any single line of code. This WP Image Borders plugin allows you to add borders around images in your post by checking the checkbox in the setting titled ” Add borders to all images in blog posts”.
Step 1: Installing the plugin
In order to use this method, first of all, you need to install this plugin. Just go to Plugins > Add New and use the search feature to look for the WP Image Borders plugin. Then quickly click on the Install Now button and Activate it.
Step 2: Configuring the settings
After installing this plugin, switch to Settings > WP Image Borders page to configure the plugin settings.
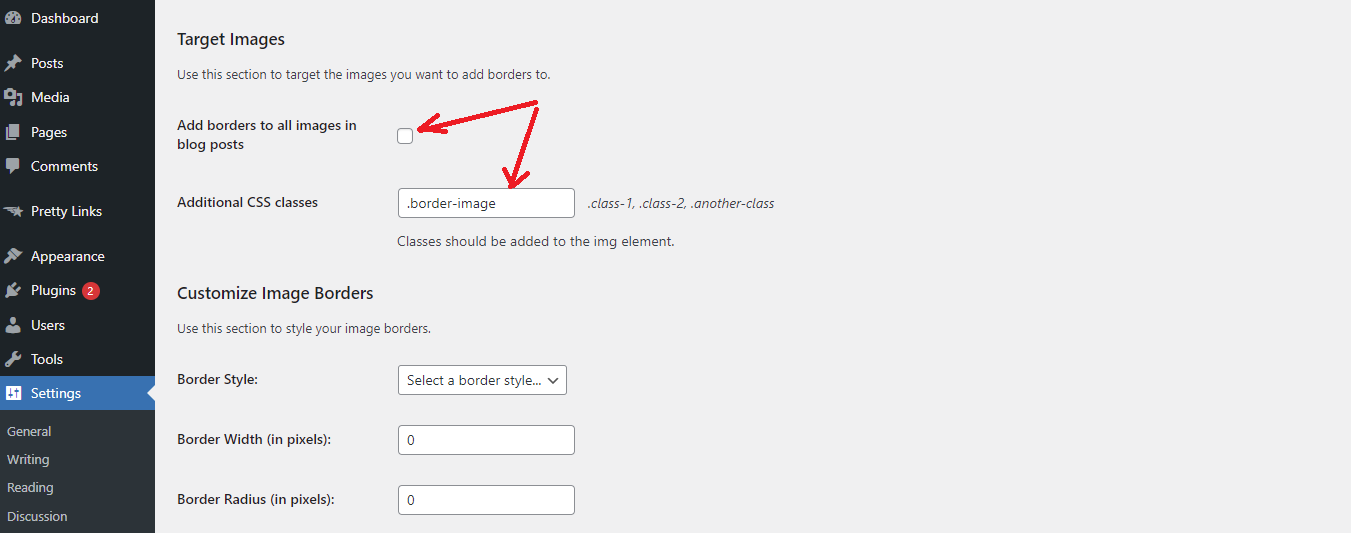
As we mentioned above, you simply check the box next to the ” Add borders to all images in blog posts ” option below the Target Images section to add borders to all images in WordPress posts. This tool will automatically add borders around images in your posts and you don’t need to do anything.
Alternatively, you can type the CSS classes to have borders in the given space next to the ” Additional CSS classes” option. Right now, you can enter anything into the CSS class. For example, .border-image
If you choose the second option to only show border
if you selected the second option to only show border for specific images, then you need to follow the next step.
Under the second section, there are a lot of options that allow you to customize border settings. You can choose a border style, width, radius, and color by clicking on the Up and Down arrow.
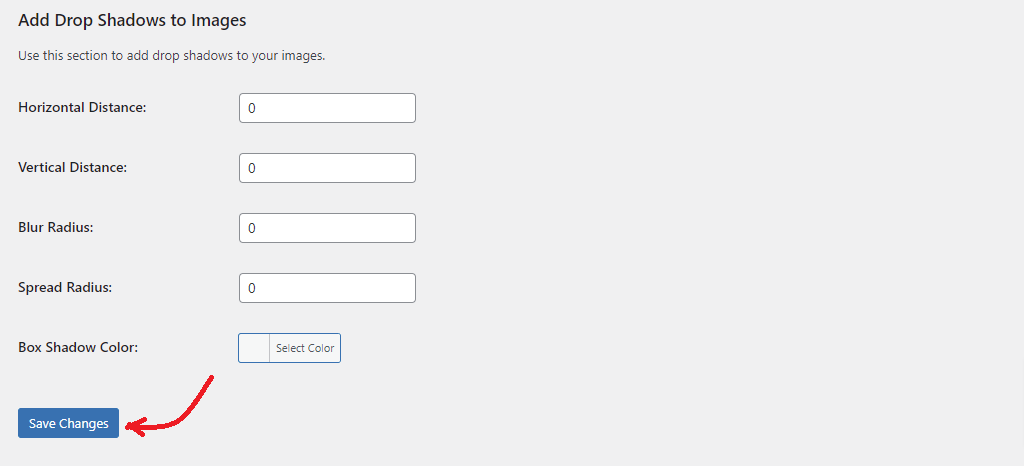
The final section on the settings enables you to add drop shadows to your images. You are able to type a horizontal and vertical distance, blur, spread radius, and box shadow color. However, these options under this section are optional, so you can leave them if you don’t want to add drop shadows to your images.
Remember to click on the Save Changes button to save your selection.
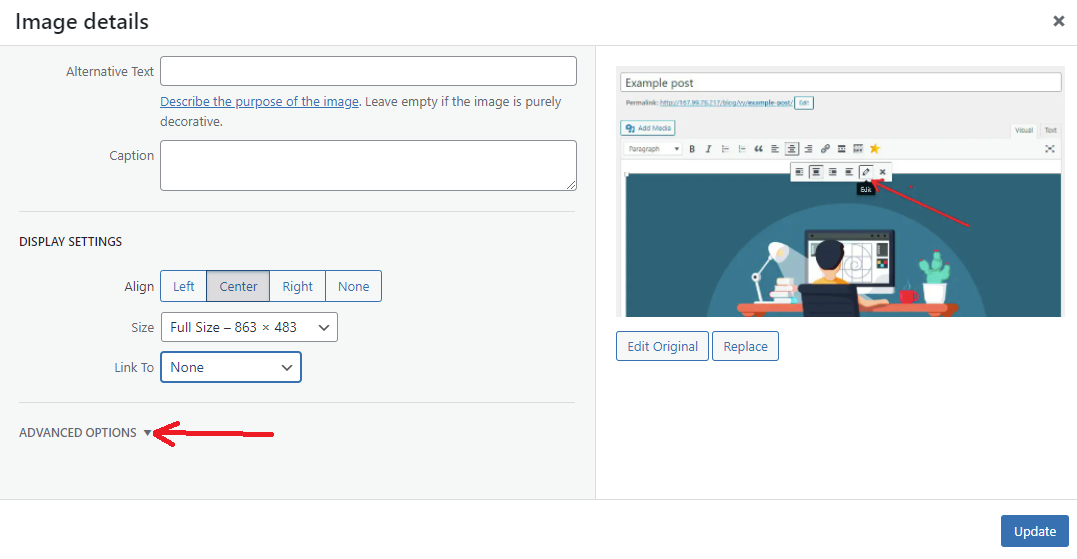
Step 3: Adding CSS Class to an Image in WordPress
This step helps you inform WordPress which images should have borders. You can do this by adding a CSS class to selected images.
Firstly, simply click on Add Media to upload your images to the Media Library and then click on the Insert into post button.
After that, you will see your image that will be displayed in the visual editor. Let’s click on the edit button in the toolbar.
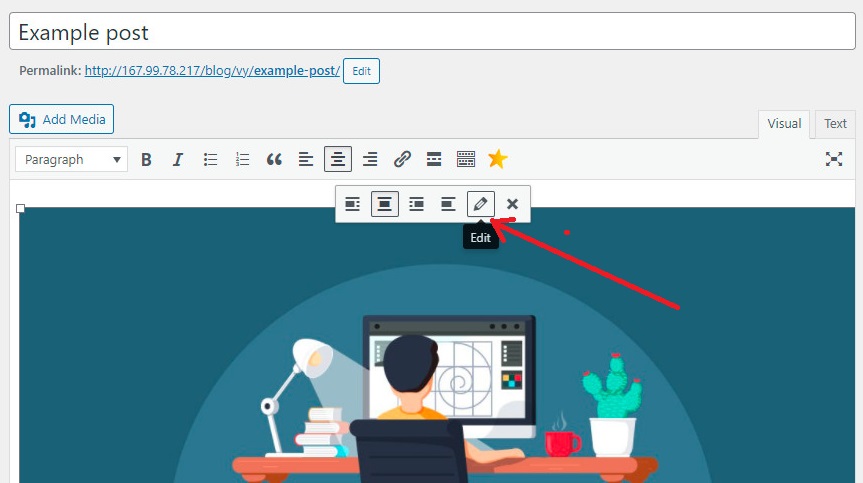
This will immediately open a popup window where you can add CSS class to your image. Let’s click on the Advanced options to expand it.
Now, you need to add CSS class to the given box next to the Image CSS Class. In our example, we will add .border-image since we selected that in our plugin settings.
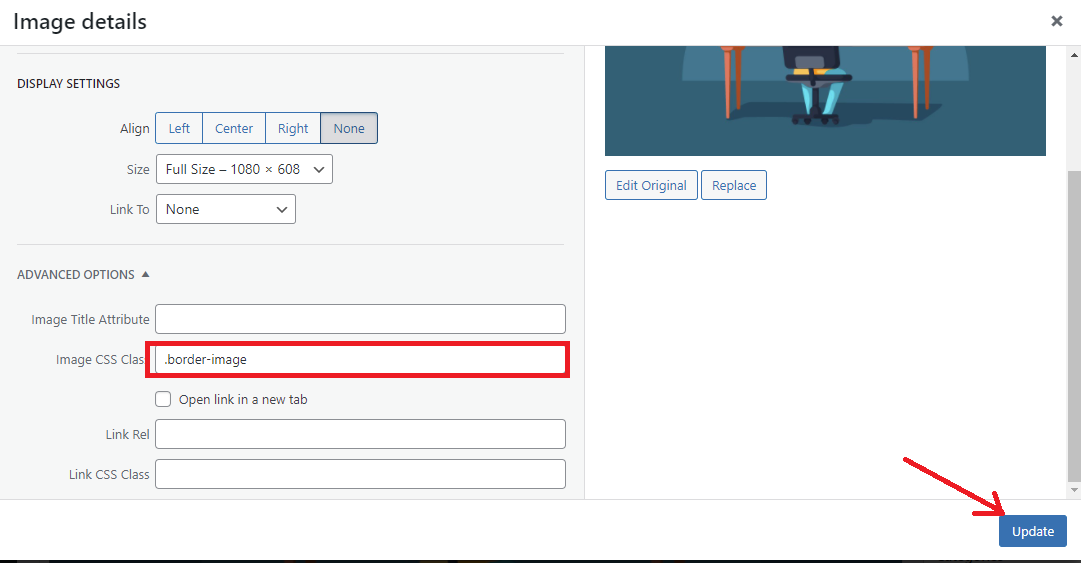
Then, click on the Update button. Now, your image will have a border around it.
Method 2: Using HTML and CSS to add image borders in WordPress
If you don’t want to install any additional plugins, you can use this method. However, it requires you have a little coding knowledge. One of the biggest advantages of this method is that it is very fast and effective to get borders around your images in WordPress.
Adding Borders Using In-line Styles in WordPress
After you have uploaded and inserted your image into your WordPress post. At the present, your image is displayed in the visual editor, let’s switch to the text editor to see HTML code for your image. Keep in your mind that your image HTML will be similar to the following HTML.
<img src="http://167.99.78.217/blog/vy/wp-content/uploads/2021/08/design.jpg" alt="design" width="1080" height="608" class="alignnone wp-image-612 size-full" />
You can easily add CSS style in the HTML code like this:
<img src="http://167.99.78.217/blog/vy/wp-content/uploads/2021/08/design.jpg" alt="design" width="1080" height="608" class="alignnone wp-image-612 size-full" style="border: 4px solid #eeeeee; padding: 4px; margin: 4px;" />
Please note that you can change the size of border width, padding, margin, and color in the above HTML code to your own preference.
Adding Image Border in Your WordPress Theme or Child Theme
If you want to add borders to all images in your WordPress blog posts/pages, you need to add CSS directly in your WordPress theme or child theme.
By default, most WordPress themes already have these styles rules defined in the theme’s stylesheet. However, you can also modify the existing CSS, or add your own CSS in a child theme.
Here is a simple CSS snippet that you can add to your child’s theme.
img.alignright {

float:right;

margin:0 0 1em 1em;

border:3px solid #EEEEEE;

}

img.alignleft {

float:left;

margin:0 1em 1em 0;

border:3px solid #EEEEEE;

}

img.aligncenter {

display: block;

margin-left: auto;

margin-right: auto;

border:3px solid #EEEEEE;

}

img.alignnone {

border:3px solid #EEE;

}
In case that you would like to only use image borders once you need them, then you can add CSS class to your selected images (see above). Or you can also add styling rules for this CSS class in your theme for a child theme.
img.border-image {

border: 3px solid #eee;

padding:3px;

margin:3px;

}
The bottom line
Adding a border around an image is really necessary for your WordPress site in some situations. Hopefully, through this article, you learned how to add a border around an image in WordPress competently. If you have any questions, don’t hesitate to leave a comment in the box below. We are willing to support you as soon as possible.
Moreover, you can drop by our Free WordPress Themes to explore plenty of eye-catching, and responsive themes for your website.

- Resolving the “Class JFactory Not Found” Error in Joomla When Upgrading to J6 - December 19, 2025
- The Utility Of VPNs For Site Authors And Admins - November 24, 2025
- Joomla! 6: What’s New and How to Upgrade from Joomla! 5 - October 23, 2025


")


hiii ….when I upload an image this is not showing an edit option like that pop-up menu…if i shall change the CSS code right side then there is no option to save the setting plz help
You can contact plugin author and ask for this support.