Introduction
Are you looking for information or tutorials to help you add expires headers to WordPress? If yes, don’t miss this article since we will give you some information about expires headers as well as how to add them to your website.
What is expires headers?
Expires headers are defined as rules that let a web browser know whether it should load web page resources from the browser’s cache of users or from your server.
When a new visitor accesses a page of your website for the first time, all the files for that page will be loaded one by one. This is the main reason for increasing website load time. As you know, the browser cache is responsible for storing some or all of those uploaded files on the computer accessed by the visitors. And after the first visit, when the visitor returns to your site, those stored files will be loaded from their computer. This improves the performance of your WordPress site.
How can they be used in WordPress?
One question is, how to make the web browser know which files to be stored and which files are not. And if they are saved, how long will the browser cache keep them? At this point, we need the support of expires headers.
We can use expires headers or cache-control headers to create rules that decide which files should be saved and how long to save them. In this blog today, we will show you how to use expires headers to set an expiration date for each file type saved in the browser’s cache. After the expiration date, your server will allow the browser to reload the files with the latest version of the page or website.
There are 2 ways to add the expires headers to your site:
- Using a plugin
- Utilizing code
Now, don’t hesitate to explore the guide with us!
Instructions to add expires headers to WordPress site step by step
Using W3 Total Cache to add expires headers
If you have WP Rocket installed and activated, you can use this plugin to automatically add expires headers. On the other hand, if you want to use a free plugin to do this, try using W3 Total Cache. In this blog, we decided to guide you with W3 Total Cache – one of the most useful WordPress Cache Plugins.
Just like any other plugin, the first thing you need to do is install W3 Total Cache. If you have already installed it, be sure to activate it and update it to the latest version.
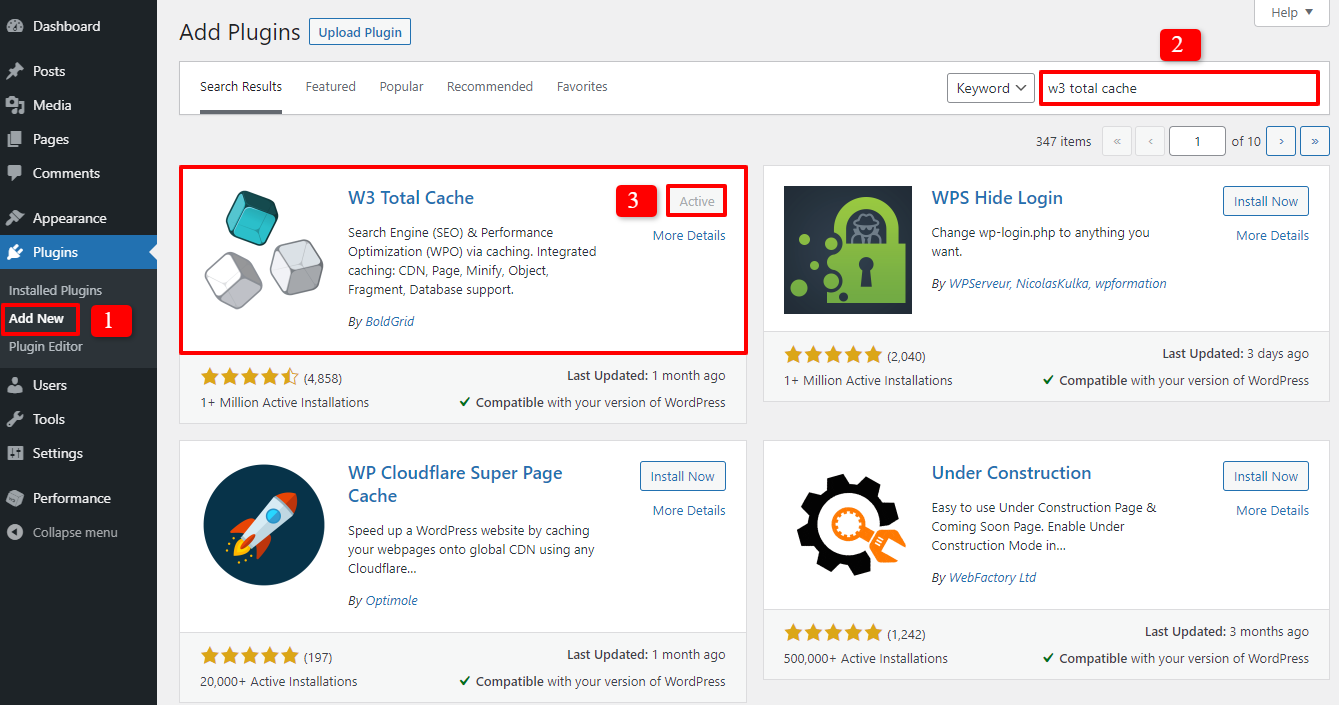
In order to install it, on the admin dashboard, let’s select Plugins -> Add New, then enter the name on the search bar. After that, just click on Install Now -> Activate button in the plugin you need to install.
Now, you are able to set the expired headers by going to Performance -> Brower Cache. In the general section, there will be the set expires header option for you to select. Just simply press in the box before the option you want.
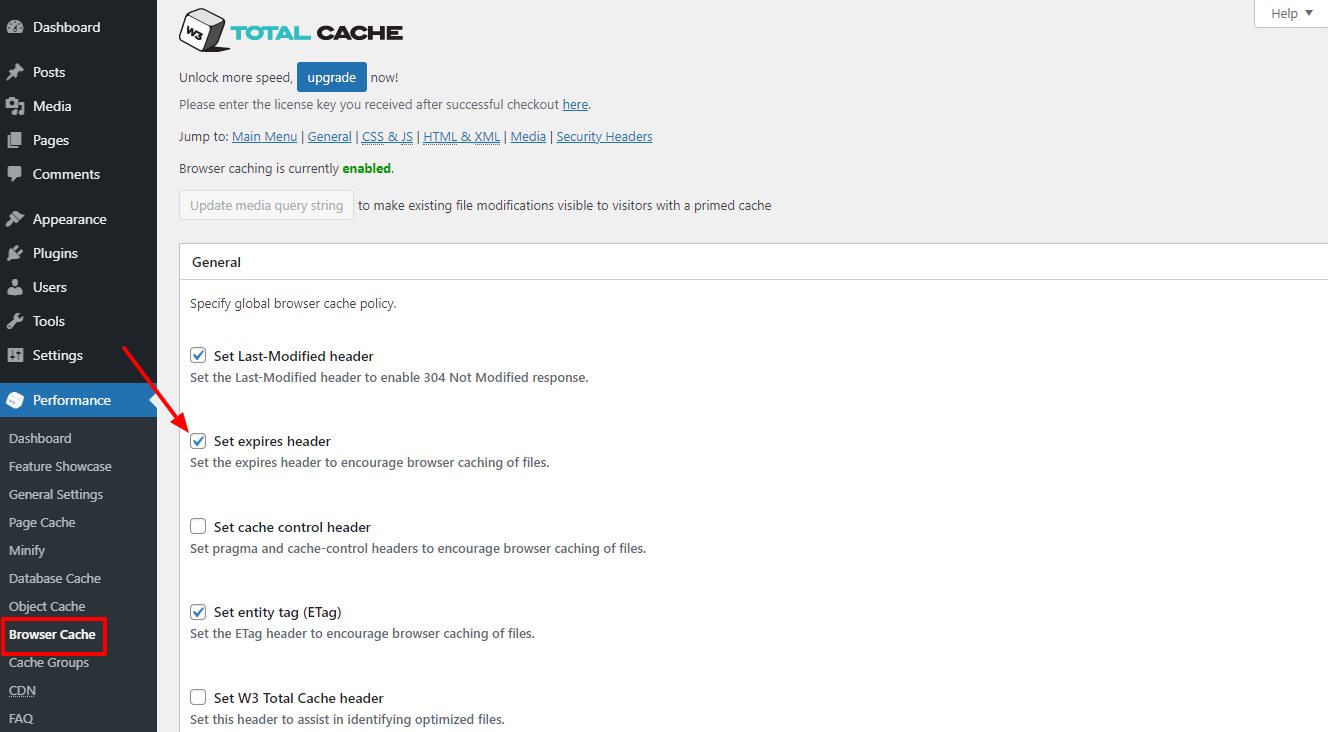
Besides the general setting, this plugin also allows you to choose the expires header and set the lifetime for CSS & JS, HTML & XML, media, and other files.

Don’t forget to click on Save All Settings after finishing your changes.
Utilizing code to add expires header
This way is related to adding code to your WordPress files. In order to make your site safe, you should back up all your website data via using WordPress Backup Plugins or other manual methods. After implementing this, let’s check that your site is running Nginx or Apache servers.
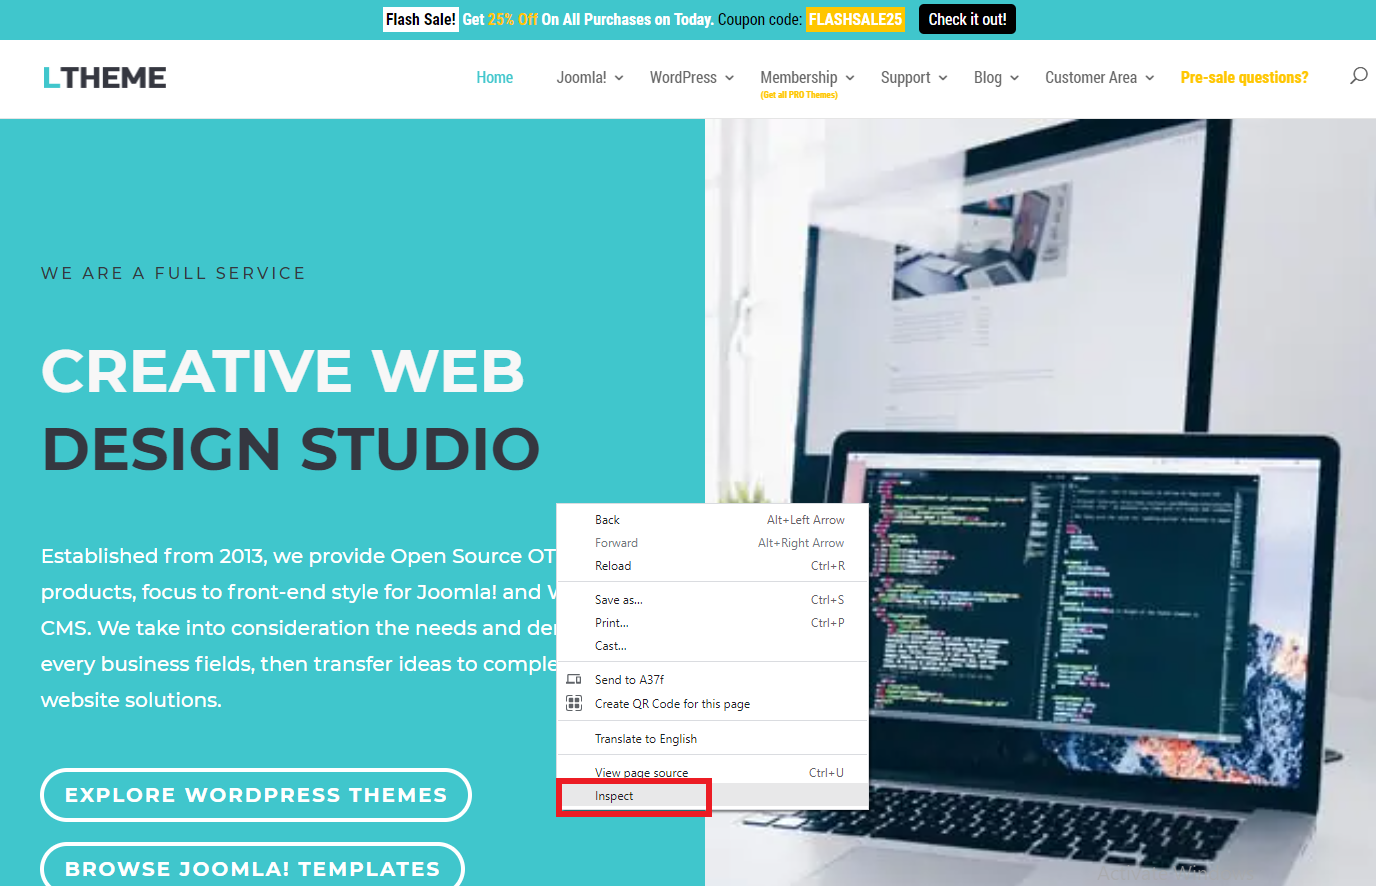
With an aim of seeing that your website is utilizing Apache or Nginx, you just need to access your site. Then, press the right mouse button and select Inspect.
In the next step, you just choose Network, don’t forget to press F5 or refresh the page to see the results. After that, type the domain name of your site on the box in the upper left corner.
Now, your domain site will appear in the Name column. Let’s click on it, a table containing headers, preview, response, initiator, timing, and cookies sections will be showcased. You need to select the Headers section, then scroll down and find the server in the Responsive headers part.

So, you can determine the web server of your WordPress site.
- In case your web server is Apache, let’s follow the following guide.
With Apache server, you need to access the .htaccess file, then add the code below near the top of this file:
## EXPIRES HEADER CACHING ##

<IfModule mod_expires.c>

ExpiresActive On

ExpiresByType image/jpg "access 1 year"

ExpiresByType image/jpeg "access 1 year"

ExpiresByType image/gif "access 1 year"

ExpiresByType image/png "access 1 year"

ExpiresByType image/svg "access 1 year"

ExpiresByType text/css "access 1 month"

ExpiresByType application/pdf "access 1 month"

ExpiresByType application/javascript "access 1 month"

ExpiresByType application/x-javascript "access 1 month"

ExpiresByType application/x-shockwave-flash "access 1 month"

ExpiresByType image/x-icon "access 1 year"

ExpiresDefault "access 3 days"

</IfModule>

## EXPIRES HEADER CACHING ##
This code will help you turn on browser caching and allow you to decide how long the loaded files will be stored. These values are pretty good for most sites. However, you can also change the length of time it is stored in the browser if you want. In addition, these codes will set different cache expiration dates. Usually, images will be cached longer than HTML, Javascript, CSS, etc.
- If your site server is Nginx, the instruction below is suitable for you.
Firstly, you need to access the server configuration file to add the following code add expires headers to WordPress:
location ~* \.(jpg|jpeg|gif|png|svg)$ {

expires 365d;

}
location ~* \.(pdf|css|html|js|swf)$ {

expires 3d;

}
This code will support you to set the expiration times for all kinds of file types. Of course, the expiration times will be different between the file types.
Wrap up
To sum up, we have already recommended for you 2 methods to add expires headers to WordPress site. Therefore, we hope that you can implement both of them successfully. In addition, if you have any question or want to get more information about that, let’s leave your comment below. So, we will answer you as soon as possible. Last but not least, don’t forget to spend a little time visiting our Free WordPress Themes that make you feel interested.

- Resolving the “Class JFactory Not Found” Error in Joomla When Upgrading to J6 - December 19, 2025
- The Utility Of VPNs For Site Authors And Admins - November 24, 2025
- Joomla! 6: What’s New and How to Upgrade from Joomla! 5 - October 23, 2025


Many people have problems with expire headers and this is a great guide. But for this kind of thing, I always prefer plugins then manual code injections.