After installing Helix Ultimate, we need to make some basic settings. You’ll get them in this post.
1. Logo
You can set / upload your logo (it can be image or text). It allows you to adjust the logo height and add SVG logos to your site as the system in Helix Ultimate is integrated.
2. Header
You can choose the header height and decide whether the header will be sticky or not.
3. Body
- Turn your Joomla website preloader on or off.
- Switch between boxed and wide site layouts. You will get several other relevant options such as background size, background image, background position,etc when you turn on the boxed layout option.
4. Footer
- Turn on the “Copyright” option if you want to show a copyright notice on your website footer.
- Select the appropriate module position for the copyright notice.
- At the Feature Position menu, you can choose the ordering to show features along with the copyright notice module.
- Put the footer copyright text.
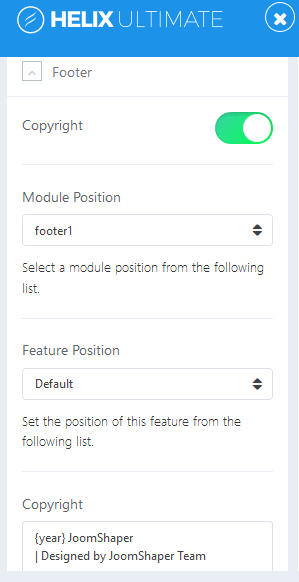
Image by Joomshaper
5. Go to Top
On the bottom-right area, you’ll see “Go to Up / Top” button. When you turn on this button, your visitors can scroll back to the top of the page just a click. This give your Joomla website better navigation.
6. Social Icons
If you want to display social media profile link on your Joomla website, you can turn on this option and add social media profile links.
7. Contact Info
Want to display your contact infprmation, just turn on this feature. It will show the information fields and module positions selection menu.
8. Coming Soon
If you want to display customized maintenance mode page when your website is under construction, turn on the “Enable Coming Soon” option.
It allows you to add page title, page content ( you can define font colors by using HTML tags with CSS code inside “style”), date, or add background image.
Turn on “Social Icons” option if you want to display social media profile link.
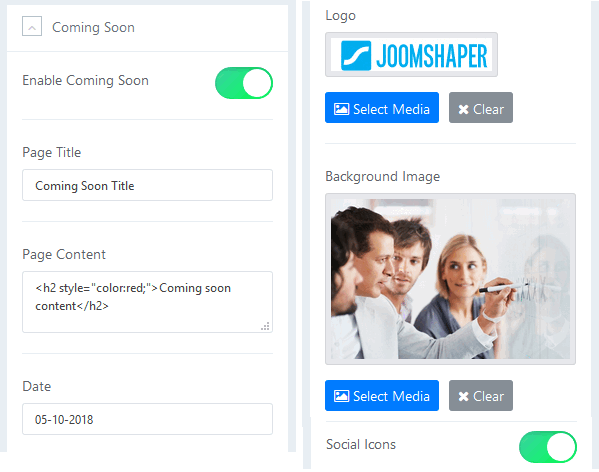
Image by Joomshaper
9. Error Page
Create a custom page that will display on your Joomla website when your site face several errors. To do it, use the Error page option, just add a custom background image and a logo for your custom page.
If you have any question about this tutorial, don’t hesitate to leave a comment below. And don’t forget to share with your friends if you find it useful! Thanks! ?

- Resolving the “Class JFactory Not Found” Error in Joomla When Upgrading to J6 - December 19, 2025
- The Utility Of VPNs For Site Authors And Admins - November 24, 2025
- Joomla! 6: What’s New and How to Upgrade from Joomla! 5 - October 23, 2025


Recent Comments