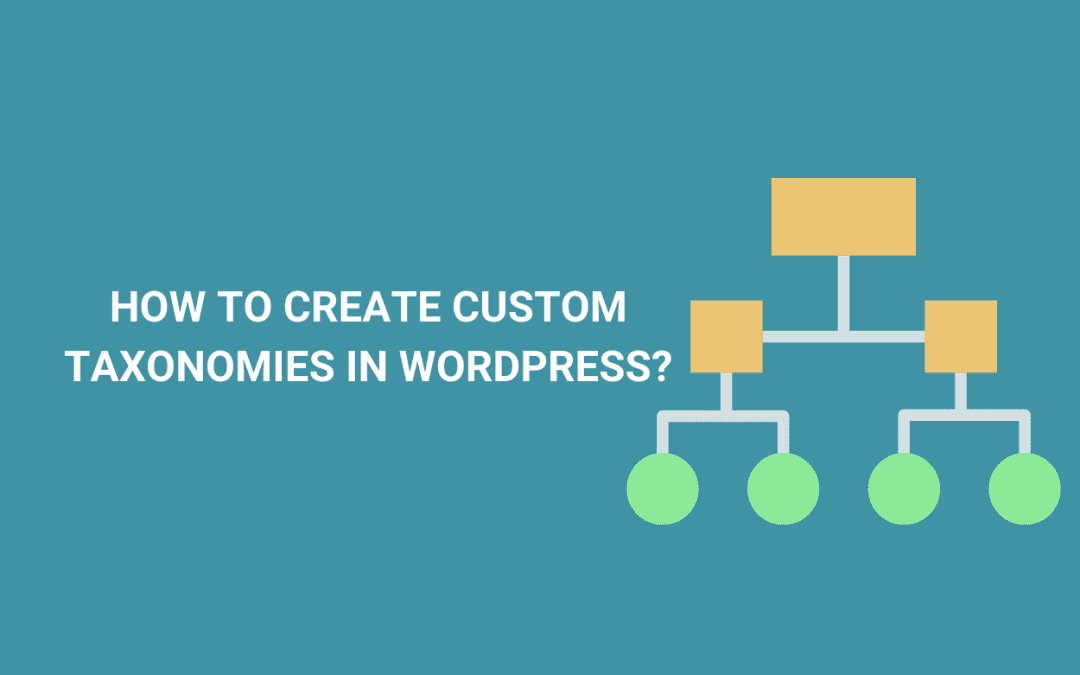
It is sure that you have heard the taxonomy term in WordPress? However, what is a taxonomy? And how create custom taxonomies in WordPress? In today’s blog, we will explain this term and give you a helpful way to add functionality to your WordPress website. Now, let’s dive into the following section.
What are WordPress Taxonomies?
WordPress Taxonomies are great methods of grouping and classifying content and data in WordPress. Once you utilize a taxonomy, you can organize a lot of blogs and similar things together. By default, there are two taxonomies in WordPress called categories and tags.
For example, you want to create a custom post type called “Foods” and sort it by using a custom taxonomy called “Recipes”. Then, you can add multiple terms such as ‘Vegetarian’ or ‘Fresh’, ‘Easy Cooking’. This way helps you and your reader easily sort foods by each topic.
Taxonomies can also be hierarchical. For example, when you create main subjects such as Comedy and Action, you can add more subitems under each category.
How to Create Custom Taxonomies in WordPress?
Now, we are going to demonstrate the two methods to add taxonomies:
Using a free plugin
Manually with code
Method 1: Create custom taxonomies by using custom post type UI
Custom post type UI is one of the powerful WordPress custom post type plugins that comes with an easy-going interface for managing custom post types and taxonomies for your website. In addition, it helps you solve the issue of creating custom post types.
Similar to other plugins, first of all, you need to install and activate the Custom post type UI plugin. For more support, you can see our step-by-step guide on how to install a WordPress Plugin for beginners.
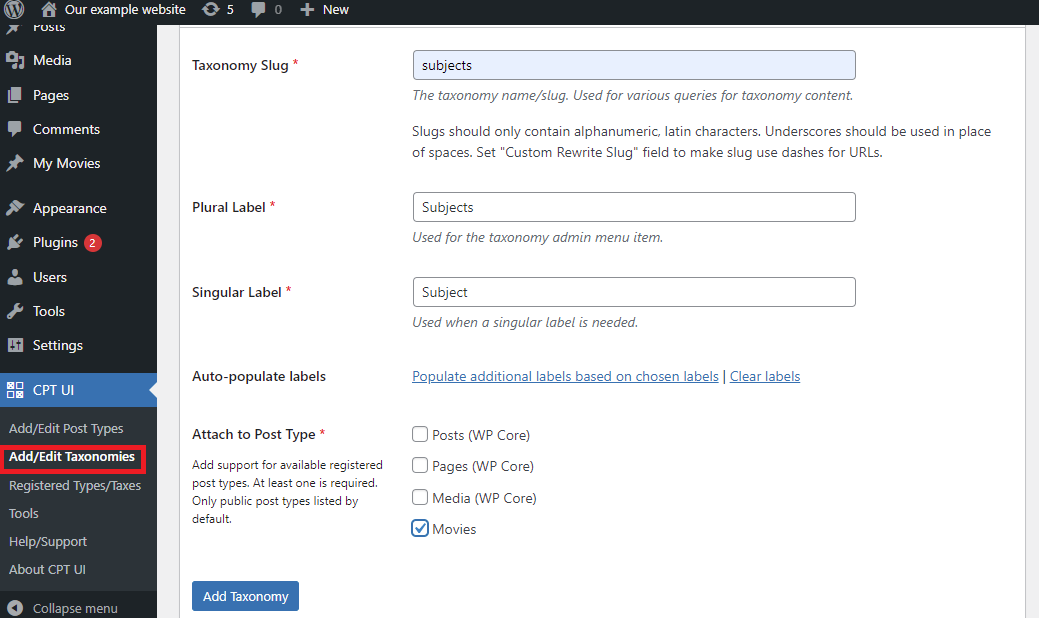
After you have activated the plugin yet, you will see a new option (CPT UI) in your WordPress dashboard menu. Let’s navigate to CPT UI > Add/Edit Taxonomies.
However, you have to make sure that you created a custom post type in advance of creating your taxonomies.
Under the Basic Settings section, you need to focus on doing the following:
Firstly, you need to create your taxonomy slug. This slug will be utilized in the URL and thanks to this URL path, you can see all posts under this taxonomy. This slug only contains letters and numbers and all letters will be converted to lowercase letters.
Secondly, you need to create the plural label of taxonomy for example Actors, and generate the singular label such as Actor.
Next, you will see the option which displays “Populate additional labels based on chosen labels“. Let’s click on this link and immediately the plugin will auto-fill the rest of the label fields for you. You can also add all the fields by yourself.
The fourth option is about Attach to Post Type. You will see all existing post types listed as checkboxes. Hence, you need to check these post types of options that you want to be attached.
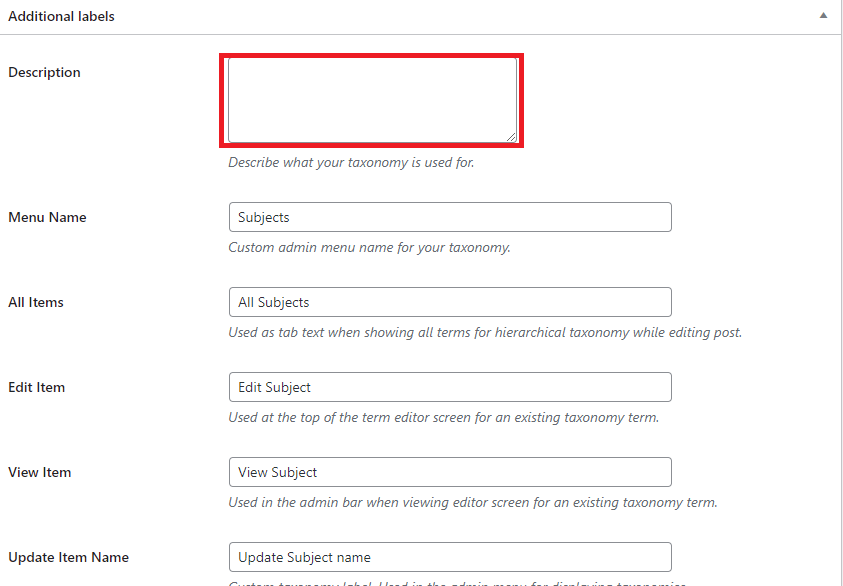
At the Additional Labels section. You are able to fill all the fields with the perspective label name. Or the plugin will automatically fill these fields, as we mentioned above. In addition, you can also provide a description of your post type.
These labels are utilized in your Menu Dashboard once you are editing and controlling content for that particular custom taxonomy.
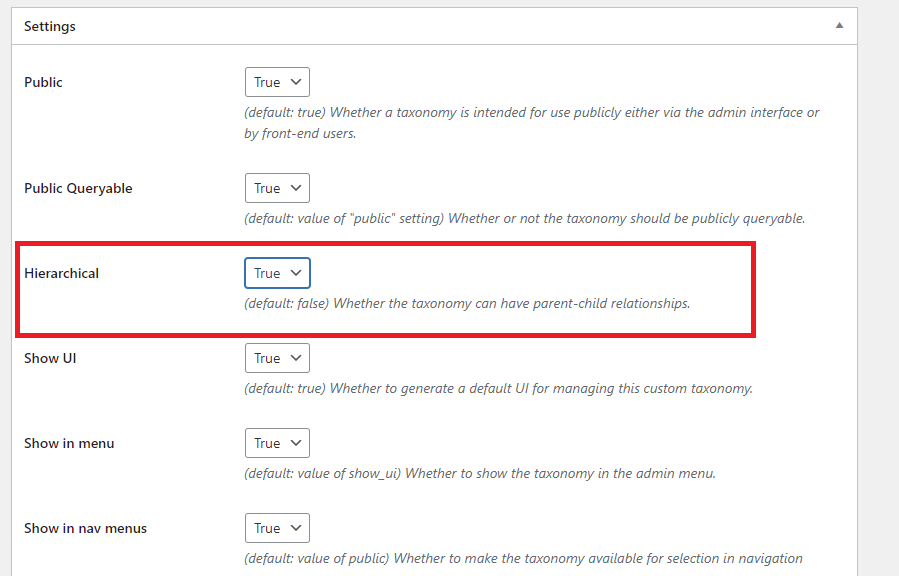
Next, you see the Settings section. In this area, there is a wide range of options for each taxonomy you generate. You can read a description displayed below each option to understand what it does. And then set it up as you want.
In the image above, you will see that we set up True to make this taxonomy a hierarchical taxonomy, and then it will work like standard post categories ( Parent-child relationship).
Otherwise, you can make this taxonomy as non-hierarchical taxonomy work by setting that field as False.
In addition, there are plenty of settings displayed on your screen such as shown in nav menu, delete with the user, has archive page, Hierarchical for the parent-child relationship, show in the admin menu, and much more. You can read the description of each field and set it as your requirements.
Once you are happy with your selections, let’s click on the “Add Taxonomy” button shown at the bottom to save your custom taxonomy.
Now, you can see the new custom taxonomy under your post type. In our case, we made a custom taxonomy for the “movies” custom post type. You can edit the post type associated with this taxonomy in the WordPress content editor to use it.
Method 2: Create custom taxonomies by code snippets
This method is quite complicated because it requires you to add code snippets to your WordPress site. Now, we are going to start with a hierarchical taxonomy that operates like categories and also have parent and child type.
Creating a Hierarchical Taxonomy
Now, you need to add the following code in your theme’s functions.php file or in a site-specific plugin to generate a hierarchical custom taxonomy that is similar to categories.
//hook into the init action and call create_movie_taxonomies when it fires
You should note that you have to replace the taxonomy name and labels in the example code with your own taxonomy labels. And of course, this taxonomy is associated with the Movies post type, you can change that to whatever post type with which you want to utilize it
Creating a Non-hierarchical Taxonomy
Similarly, in order to create a non-hierarchical custom taxonomy like Tags, you need to add the following code in your theme’s functions.php or in a site-specific plugin:
//hook into the init action and call create_topics_nonhierarchical_taxonomy when it fires
You need to distinguish between the 2 codes. The first one is true for category-like taxonomy and false for tags-like taxonomies.
Additionally, in the labels array for non-hierarchical tags-like taxonomy, we added null for parent_item and parent_item_colon arguments, so nothing will be displayed in the UI to generate parent items.
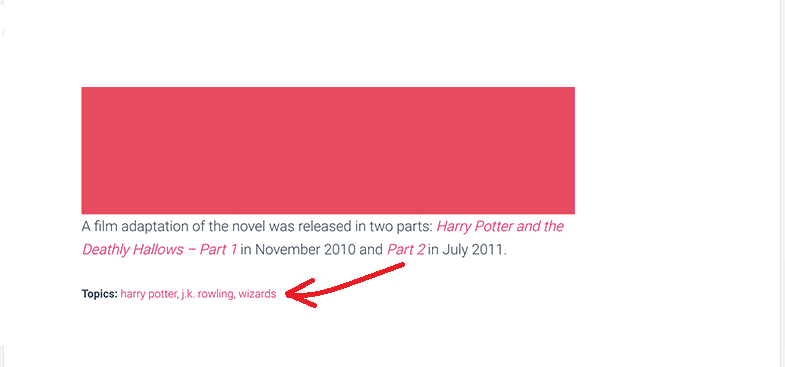
How to display custom taxonomies in WordPress?
After you have created custom taxonomies, WordPress will not automatically display them. Hence you need to add some code to your WordPress theme, or child theme to display them.
The following code will need to be added in templates files in which you want to show the terms.
In fact, it is single.php, content.php, or one of the files displayed in the template-parts folder in your WordPress theme. It is easy for you to find this file and edit it.
Now, let’s add the following code where you want to show the terms.
Moreover, you are able to add it to other files such as archive.php, index.php, and any positions you want to display the taxonomy.
How to add Taxonomies for custom posts?
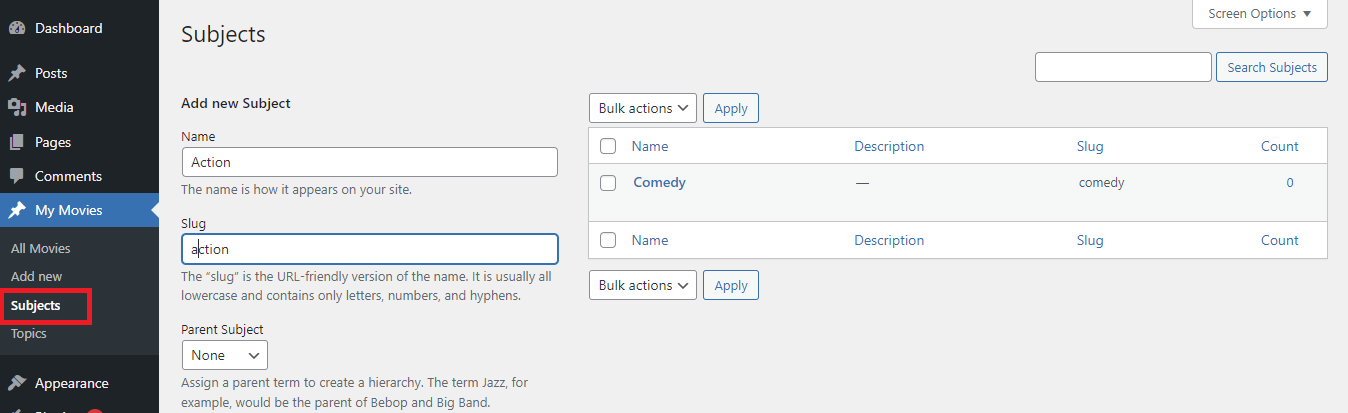
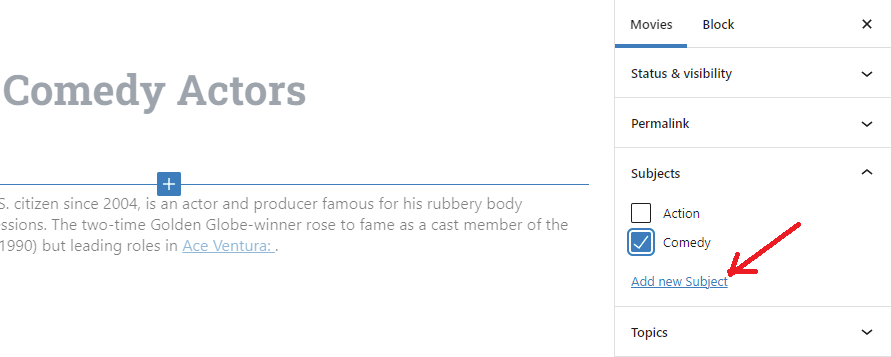
Now, you will see that your custom post type (Movies) has a new submenu item: Subjects, let’s click it.
From here, you can add new items to the Subjects taxonomy. For example, we are going to add “Action”.
On the screen, you need to pay attention to 4 areas including Name, Slug, Parent, and Description.
In the first area, you need to enter the term you want to add. In our case, the “Action” term was added. You can leave the slug part and optionally provide a description for this term.
Then, don’t forget to click on the “Add New Subject” button to create your new taxonomy. Immediately, the new term will be displayed in the right column.
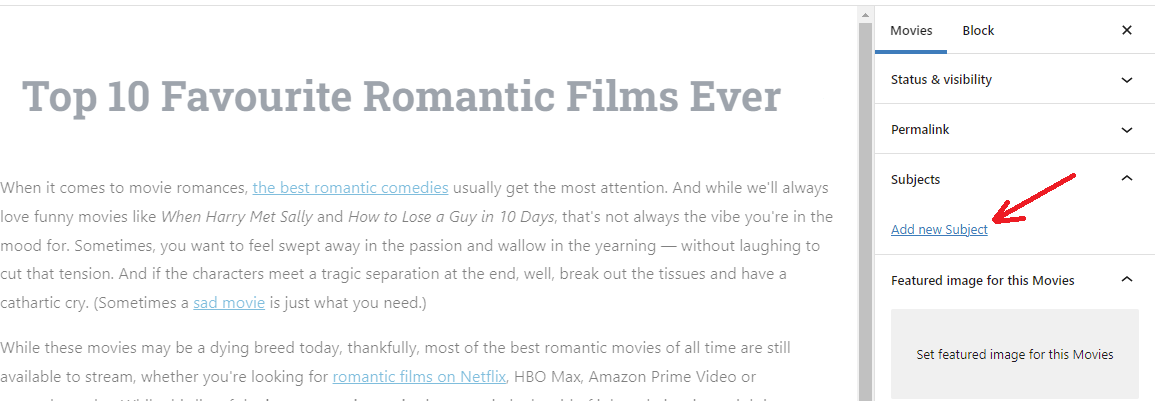
Now, if you navigate to the Movies and Add New page to create a post. You will see the Subjects taxonomy on the right sidebar. On the post edit screen, you choose from available options or create new terms by clicking on the Add New Subject link.
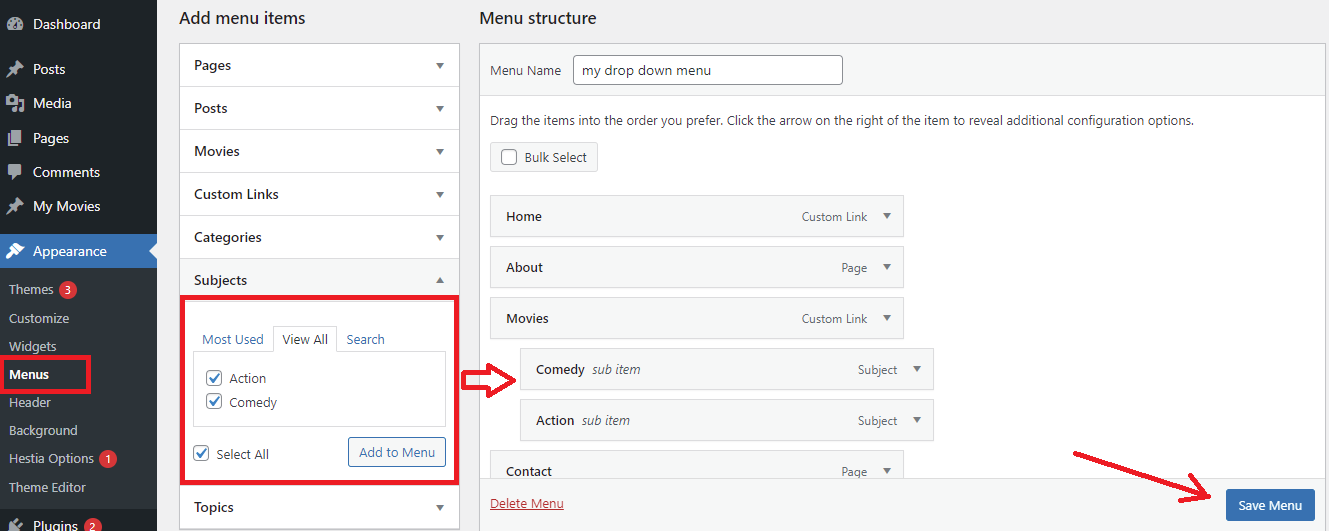
How to add custom taxonomies to the navigation menu?
After you have created custom taxonomies yet, you can display them in your WordPress site’s navigation menu.
Simply visit Appearance > Menu and then choose the terms you want to add under your custom taxonomy tab.
Remember to click on the “Save Menu” button to save your changes.
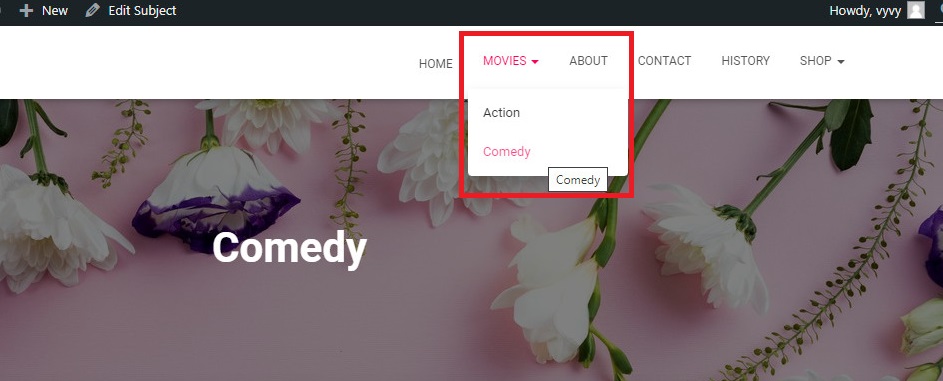
Now, it’s time for you to visit your website to see your menu in action.
Congratulation! If you have read this far, we believe that now you have the ability to create custom taxonomies in WordPress professionally. Hopefully, this post gave you a lot of useful methods to handle your problem. If you have any questions, don’t hesitate to let us know in the comment below.
Moreover, do you already have a beautiful website? Let’s visit our Free WordPress themes to discover a wide range of attractive, SEO-friendly designs for your website.
Welcome to LT Digital Team. We make daily blogs for Joomla! and WordPress CMS, support customers and everyone who has issues with these CMSs and solve any issues with blog instruction posts, trusted by over 1.5 million readers worldwide.
Latest posts by LT Digital Team (Content & Marketing) (see all)
We use cookies to improve your experience on our website. By browsing this website, you agree to our use of cookies.
Functional
Always active
The technical storage or access is strictly necessary for the legitimate purpose of enabling the use of a specific service explicitly requested by the subscriber or user, or for the sole purpose of carrying out the transmission of a communication over an electronic communications network.
Preferences
The technical storage or access is necessary for the legitimate purpose of storing preferences that are not requested by the subscriber or user.
Statistics
The technical storage or access that is used exclusively for statistical purposes.The technical storage or access that is used exclusively for anonymous statistical purposes. Without a subpoena, voluntary compliance on the part of your Internet Service Provider, or additional records from a third party, information stored or retrieved for this purpose alone cannot usually be used to identify you.
Marketing
The technical storage or access is required to create user profiles to send advertising, or to track the user on a website or across several websites for similar marketing purposes.


Recent Comments