These mass actions will allow you to process almost everything in Hikashop, directly from this screen or based on a specific trigger. Thanks to this system, you can edit multiple products in one click as well as categories, orders, addresses or Hikashop users, avoiding long hours of repetitive work doing it element by element. Mass actions will for example help you move thousands of products from one category to another or change the order status for every orders of a specific customer in a few clicks. In addition to these one time processes, you will also be able to create tasks executed periodically or on a specific triggers like at the order creation or when a product is deleted, etc.
Beware that these actions may have irreversible consequences so be careful when you configure them as you could easily wipe out all your orders or products or users in a few clicks ! If unsure, please make sure that you do a backup of the website before or try first on a copy of your website.
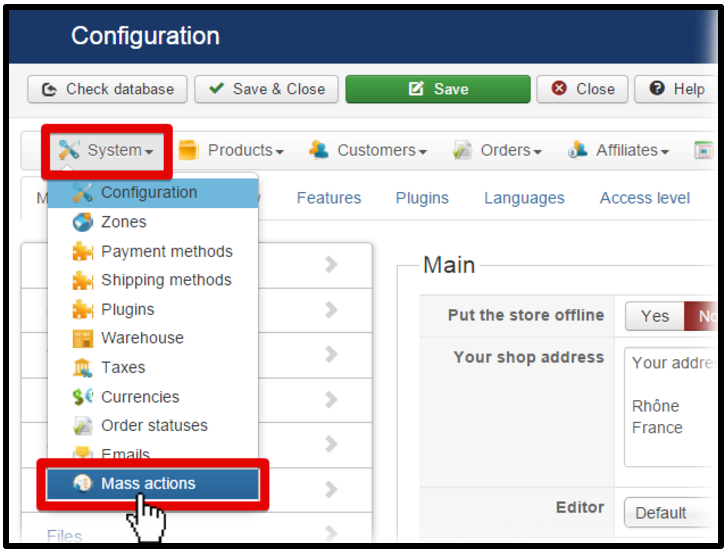
Mass Actions are available for all HikaShop versions and available via the menu System>Mass actions.
Reach Mass Actions
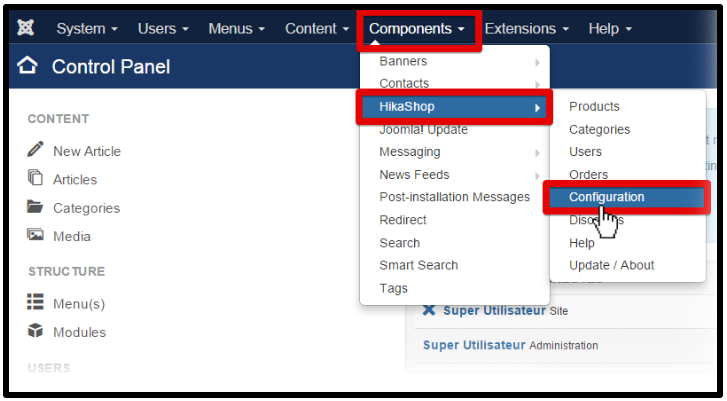
Go to “Components -> HikaShop -> Configuration“.
Then, click on “System“, and “Mass actions“.
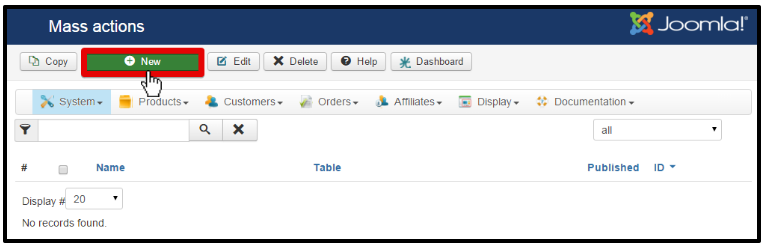
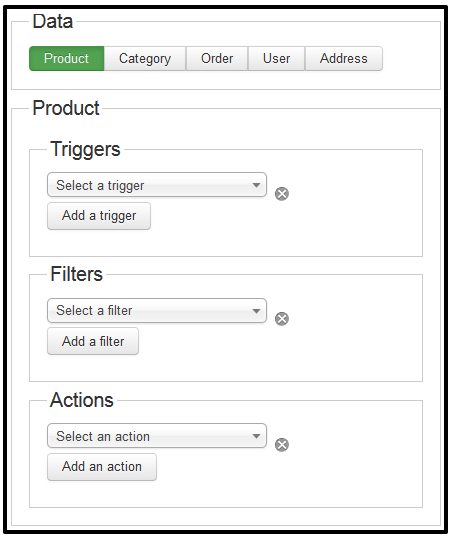
You can now, see “Mass action” screen, here for example, as no Mass actions have been configured, the listing is empty.
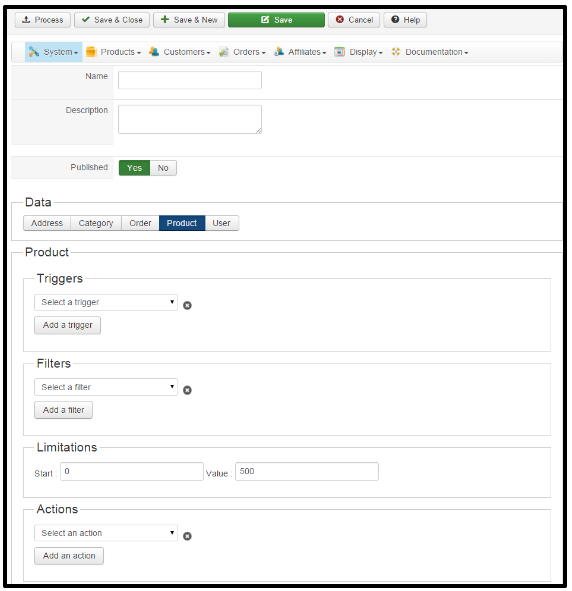
And so, here you can see configuration screen.
Additional Information
Data : These buttons allow you to choose the type of data you want to work on. Each data has specific triggers, filters and actions available, enabling you to do different combinations.
Triggers : Triggers allows you to specify when the mass action should be processed. You can either use it to execute your mass action on a regular frequency (for example you can import a csv with your products every day, updating your data according to the modification you made in the file), or execute the defined action on a given trigger like after a product is created. This way, you will be able to define for example a weight for a newly created product if you didn’t specified any, avoiding shipping method errors. If you use a time trigger or click on the process button, the system will use all the data available but if you choose a trigger like “after a product is create”, the mass action will run only on the data of the trigger, so only on that product in that case.
Filters : Here you can add filters to your mass action. For instance, you can specifically select products which belong to a category or customers living in Europe. Thus, you can process actions only on the selected data. Note that the number of elements filtered will be displayed next to the dropdown, letting you know how for example much products will effectively be processed in the given category.
Actions : This is the main part of the mass action system since it define what kind of action will be processed on the selected and filtered data. Here, you can choose to modify the data, export it as a csv, and even display the results on the current page. This last option will display the selected information in a table and give you the possibility to dynamically change the displayed values.
Detailed options
Filters
Generic
Columns : This option allow you to filter on any column of the selected table. This take the values in the database directly.
Limit : To have only a defined number of results, you can use this option. It is often useful when you want to export data or display them.
Product
Product type : The product type option allow you to filter only the main products or the variants.
CSV product : You can give a csv file as filter, the mass actions will take the content of the file, and filter on the given products.
Characteristics : To filter on the characteristics, it display only the available characteristics.
Access level : The access level filter restrict the results of the search to the defined access level.
Category
Category type : Allow to filter only the selected category type, for example only the product categories.
Access level : The access level filter restrict the results of the search to the defined access level.
Order
Order status : Restrict the results to the selected order status.
User with ACL : To get the orders where the users have the group defined.
User
Don’t have : Return the users which don’t have the value set.
User with ACL : To get the users with the group defined.
Address
User with ACL : To get the addresses where the users have the group defined.
Actions
Generic
Display the results : This option will display the elements previously filtered in a dynamic table, when this table is displayed a simple click on a row allow you to change the value of the selected element.
Export a CSV file : You can export the elements in a CSV or XLS file. Besides, you can define or not a path for this file. When a path is set, the file will automatically be saved in the specified folder. If you let the path empty, it will display the browser download bos to let you select an action, display, or save.
Update the values : This will allow you to change a value on all the elements returned, be careful when using this option because it is irreversible.
Delete the elements : As indicated, you can delete the filtered elements, as the previous optionit is irreversible.
Product
Update the categories : This will update the categories of the product, two choices are present, add to only add new categories to the product or replace, to remove the previously set categories and add the selected one. To remove all the categories, you can let the field empty and use the option “replace”.
Update the product relateds : As the categories, you can add or replace one or many related product(s) to the filtered products.
Update the product options : This option will do the same thing as the previous one, but it is applying on the options.
Category
Order
Change status : Easily change your order status by selecting a new one, it will change it to the triggered and/or filtered one.
Add an existing product : To add a product, for example a gift on an order, you can do that automatically or manually with this action. You can select one or many products to add.
User
Change the user group : Simply select the user group to set to the selected user(s). You can add a group or replace the current group(s) to the selected one.
Address
Create a massaction
First, to use the mass actions you have to click on the menu “System” then “Mass actions”. When you arrive in the mass action page, you have to click on the “New” button in the toolbar in order to create a new Mass action.
nce you are in the Mass action form, you can enter the main information relative to the mass action you’re creating. The following fields allows you to set a name and a description to your mass action. We recommend to set meaningful information, it will be easier for you to find back a mass action in the future.
As all the other features, you can publish or not the mass action. It’s useful when you are using one or many triggers in the mass action.
The triggers are called generally before or after an action. For example, when you create a product, it calls the two triggers “onBeforeProductCreate”, which is called before the save of the created product, and “onAfterProductCreate”, which is called after the save.
A mass action can be applied to one data type. You have to select the desired data on which you want to apply a mass action. The default possibilities are Product, Category, Order, User and Address.
If you want to create a mass action on another data type and you have some Php skills, you can code your own mass action plugin by following our developer documentation on that.
When the data is selected, you can choose one or many triggers, filters, actions. To add one of these elements, you just have to click on the corresponding “Add a …” dropdown and to remove one of them click on the remove icon.
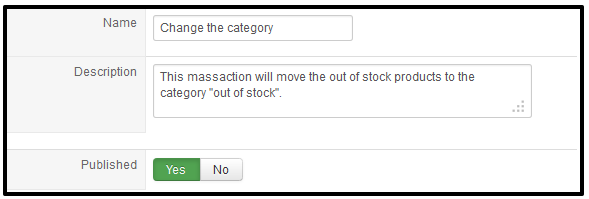
First example: change the category of a product
As an example of the use of the mass action system, we will see how to move all the out of stock products into the category “Out of stock”.
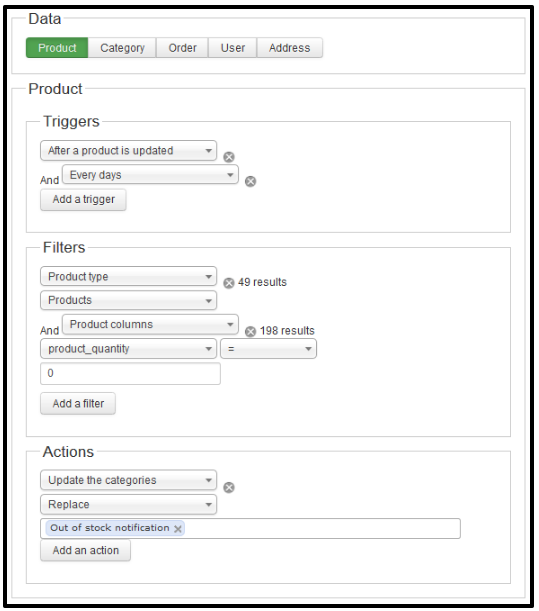
To do that, you can configure your mass action as the following screen shot:
With this configuration, the mass action will be called when a product is updated and every day. The every days trigger is not required here but it can be more secure to add a check on all the products once a day like that.
This mass action will modify the categories of the product being updated when called on the “After a product is updated” trigger, and will affect all the products when called by the “Every days” trigger. Note that the first trigger passes an element to the mass action, processing only this element. At the opposite, the second trigger, since it’s not applied on a specific element, will be based on all the elements.
The action will be executed on elements, but the elements must correspond to the filters. In this case, if the product(s) are in stock and/or are variants, the action will not be executed on them.
If we have at least one product which is out of stock, the action “Update the categories” will be executed on it/them. As you can see, there is a dropdown on the left of the action, it allow you to select “Add” or “Replace”.
We wanted to change the category so we selected “Replace” here. To add a category beside the current categories of the product, just choose the “Add” option.
Don’t forget to save the mass action. Otherwise, it will not be triggered. If you click on “Process” it will execute the mass action on all the elements corresponding to the filter but only at that moment.
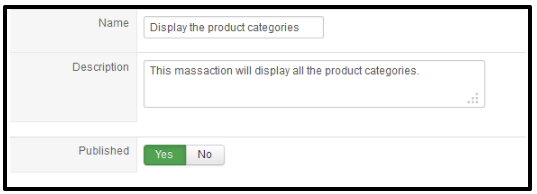
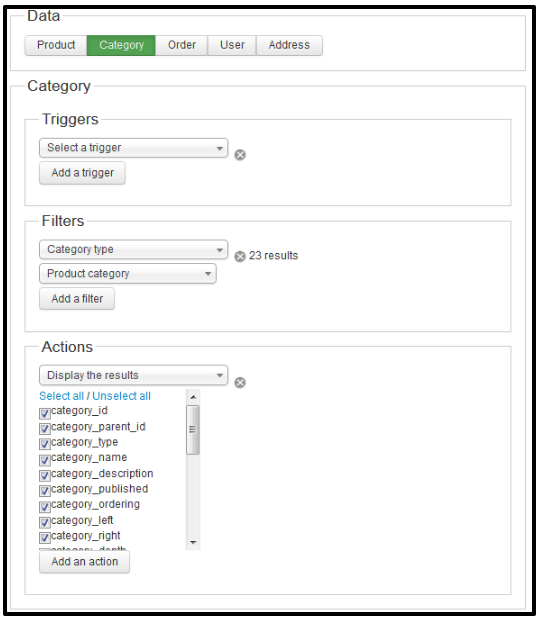
Second example: Display all the product categories
This second example will show you how to display all the product categories. First, you have to select the data “Category” and configure it as the following screen shot:
To display the products categories, you have to use the filter “Category type” and select “Product category”.
Then, in the action, simply select “Display the results” and you will see the elements to display. By default, nothing is selected and you can check all the columns by clicking on “Select all”.
To display the results, just click on the “Process” button and the process will execute the selected action(s), and save the current mass action.
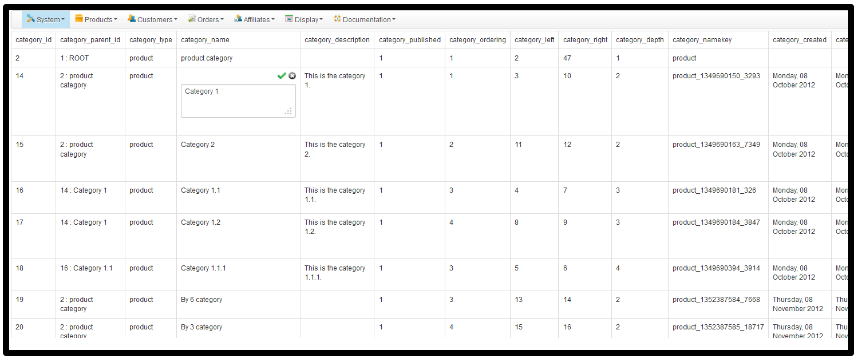
Here is the display of a “Display the results” action:
As you can see, when clicking on a cell, it becomes editable. Just edit the value and click on the save icon.
The display of the row edition change depending on the type, you can find textarea, dropdown, datepickers…
Hi, We're document team, we write document for all products from our company. You can reach our Document Portal. If you have any questions or problem during using our products, feel free drop comment, we will come to help you shortly.
We use cookies to improve your experience on our website. By browsing this website, you agree to our use of cookies.
Functional
Always active
The technical storage or access is strictly necessary for the legitimate purpose of enabling the use of a specific service explicitly requested by the subscriber or user, or for the sole purpose of carrying out the transmission of a communication over an electronic communications network.
Preferences
The technical storage or access is necessary for the legitimate purpose of storing preferences that are not requested by the subscriber or user.
Statistics
The technical storage or access that is used exclusively for statistical purposes.The technical storage or access that is used exclusively for anonymous statistical purposes. Without a subpoena, voluntary compliance on the part of your Internet Service Provider, or additional records from a third party, information stored or retrieved for this purpose alone cannot usually be used to identify you.
Marketing
The technical storage or access is required to create user profiles to send advertising, or to track the user on a website or across several websites for similar marketing purposes.

 ?")


Recent Comments