Introduction
There are many ways to improve SEO for your website. One of the most effective ways is optimizing the Robots.txt file. As you know, the Robots.txt file is known as a powerful SEO tool because it tells search engines how to crawl your website. Therefore, you can freely boost the SEO of your site by optimizing the Robots.txt. In today’s blog, we will clearly explain some methods for doing this.
The Robots.txt file definition
You can read an overview of the Robots.txt in WordPress here.
Now, let’s look at the basic format of a robots.txt file below:
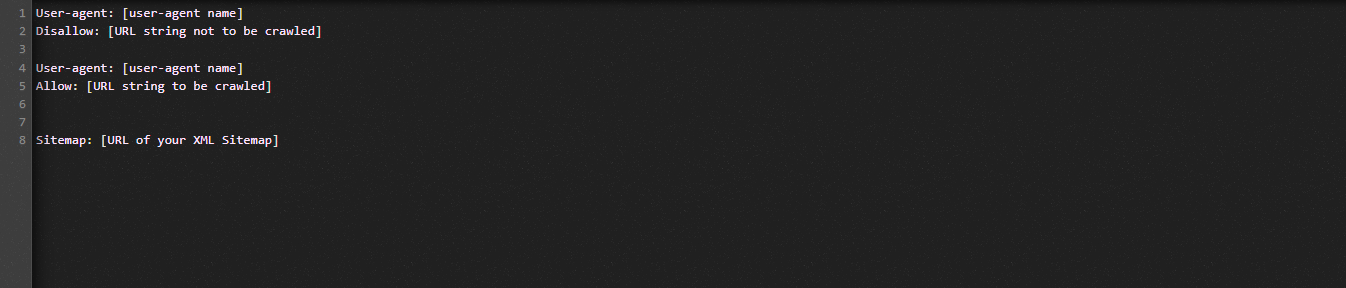
Let us explain the terms that are used in the Robots.txt file:
- User-agent: The name of the crawler
- Disallow: Prevents crawling of certain pages, directories, or files of a website
- Allow: Permits crawling of directories, files or pages
- Sitemap (optional): Shows the location of the sitemap
- *: Stands for any number or character
- $: Stands for the end of the line; you can use it to block web pages that contain a certain extension
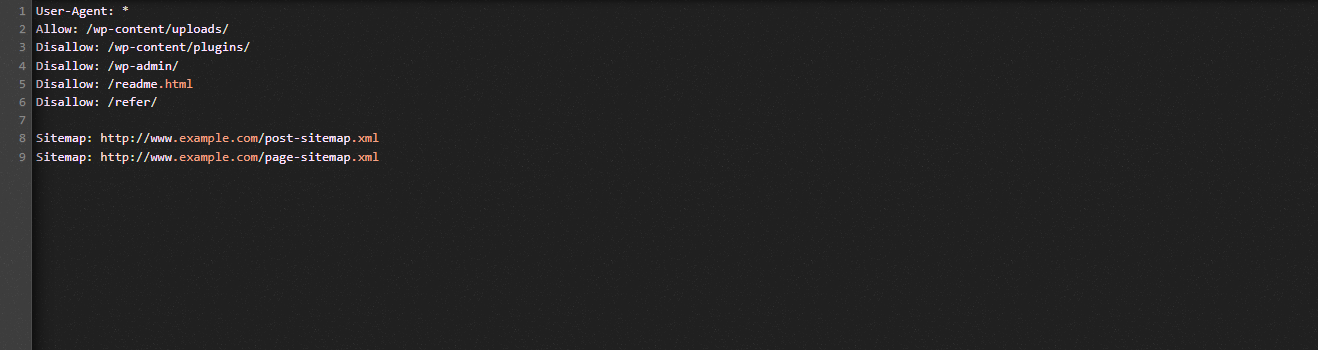
To help you understand clearly, let’s look at the following example:
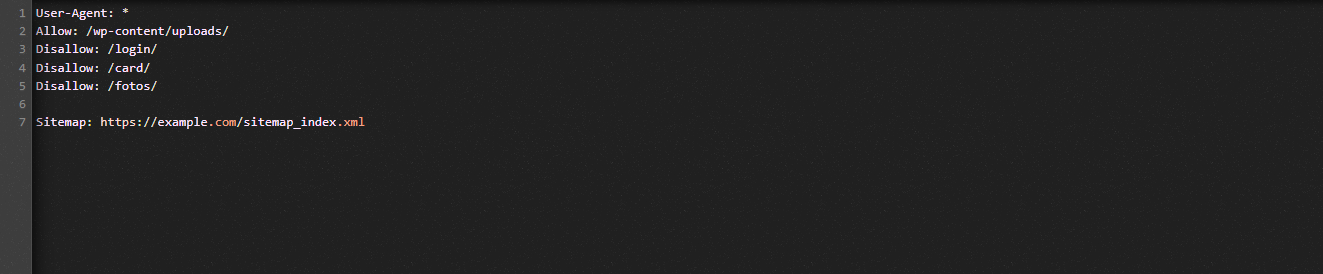
In the robots.txt example, we allow search bots to crawl files in the WordPress uploads folder.
On the other hand, we prevent search engines from accessing the login, cart, and photos folders.
Finally, we give it the URL of our sitemap.
Why should you create a Robots.txt file for your WordPress site?
Search engines will still crawl and index all pages of a website without a Robots.txt file. However, instead of crawling the folders or pages you want, they will crawl all content on your website.
There are 2 main reasons why you should generate a Robots.txt file for your site. First of all, with its help, you can manage all the content of your site easily. You can decide which pages or folders need to be crawled or indexed. That means the search bots won’t crawl the unnecessary pages, such as plugin files, admin pages, or theme folders. Thus, it helps search engines index your website more efficiently.
The other reason is that you may need to stop search bots from indexing an unnecessary post or page of your site. This makes it convenient and simple for you to hide a WordPress page or post from appearing in search results.
Methods to optimize the WordPress Robots.txt file
In this tutorial blog, we are going to bring you 2 ways to generate as well as optimize the Robots.txt in your WordPress site:
- Customizing Robots.txt file by using a plugin: All in One SEO
- Editing Robots.txt file manually with FTP
Using All in One SEO plugin to optimize the Robots.txt file
In the WordPress market, there are many WordPress SEO Plugins that can help you with this. However, in this blog, we will guide you with All in One SEO – a popular plugin with over 2 million users.
First of all, let’s install it by going to Plugins -> Add New. Then search for the name of the plugin, install now and activate it.
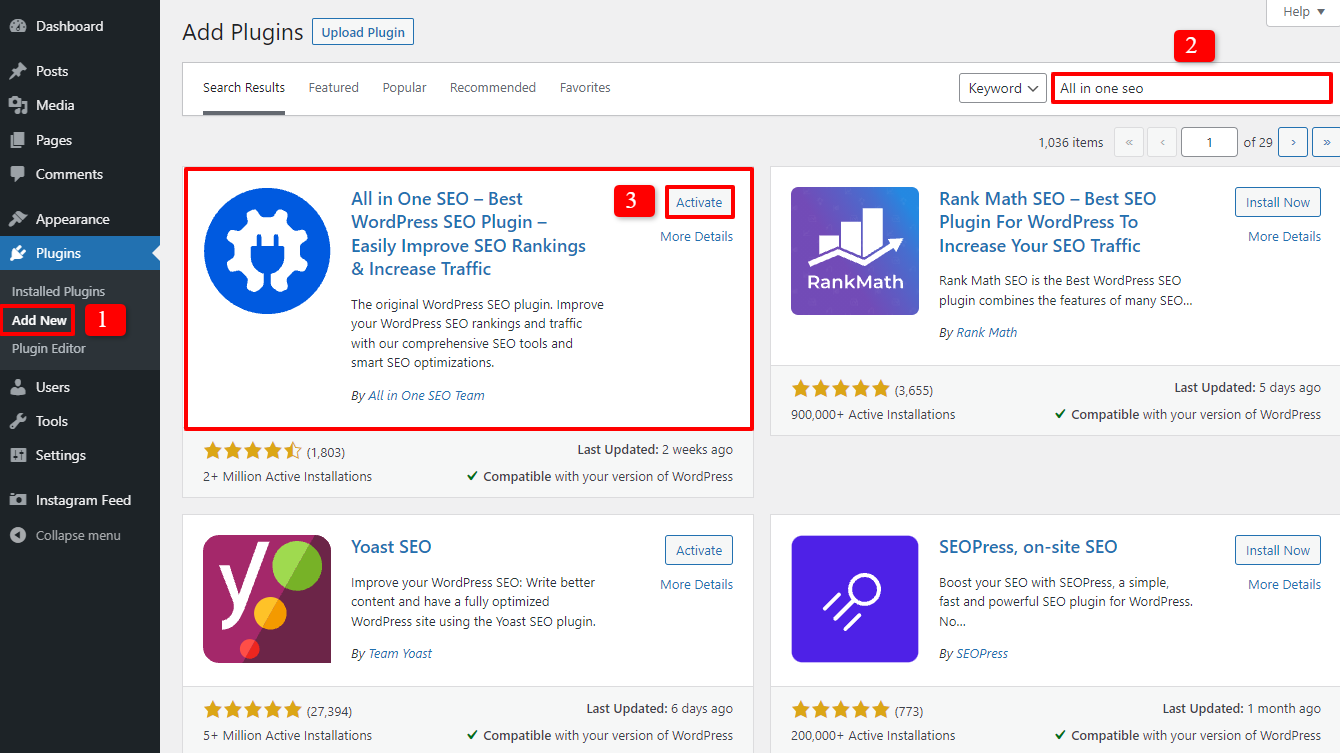
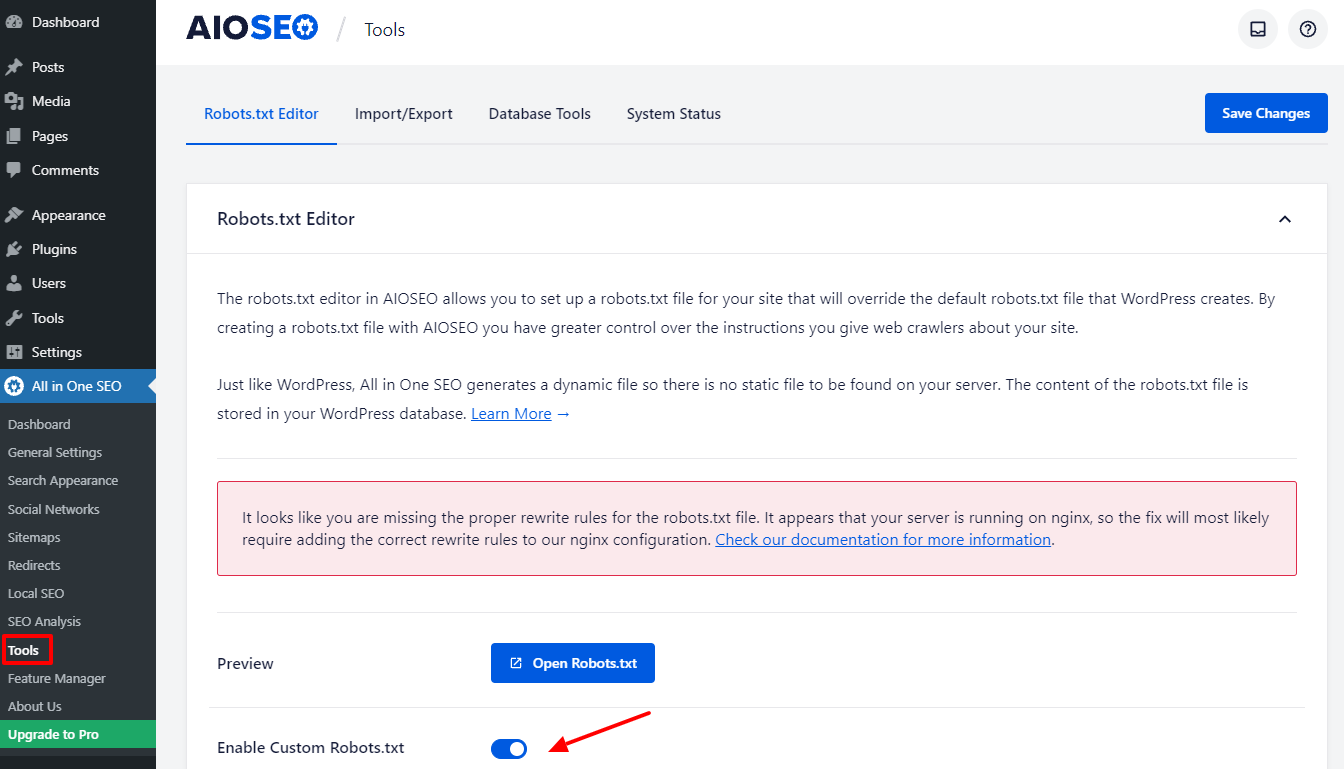
After finishing some simple steps, you will return to the admin dashboard. Now, you need to go to All in one SEO -> Tools.
In the Robots.txt Editor section, switch the Enable Custom Robots.txt button to turn it on. You will then be able to create a custom Robots.txt file in WordPress after turning it on.
Scroll down, and you will see that this plugin shows you a box with the Robots.txt preview. These are the default rules that WordPress added.
If you want to improve the SEO of your website, you can add your own custom rules by clicking on the Add Rule button.
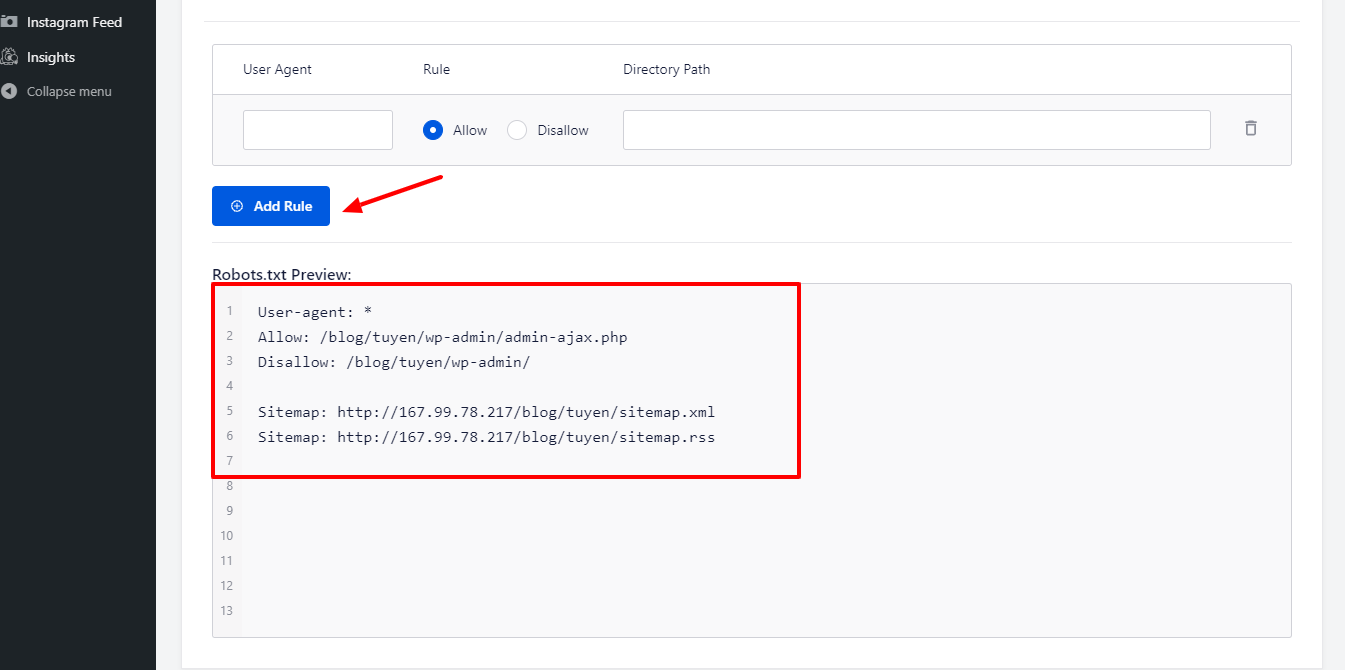
To add a new rule, fill out the User-Agent field with a * so that the rule applies to all user agents.
In the next step, you just need to choose Allow or Disallow for the search bots to crawl.
After that, in the Directory Path, don’t forget to fill out the filename or directory path.
Last but not least, press the Save Changes button when you finish all your settings.
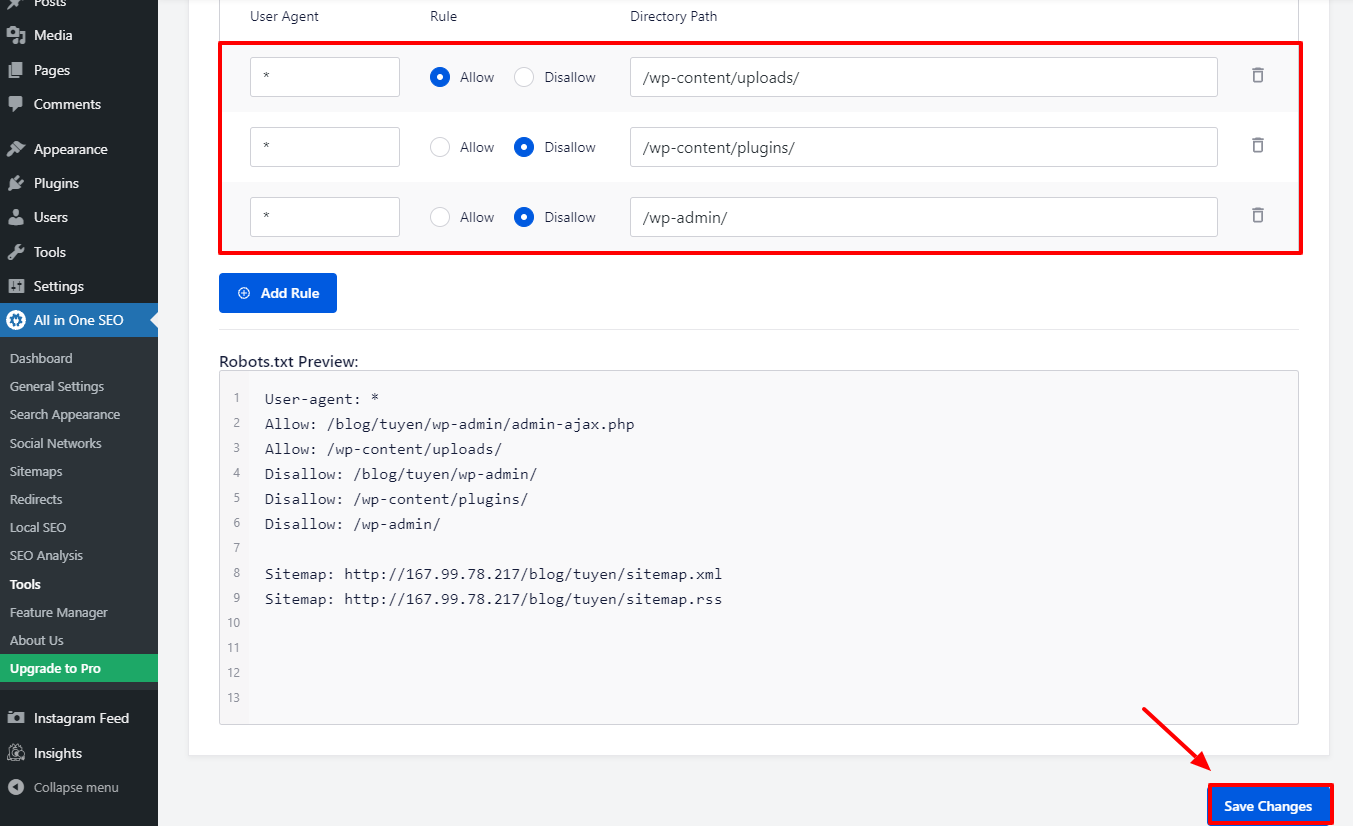
Now, all the new rules you have added will be applied to the Robots.txt file automatically.
Utilizing FTP to customize and optimize the Robots.txt file manually
This is another way to optimize the WordPress Robots.txt you may like. To do it, you have to use an FTP client to customize the Robots.txt file.
Firstly, connect to your WordPress hosting account using the FTP client. Once connected, you will easily see the Robots.txt file in your site root folder. Right-click it and select View/Edit.
Conversely, if you can’t find it, you probably don’t have it. So, let’s create a Robots.txt file for your site first by right-clicking and choosing Create a new file.
Since the Robots.txt file is a plain text file, you are able to download it and customize it via a plain text editor, such as Notepad or TextEdit. After that, you just need to upload it back to your site’s root folder. Sounds simple, right?
Test the Robots.txt file of your WordPress site
When you have already created and set your Robots.txt file, you should test it to find any errors. So, you need to test it with a Robots.txt tester tool. We highly suggest trying Google Search Console.
If you want to use Google Search Console, make sure that your website is linked to this tool. After that, you are able to utilize the Robots Testing Tool by choosing the property in the dropdown list. It will then load the Robots.txt file of your site automatically. If there is any error, it will warn you.
Wrap Up
All in all, the main purpose of optimizing the Robots.txt file is to prevent search bots from accessing pages that are unnecessary to the public, such as plugin folders or admin folders. You don’t need to block WordPress tags, categories, or archive pages to improve your SEO. You can follow the Robots.txt format to generate an ideal Robots.txt file for your WordPress site.
We hope that today’s blog is useful for you. Don’t forget to share it with your friends and other webmasters. Furthermore, if you have any inquiries, leave a comment below and we will reply to you as soon as possible. Now, it’s time for you to explore how to optimize the WordPress Robots.txt file. See you in the next blogs.