WordPress is the most popular open source in the world which allows you to create and manage any kind of website. Compared with other open sources like Joomla, Drupal, …, then WordPress is the most easy-using, friendly, and it has clean permalink structure, and many other remarkable features.
In addition, WordPress is well-known for its ease of installation. In this post, we share with you how to install WordPress simply and quickly.
Step 1: Download the WordPress installation package
To download the WordPress installation package, you access to https://wordpress.org and click on the DOWNLOAD button.
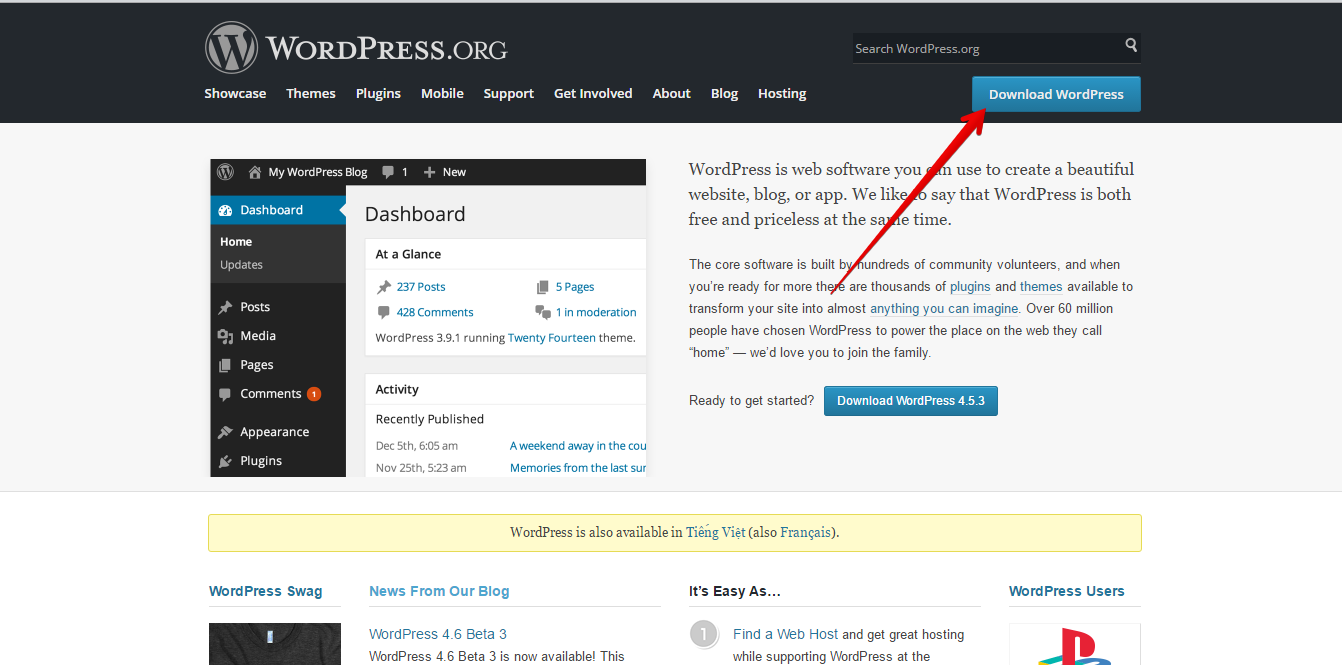
The installation package will be saved to your hard disk. Unzip the downloaded file to a new folder.
Step 2: Upload the WordPress files to your server
Now, you can upload the installation files via FTP (File Transfer Protocol) using a client application like Filezilla.
If you want this WordPress installation to be main for your website, the files should reside in the public_html folder of your account.
You can also upload the WordPress files via cPanel as follows:
– Login to cPanel -> click File Manager.
– Select Web Root and Show Hidden Files and click Go.
– Click to open the folder to which you’d like to upload files.
– Click Upload -> Click Browse.
– And finally, select the file you wanna upload.
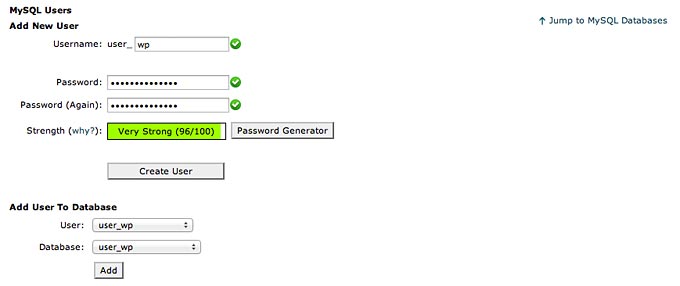
Step 3: Create a MySQL Database for WordPress to use
In order to create a MySQL database on your hosting account, you need to log in cPanel. You can go to cPanel button in the Customer Area ->My Accounts section or by entering one of the following URLs in your web browser: http://yourdomainname.com/cpanel or http://cpanel.servername.com
- Log into cPanel.
- In the Databases section, click the MySQL Database Wizard icon.
- Create A Database, enter the database name and click Next Step.
- Create Database Users, enter the database user name and password and click Create User.
- Add User to the Database, click the All Privileges checkbox and click Next Step.
Step 4: Go through the installation process
If you have uploaded WordPress in your public_html directory you’ll need to go to http://yourdomain.com in your preferred browser. Then you follow the instructions below:
- Just click on the Create a Configuration File button to proceed. Then press the Go! button.
- Enter the details for your newly created MySQL database and press the Submit button.
- When you finish entering the necessary information, it will show a confirmation screen. Press the “Run the Install” button to proceed.
- Enter the information about your administrative username and the title of your new site.
- Press the Install WordPress button.
Your new WordPress application is installed.
Note: You should specify a real email address. It can be later used in case you forget your password.

- Resolving the “Class JFactory Not Found” Error in Joomla When Upgrading to J6 - December 19, 2025
- The Utility Of VPNs For Site Authors And Admins - November 24, 2025
- Joomla! 6: What’s New and How to Upgrade from Joomla! 5 - October 23, 2025


Recent Comments