WordPress has an effective content management system. Therefore, it enables you to add new users and manage users on your blog. If you want to add multiple users to your WordPress blog with various roles, luckily you have come to the right place. In this blog, we demonstrated three solutions to help you add new users & authors to your website including:
Open your site for user registration
Manually add new users
Using a plugin
How to Add New Users and Authors to your WordPress blog
There are several methods to add new users to your WordPress blog. However, in today’s blog, we will show you three basic and easy ways to quickly add new users to WordPress sites. Now, let’s check them out.
Method 1: Open your WordPress site for any registration
If you want to allow users to register on your website for free instead of adding each user manually, this is a useful method for your website. Users will create their own accounts.
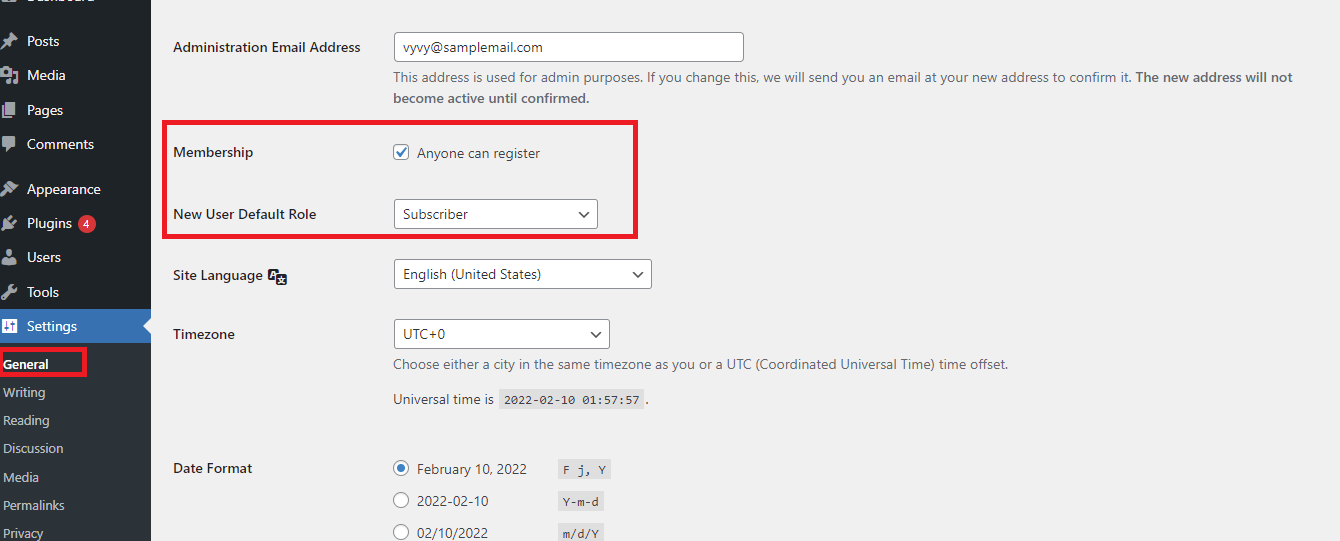
In order to use this method, first of all, you need to navigate to Settings > General from your WordPress dashboard.
Then, locate the Membershipsection and check on “Anyone can register“.
In the “New User Default Role” section, let’s choose a role for new users from the drop-down menu(Administrator, Subscriber, Editor, User, Contributor)
Finally, remember to click on the “Save Changes” button to store your changes. In addition, it is necessary to create a login form for your website. You can see our detailed tutorial on how to enable user registration on your website to help you handle this issue.
Method 2: Manually add new users or authors to your WordPress site
To add new users or authors to your WordPress, you need to follow the steps below:
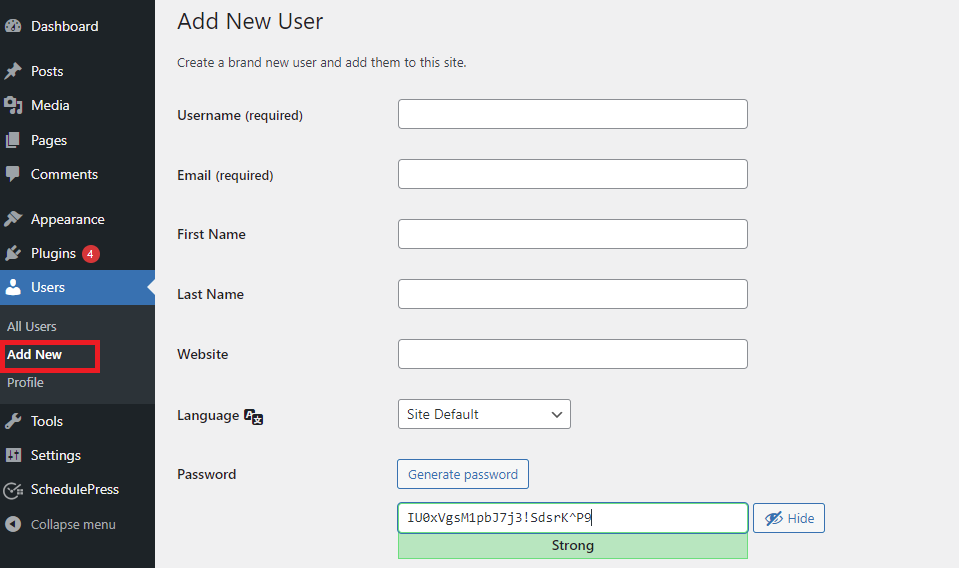
Step 1: From your WordPress dashboard, go to Users > Add New.
Step 2: Fill out the information on the form to generate a new user.
On the form, you need to fill in the following information:
Username: Your user will use this username or their email address to log in to your website
Email: You need to provide the correct email address. In that case, users need to reset their passwords then they will receive email notifications via this email address.
First name, last name, and Website URL: enter the first name and last name of your users. These are optional information, so you can leave these fields if you want.
A password: Let’s click on the “Generate password” button to automatically create a strong password
Have a look at the “Send User Notification” option, and tick on the checkbox “Send the new user an email about their account“. Then, the user will receive a detailed email that help them know how to log in.
Next, in the “Role” option, you need to assign the following roles to your new user:
Before assigning, you need to understand each user role in WordPress thoughtfully.
Administrator: An Administrator has the authority to perform all tasks on your website including add, edit, delete, change, and install anything on your blog. Therefore, you should only assign this role to those who you completely trust
Editor: An editor can perform the following task on your website including add, delete, edit, and publish their own WordPress posts. Their authority is limited to accessing website settings, plugins, themes, and other admin features.
Author: Authors are able to add, edit, and publish their own posts. They can not edit or publish other users’ posts and access features.
Contributor: Contributors who are able to add and edit their own posts but can not publish them. In addition, they are limited to access features such as plugins, themes, website settings, tools, and editing other users’ posts. Further, they also do not have the authority to upload media files such as images.
Subscriber: Subscribers don’t have the authority to contribute anything to your website. They can only view your site, submit comments, and download content on your website.
Step 3: Once you have filled out all information and assigned the role to the new user. Let’s click on “Add New User” to finalize the process.
Method 3: Import new users or authors in bulk
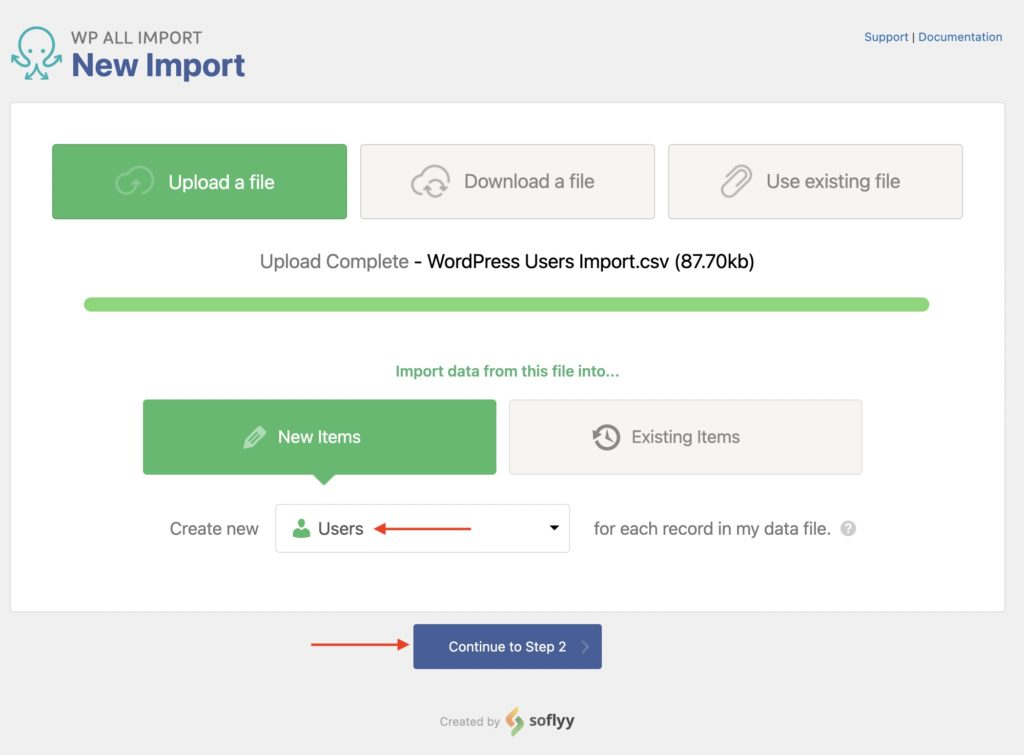
To add new users or authors in bulk, you will need to use a plugin. We recommend WP All Import.
With this plugin, just follow these steps:
Step 1: From your WordPress dashboard, go to All Import › New Import and then upload your file. Select Users for the import type, then click Continue to Step 2.
Step 2: Review the import file to make sure that the incoming data is correct. WP All Import provides a convenient screen to perform this review.
Step 3: Map the incoming data elements to the WordPress user fields using a simple drag & drop interface.
Step 4: Configure the remaining import options, including:
Automatic assignment of new unique user IDs
The ability to block email notifications to new users during the import
Options to update existing users with changed data, delete existing users that are not in the import file, etc.
You can even choose which fields you want to update.
Step 5: Run the import and verify the imported users.
What we like about WP All Import is its flexibility. For example, it allows you to handle passwords in either an encrypted or plain text form. It lets you try to maintain old user IDs when importing. And if you also use WP All Export, you can even migrate the users from one website to another with just a few clicks.
The bottom lines
Honestly, it is easy to add new users or authors to your WordPress blog. Hopefully, our blog helped you address your problem. If you have any queries about mentioned methods above, please let us know by leaving a comment below.
By the way, you can spend a little time visiting our free WordPress Themes to explore hundred of stunning, cutting-edge, SEO-friendly designs.
Welcome to LT Digital Team. We make daily blogs for Joomla! and WordPress CMS, support customers and everyone who has issues with these CMSs and solve any issues with blog instruction posts, trusted by over 1.5 million readers worldwide.
Latest posts by LT Digital Team (Content & Marketing) (see all)
We use cookies to improve your experience on our website. By browsing this website, you agree to our use of cookies.
Functional
Always active
The technical storage or access is strictly necessary for the legitimate purpose of enabling the use of a specific service explicitly requested by the subscriber or user, or for the sole purpose of carrying out the transmission of a communication over an electronic communications network.
Preferences
The technical storage or access is necessary for the legitimate purpose of storing preferences that are not requested by the subscriber or user.
Statistics
The technical storage or access that is used exclusively for statistical purposes.The technical storage or access that is used exclusively for anonymous statistical purposes. Without a subpoena, voluntary compliance on the part of your Internet Service Provider, or additional records from a third party, information stored or retrieved for this purpose alone cannot usually be used to identify you.
Marketing
The technical storage or access is required to create user profiles to send advertising, or to track the user on a website or across several websites for similar marketing purposes.


")


Recent Comments