Adding audio files and creating playlists in WordPress are considered easy tasks. However, many beginners really find it difficult to start. Therefore, in today’s blog, we will give you a step-by-step guide to help you handle this issue.
Why should you add audio files and create playlists in WordPress?
In addition to text and image content, audio is also an effective way of getting your message across to your audience. Moreover, adding audio files helps you enhance your site’s user experience thanks to memorable music and vocal presentations.
When someone enjoys what they hear, they will stay on your page longer. As a result, it will have positive effects on your WordPress SEO.
Especially, if you are running music production websites, it is necessary for you to add audio files or create catchy playlists to share your favorite tracks with your audience.
How to Add Audio Files and Create Playlists in WordPress editor?
Adding a single audio file in Classic editor
It is easy for you to add a single audio file or music track to WordPress posts or pages. If you are still using the Classic Editor, simply click on the Add Media button on the post edit screen.
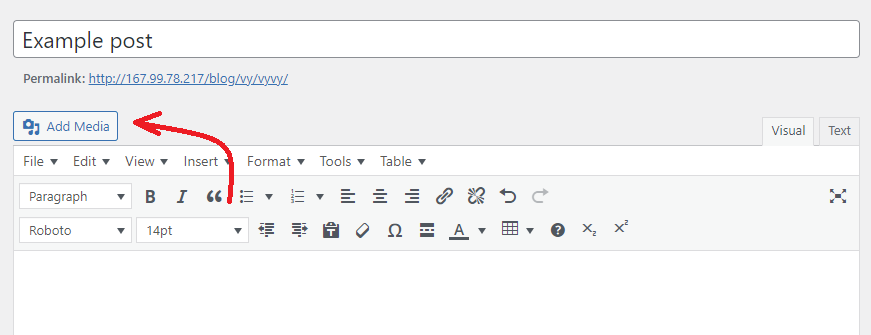
After that, this will open a popup window where you can upload audio files from your computer by clicking on the Select file button or drop files to upload.
Once the audio file was uploaded, you need to click on the “Insert into post” button at the bottom left corner of the popup window.
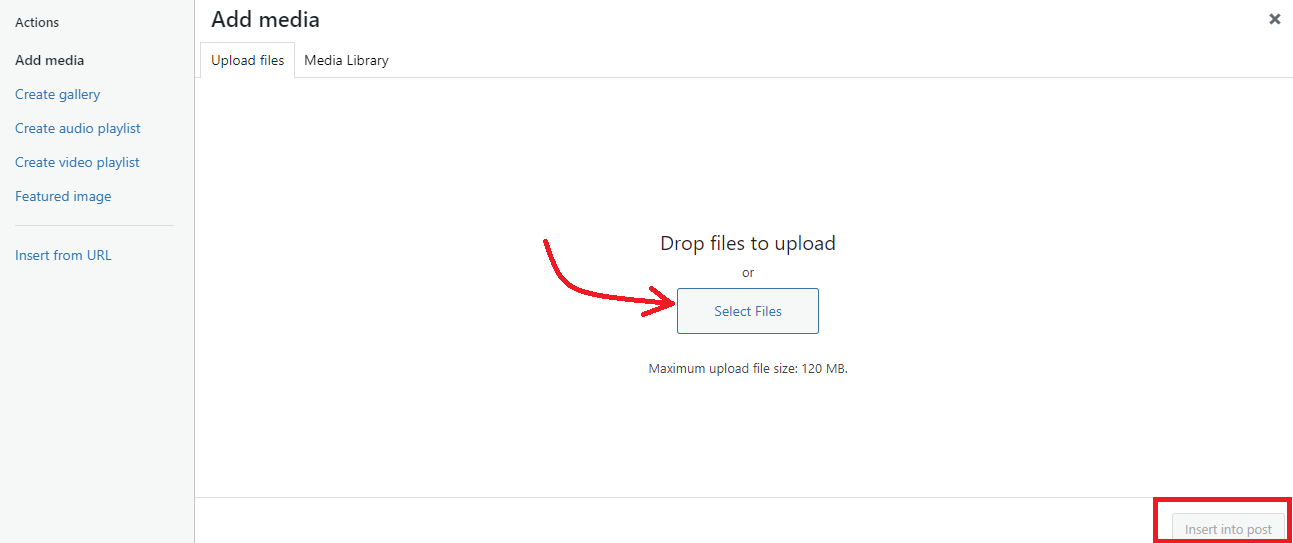
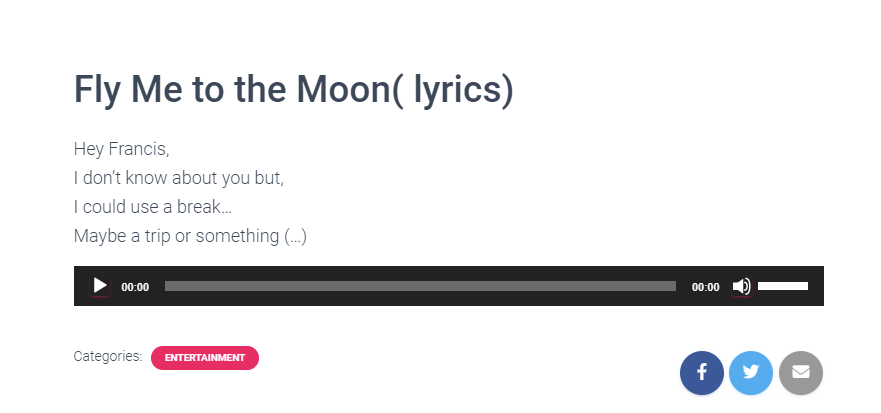
Immediately, you will see the file embedded in your post in the visual post editor. When you switch to the text editor, you are able to see the audio shortcode.
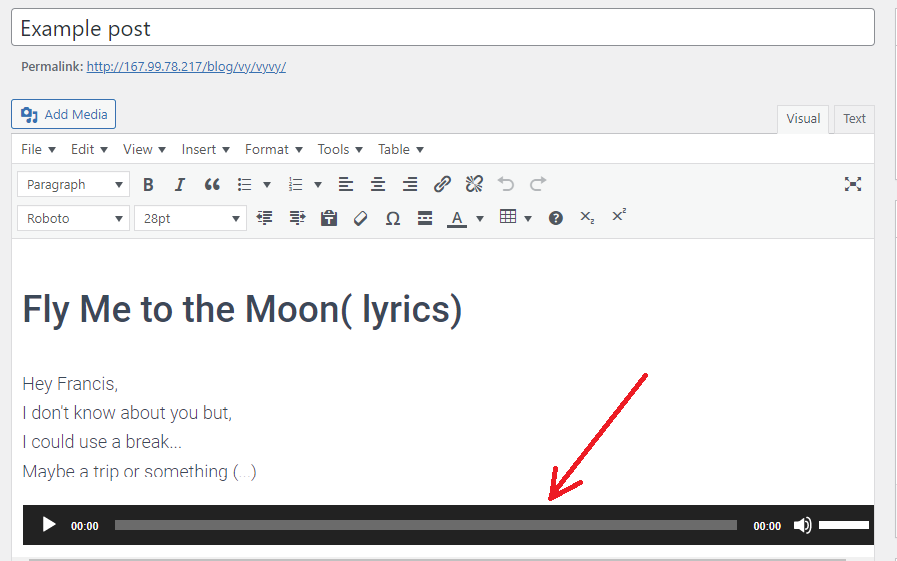
You are able to continue editing your post, save or publish it. After publishing, you can view your post on the front end with your audio file embedded as the screenshot below.
Additionally, another simpler method to insert a single audio file in WordPress is to upload the file to your media library first. Then you can copy the file URL and paste it into the Visual editor.
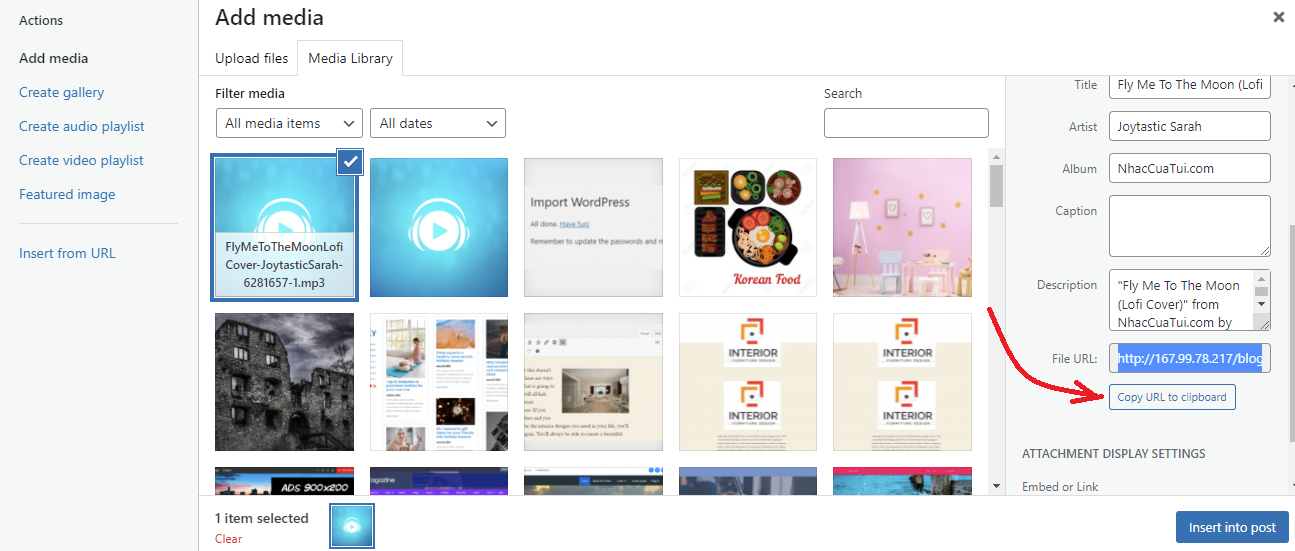
WordPress will automatically embed this URL for you. Generally, adding a single audio file is similar to the processing of embedding videos in WordPress. Because you only need to paste the URL of a Youtube video, WordPress will help you embed it.
Creating an audio playlist in Classic editor
If you used to create image galleries in WordPress, you will find the process of creating an audio playlist in WordPress extremely easy. First of all, you need to click on the “Add Media” button to add all your audio files to the media library.
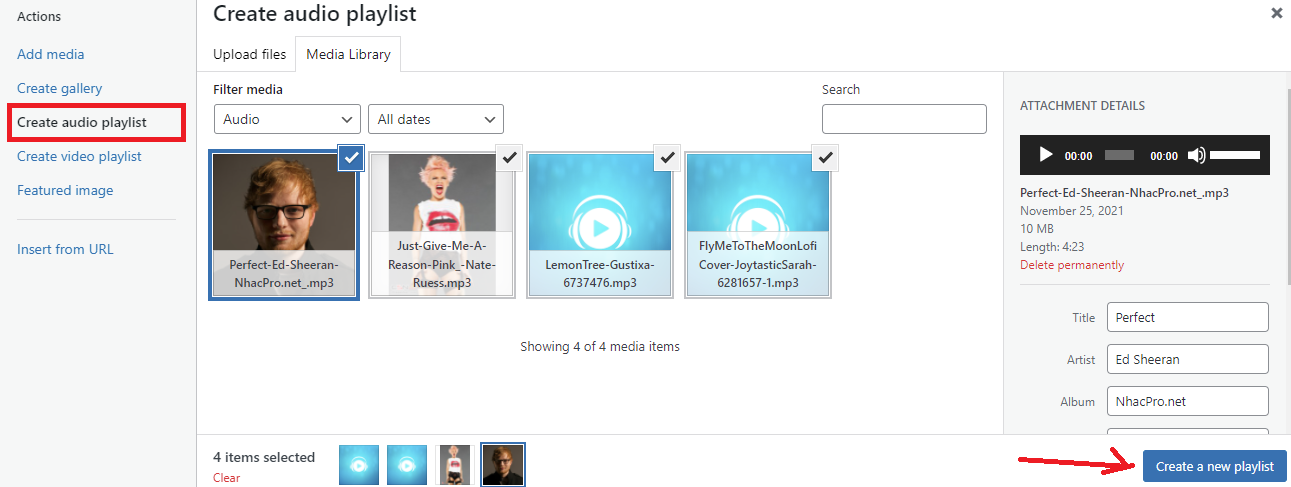
Once all audio files are available in your media library, let’s choose the Create Audio Playlist option in the left-hand column and select the files you want to include in the playlist. Then click on the Create a new playlist button.
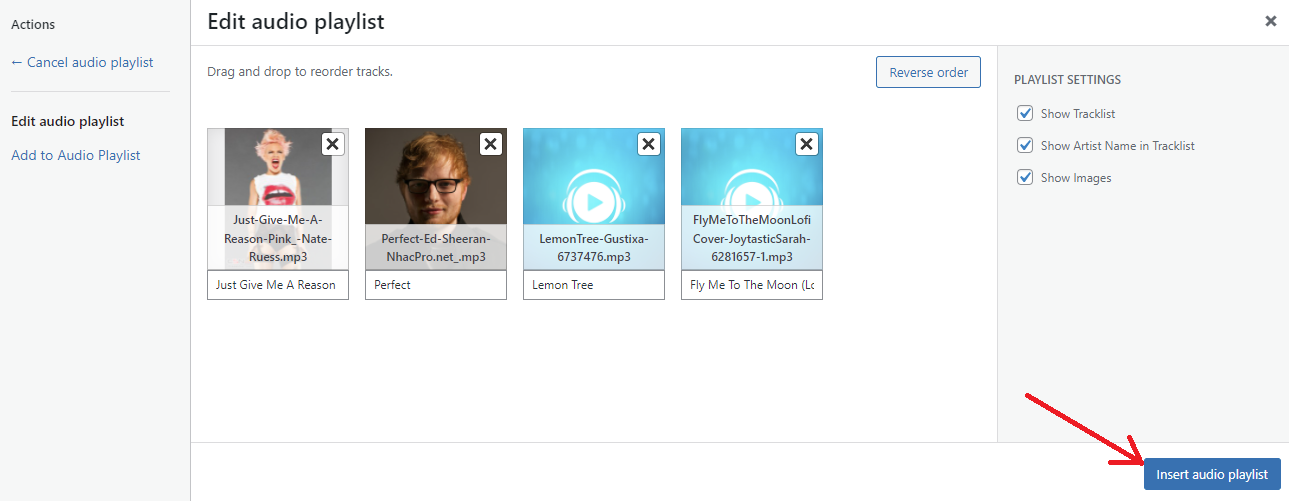
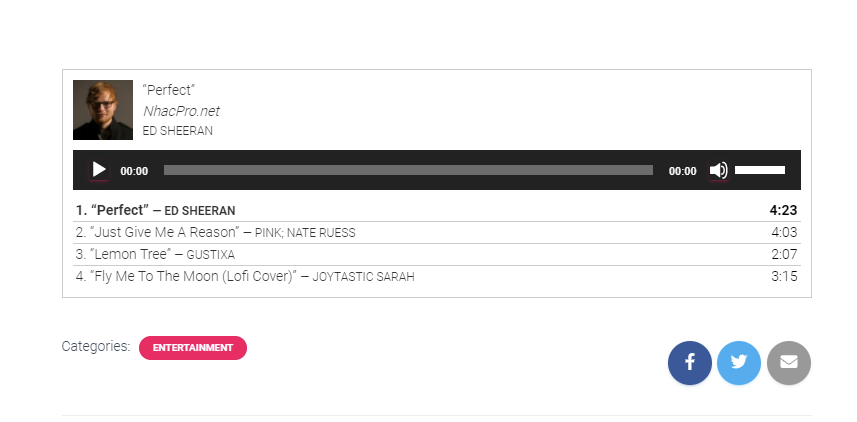
In the next popup window, you can drag and drop to reorder tracks in the playlist according to your purposes. Additionally, you can enable or disable the display of tracks’ names, artist names, and images under the playlist settings.
All information is embedded with your MP3 file’s IDT meta tag and is showcased by WordPress automatically.
When you are pleased with your selection, let’s click on the Insert Audio Playlist button. Then, your playlist will be inserted into your post and you are able to see it in the visual editor.
When you publish or preview your post, you will see how it displays as the screenshot below in the front end.
Adding a single audio file in Gutenberg editor
First of all, open your post or page you want to add audio files. In the editor screen of Gutenberg, let’s click the Add block (+) symbol and select Audio block.
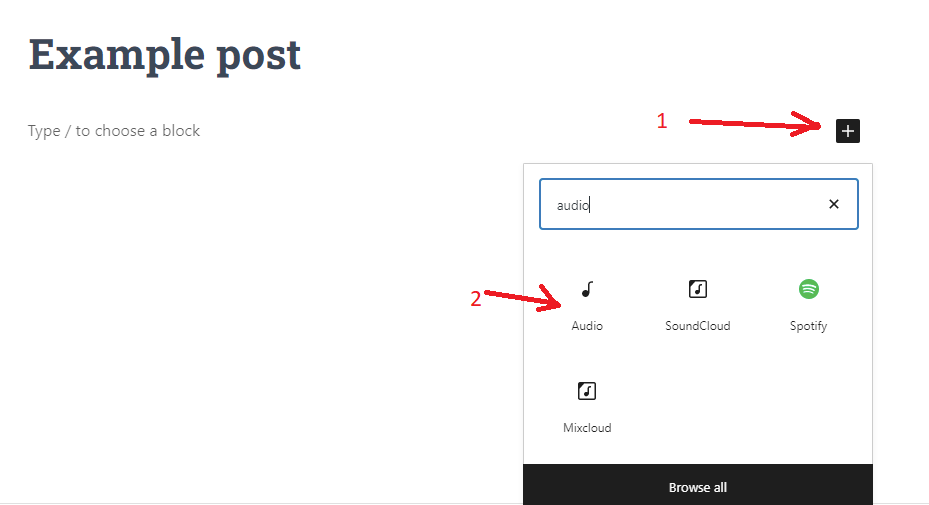
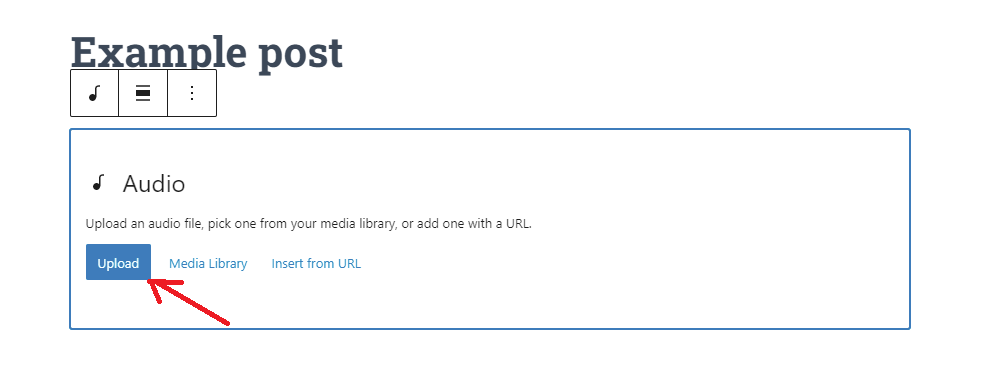
Now the audio block will display 3 ways to add audio files. You can click on the Upload files button to upload your files from a computer or click on the second button to choose uploaded files from the WP media library. And the final button allows you to insert an audio file by providing the URL.
For example, we are going to upload a sample file from the computer.
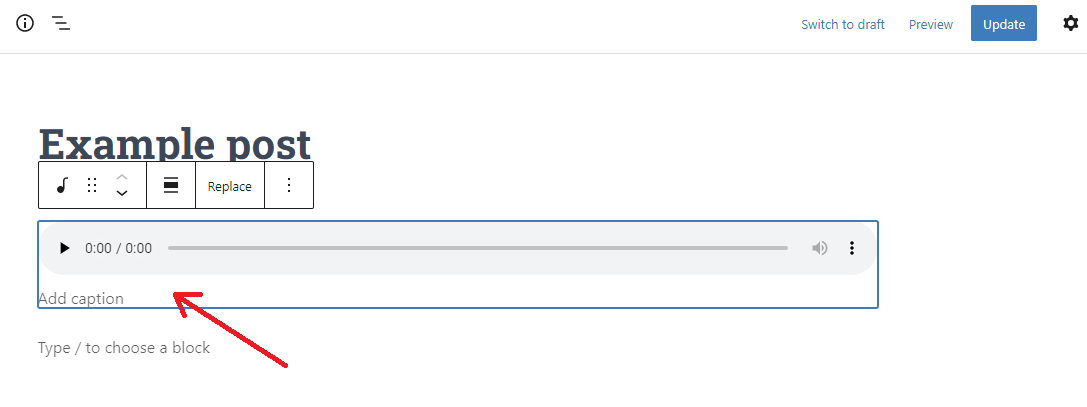
For this example, we’ll upload a sample mp3 file from the computer. Immediately the audio file will appear in the post.
Now you can add and format a caption for the file (optional).
You can click the Preview link at the top to view your post in the front end. If you are pleased with the result, let’s click on Publish/ Update to finish.
Creating a playlist in Gutenberg editor
At the moment of writing this tutorial, Gutenberg doesn’t offer any specific widget or block for creating an audio playlist in WordPress. Nowadays, there are a lot of outstanding WordPress Music Player plugins that can help you handle this issue. However, if you don’t want to install additional plugins, you can use the following method.
Initially, you need to add the HTML block/ widget to a page/post where you want to add the playlist. Then past the following shortcode in the block/widget.
[ playlist ids = "insert_track_ids_here" ]
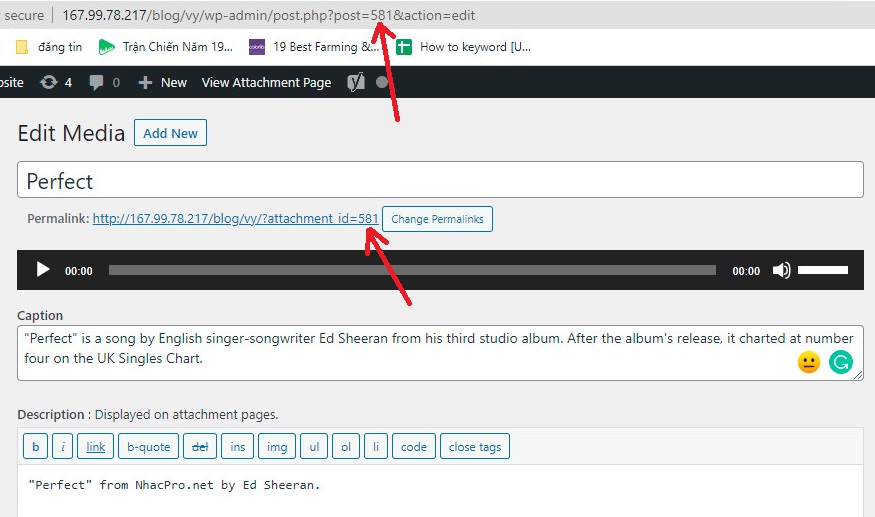
In order to find out the IDs of tracks, you need to go to Media > Library. Click on the file you would like to include in the playlist to seek the ID in the address bar. The ID will display between “post=” and “&action=”. In our case, the ID of the track is 581.
You can also get the ID at the end of the permalink.
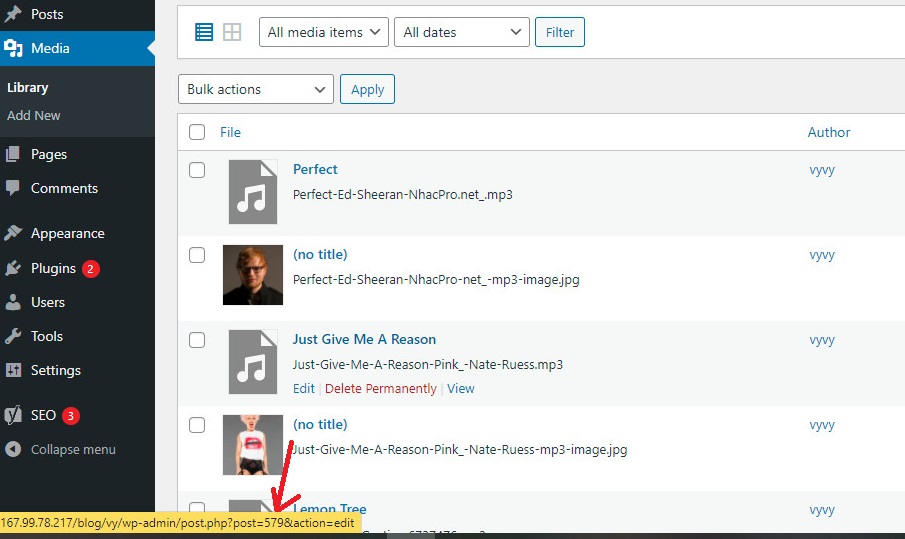
Alternatively, you can hover over the file that you want to get the ID. You will see the edit link that appears at the bottom left corner of your screen.
After all track IDs have been collected, let’s add them to the shortcode. For example, ours goes like this.
[ playlist ids = "581, 578, 579" ]
After you save the changes, a playlist will appear on your site.
Editing meta information of audio files in WordPress
By default, WordPress will automatically gain the meta information from your MP3 file. Nevertheless, when your file doesn’t include any meta information, or you would like to change some meta information. Then, you can easily change it in the media uploader.
Simply click on the Add Media button to open the media uploader. You can click on the Select files button to upload your audio file or click the media library tab if the audio files have been uploaded.
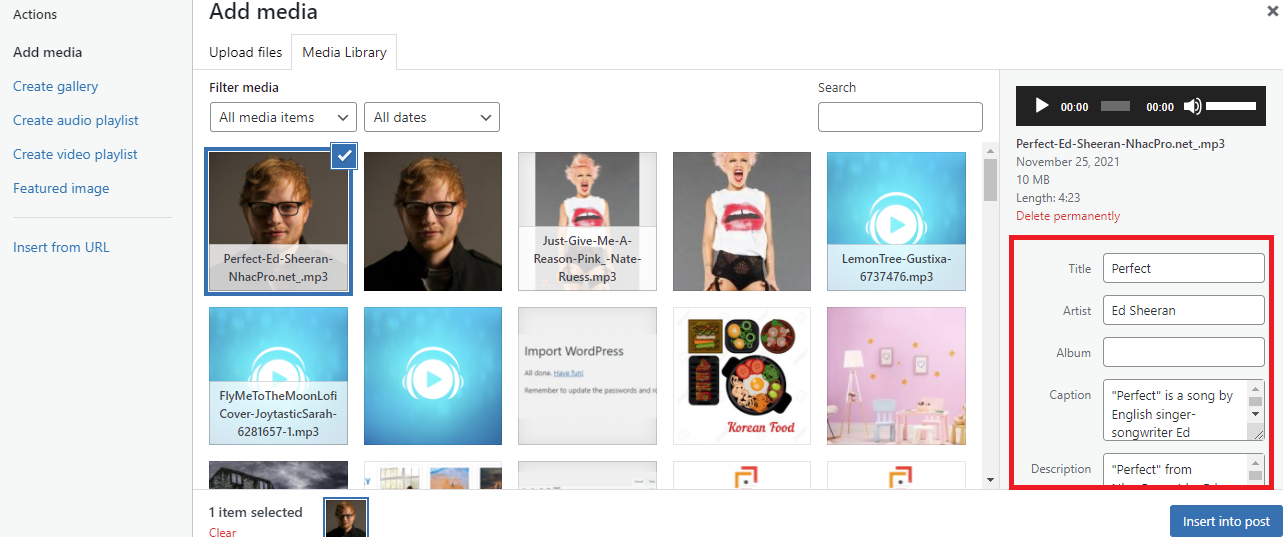
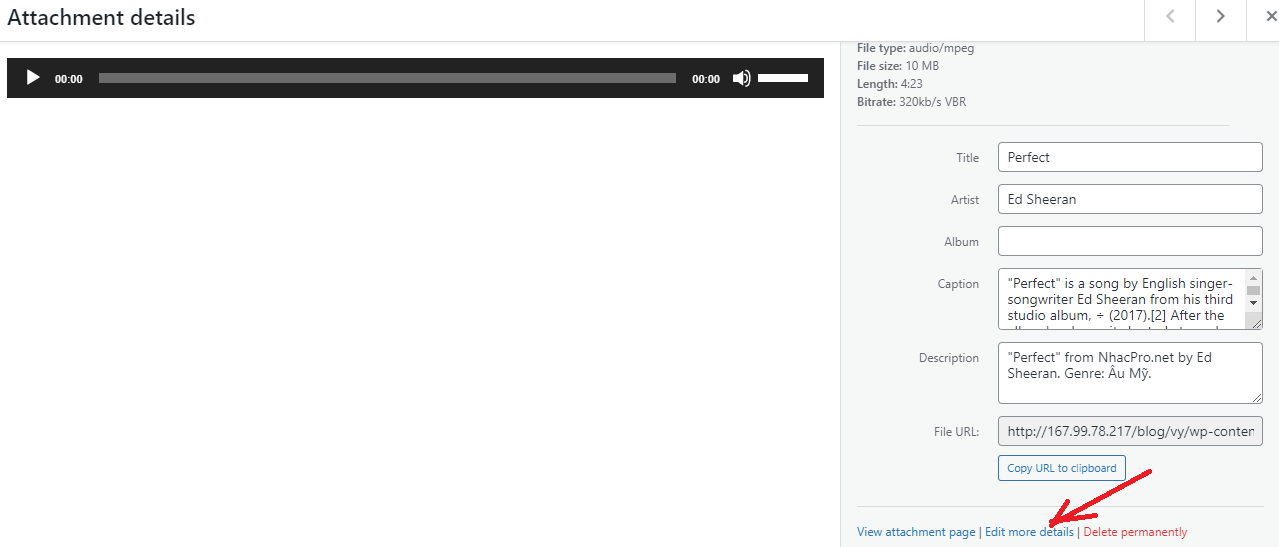
Click on the audio file that you want to edit and have look at the attachment details column on the right. Here, you will see all meta information of that track including title, artist name, album name, caption, and description. You can easily change this information as you want.
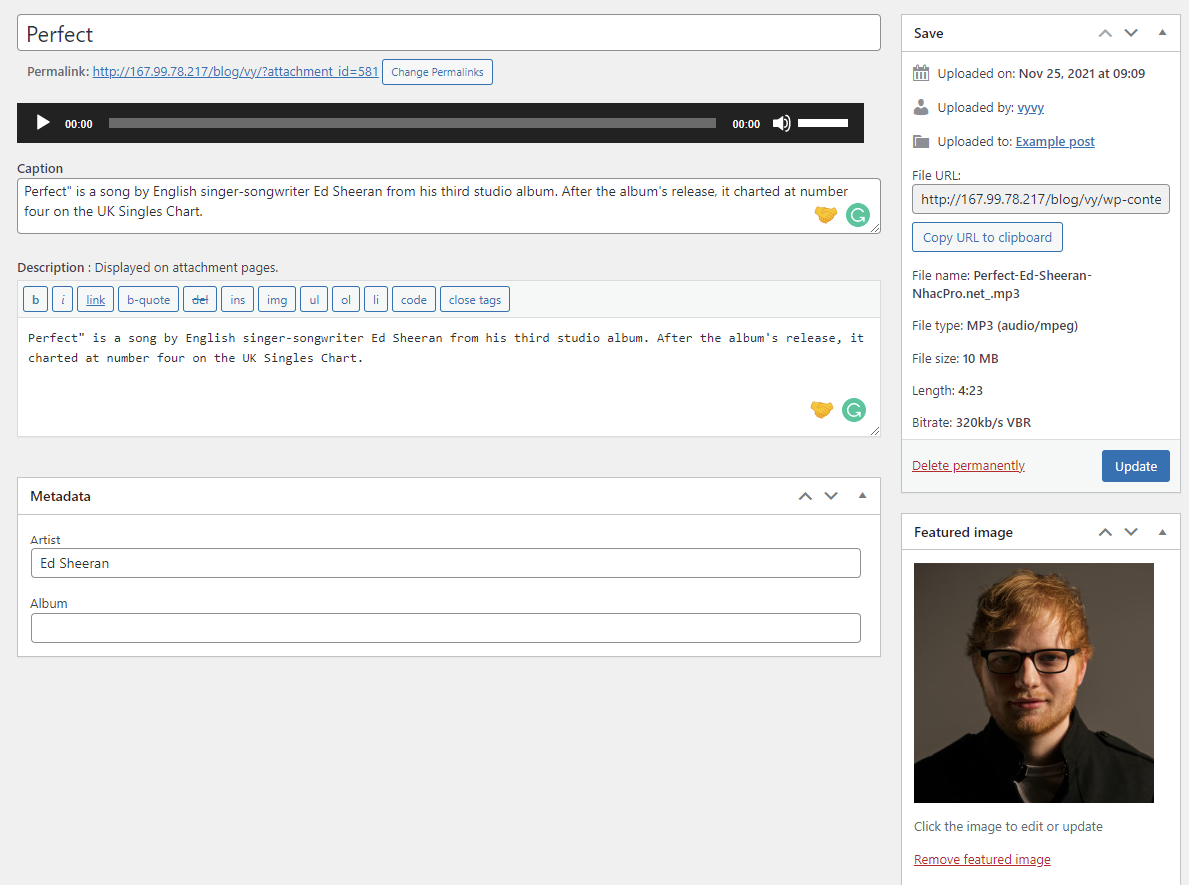
Whether the audio file that you uploaded has an embedded image, this image will be utilized as the album cover. Then, WordPress will automatically extract it.
For the audio file without a cover image, you can edit the file in WordPress and then upload an image.
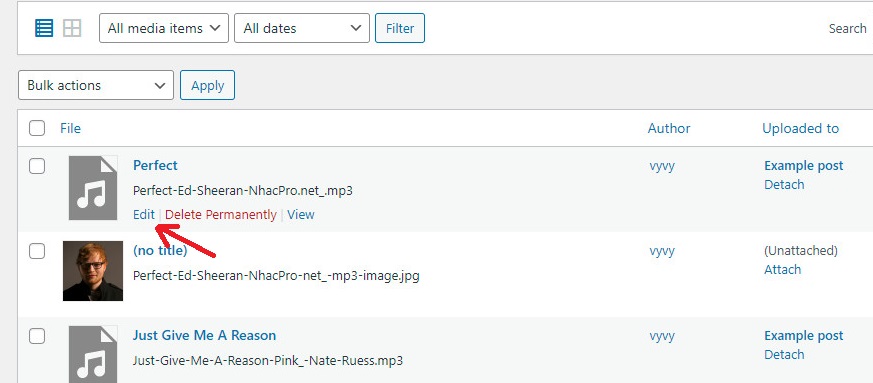
Just visit Media > Library and choose the audio file you want to edit by clicking on the Edit link under it.
In case you are opening the media library in grid view, clicking on the audio file will open a popup window. Now, you need to click on the Edit more details link at the bottom of the popup window to edit the file.
Here, you can edit all the meta-information for your audio file. Additionally, you can also upload a featured image. Then, this image will be utilized once the audio file is inserted into a playlist.
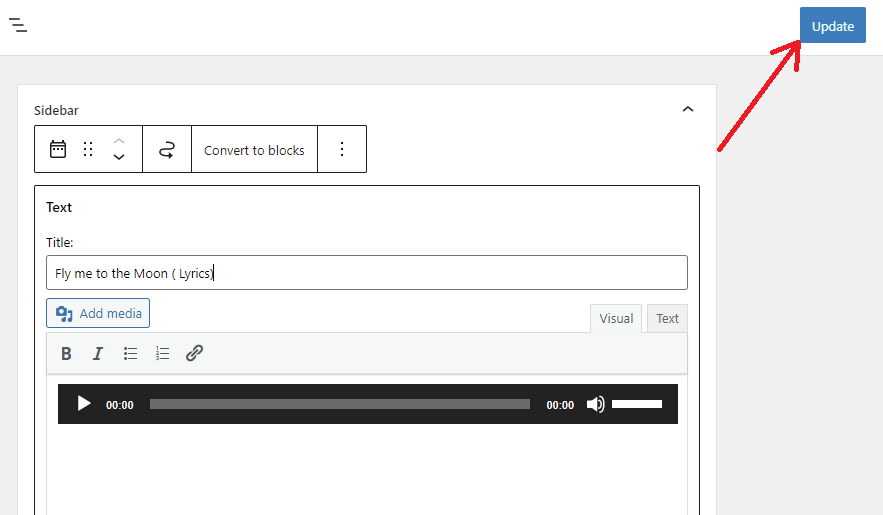
How to add audio files and playlists to the sidebar?
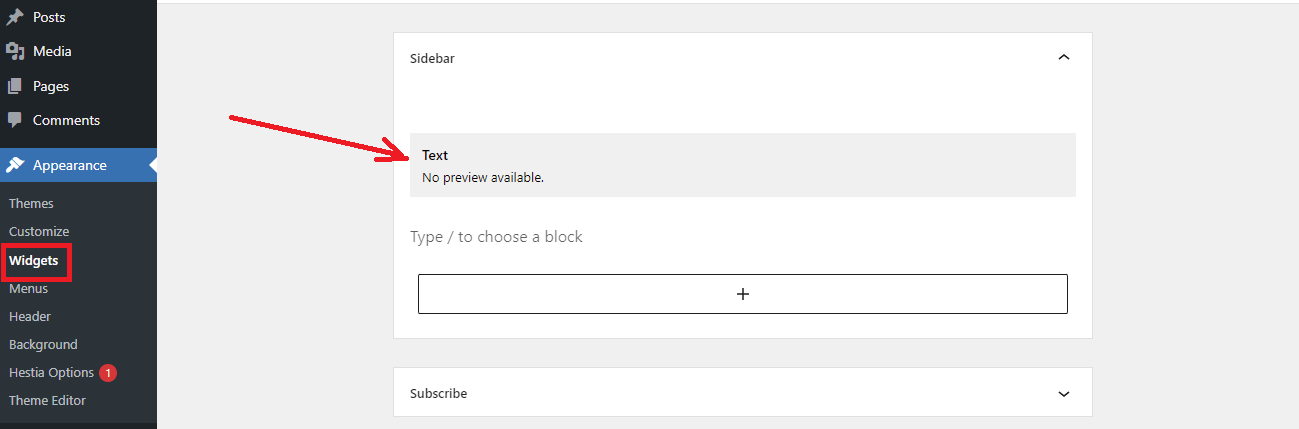
If you want to display a playlist to the sidebar on your website, you can use the Text widget.
Firstly, go to Appearance > Widgets. You will see a Text Widget available in the sidebar. Let’s click on it to edit.
Here you can enter a title and click the Add Media button to upload your audio files or choose uploaded audio files in the media library. The remaining steps are the same as adding a single audio file/ playlist to pages and posts (see above).
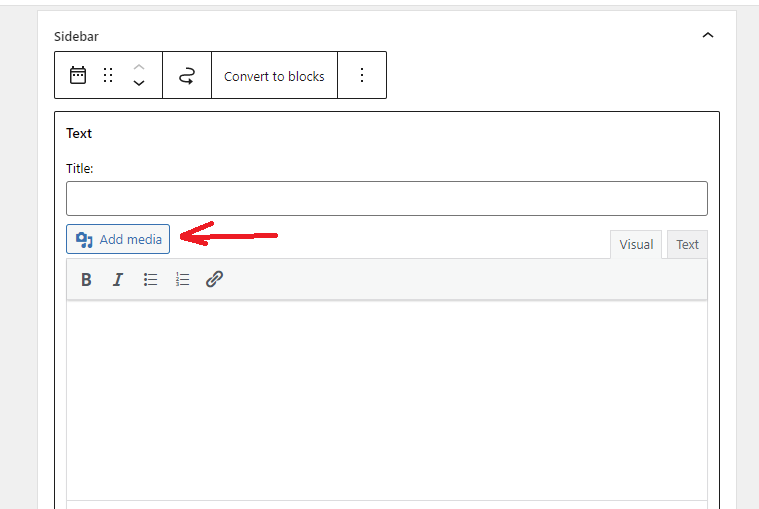
Once you are done, click on the Update button and visit our website to see the result.
Wrap up
We have just displayed the detailed guide to add audio files and create playlists in WordPress. If you have any questions or encounter any problems during the process of using these mentioned methods above, let us know by leaving a comment below.
Moreover, you can drop by our Free WordPress Themes to explore plenty of eye-catching designs for your website.

- Resolving the “Class JFactory Not Found” Error in Joomla When Upgrading to J6 - December 19, 2025
- The Utility Of VPNs For Site Authors And Admins - November 24, 2025
- Joomla! 6: What’s New and How to Upgrade from Joomla! 5 - October 23, 2025


Recent Comments