J2store provides you with a powerful feature which is Product layout, so customers can customize the product description and display options.
Notice: this feature only works on Joomla articles. You will need to configure product layouts by the menu item if you use FLEXIcontent, SEBLOD or any other catalog systems.
How to create a Product Layout?
Let’s go to your Joomla Control Panel, click Menus > Main Menu
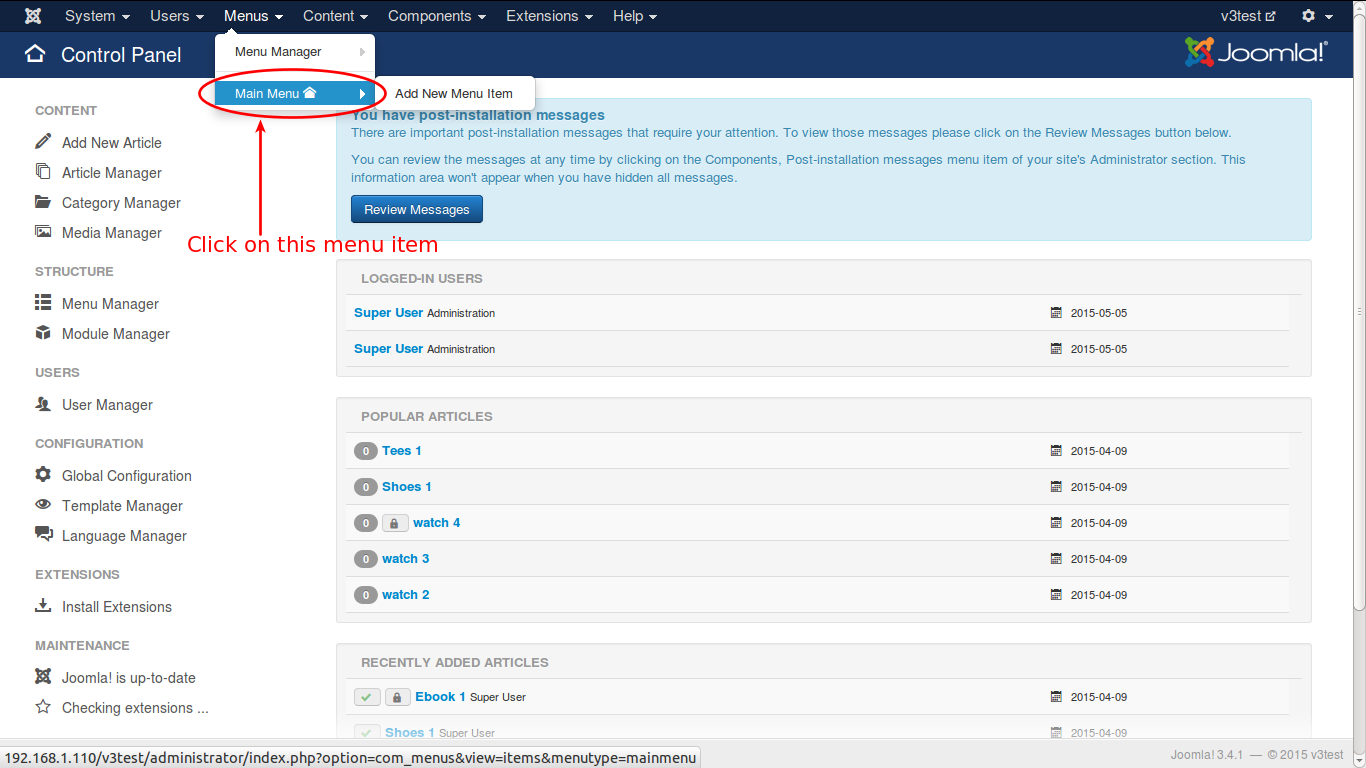
A list of menus will be displayed like the image below:
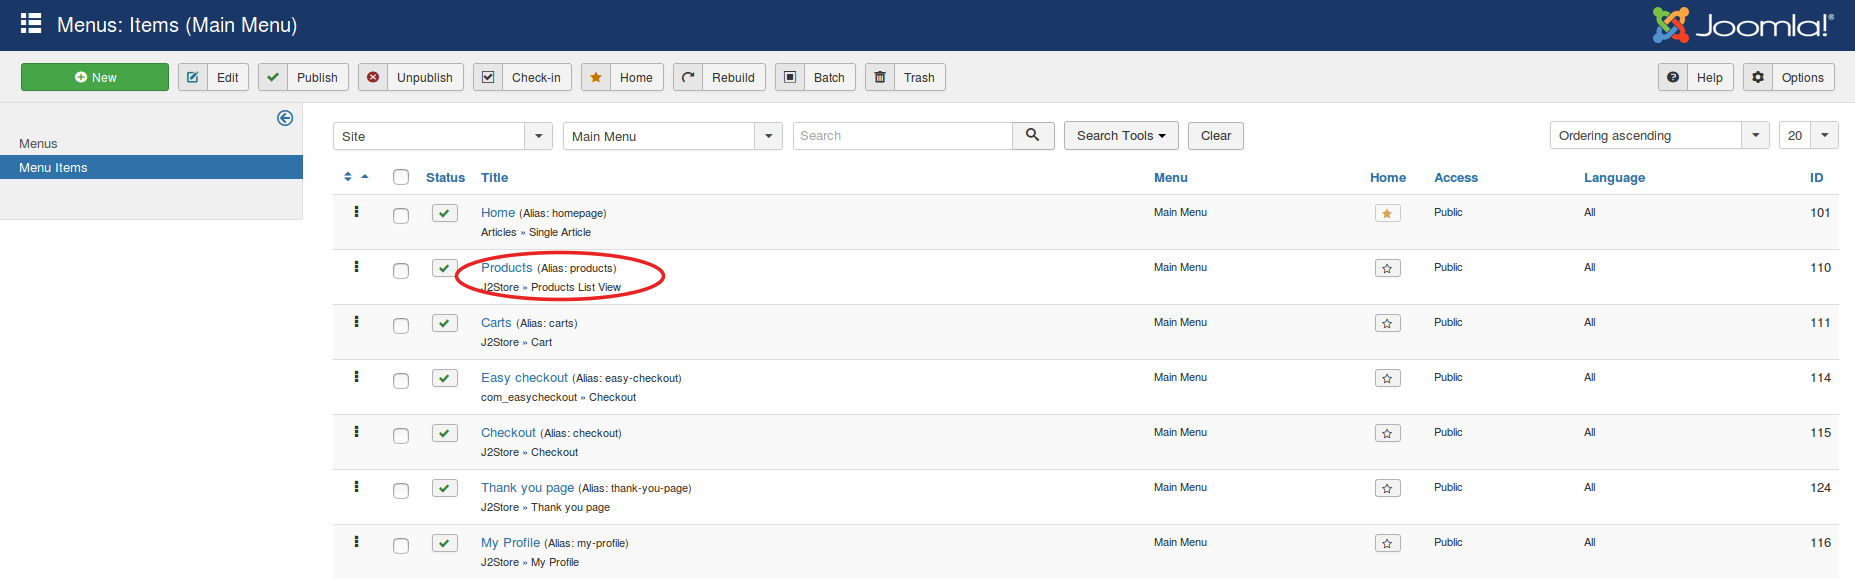
Click “New” button to create a new item, then you will see this page:
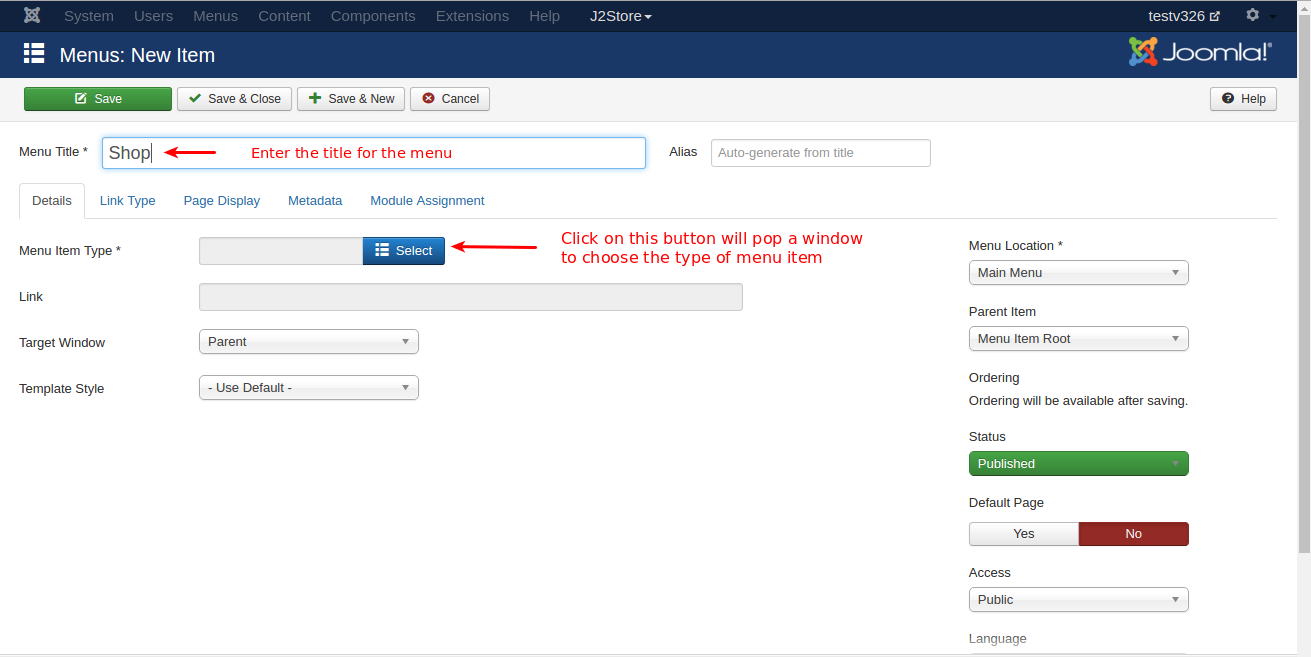
First of all, please fill the item’s title, such as “Shop”. There is an alias will be automatically created based on the title.
Next, there are some tabs in the page, the first tab to explore is tab Details
Detail Tab
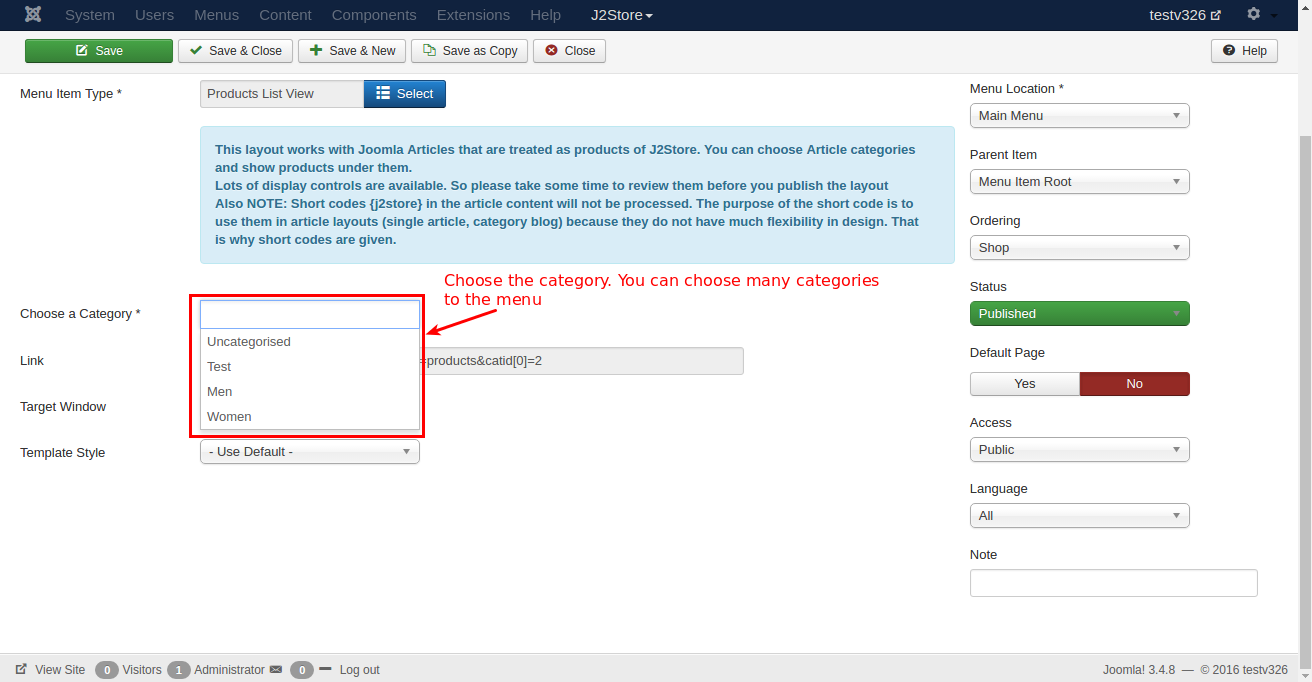
At this tab, click on the button Select > choose Menu Item Type. A popup window will appear:
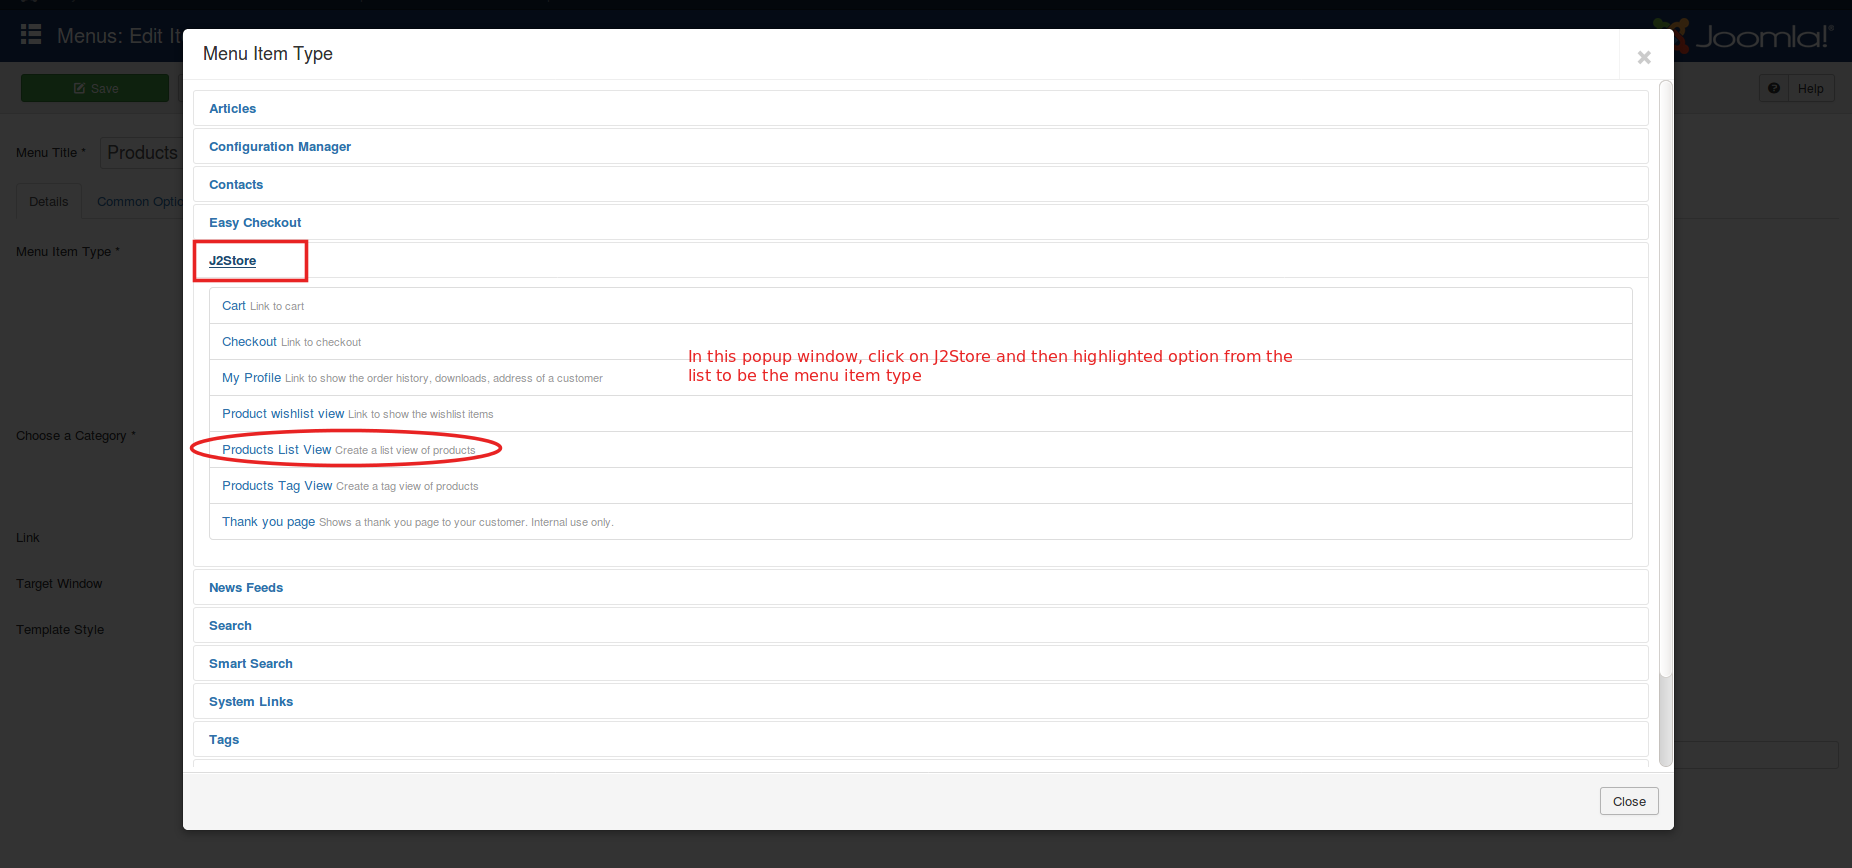
In this window, choose J2store > Products List View > close the window. The selection you chose will show like the image below
Now the menu item is chosen and the automate link is created, you can choose the product categories listed by clicking on text box Choose a Category. It is possible to add as many categories as you want in this box.
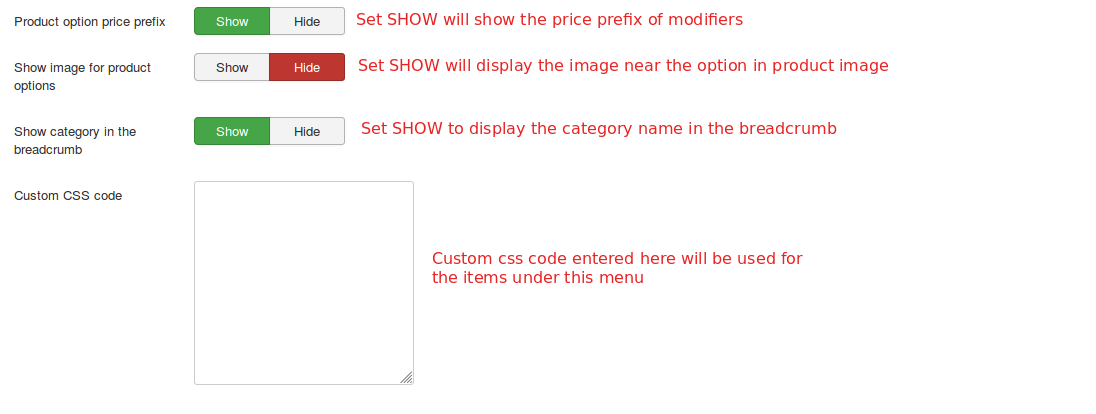
Common Options Tab
Common options tab contains common settings for all items. You can add custom CSS code or showing images for product options here, or just leave it by default.
Notice: in the option “Sub-template”, if the bootstrap version you are using is 3.x, please choose bootstrap3. If you are using version 2.x, just leave it “Default”
Set the option to Hide if you don’t want to show product option Price in the frontend.
Item View options in category listings
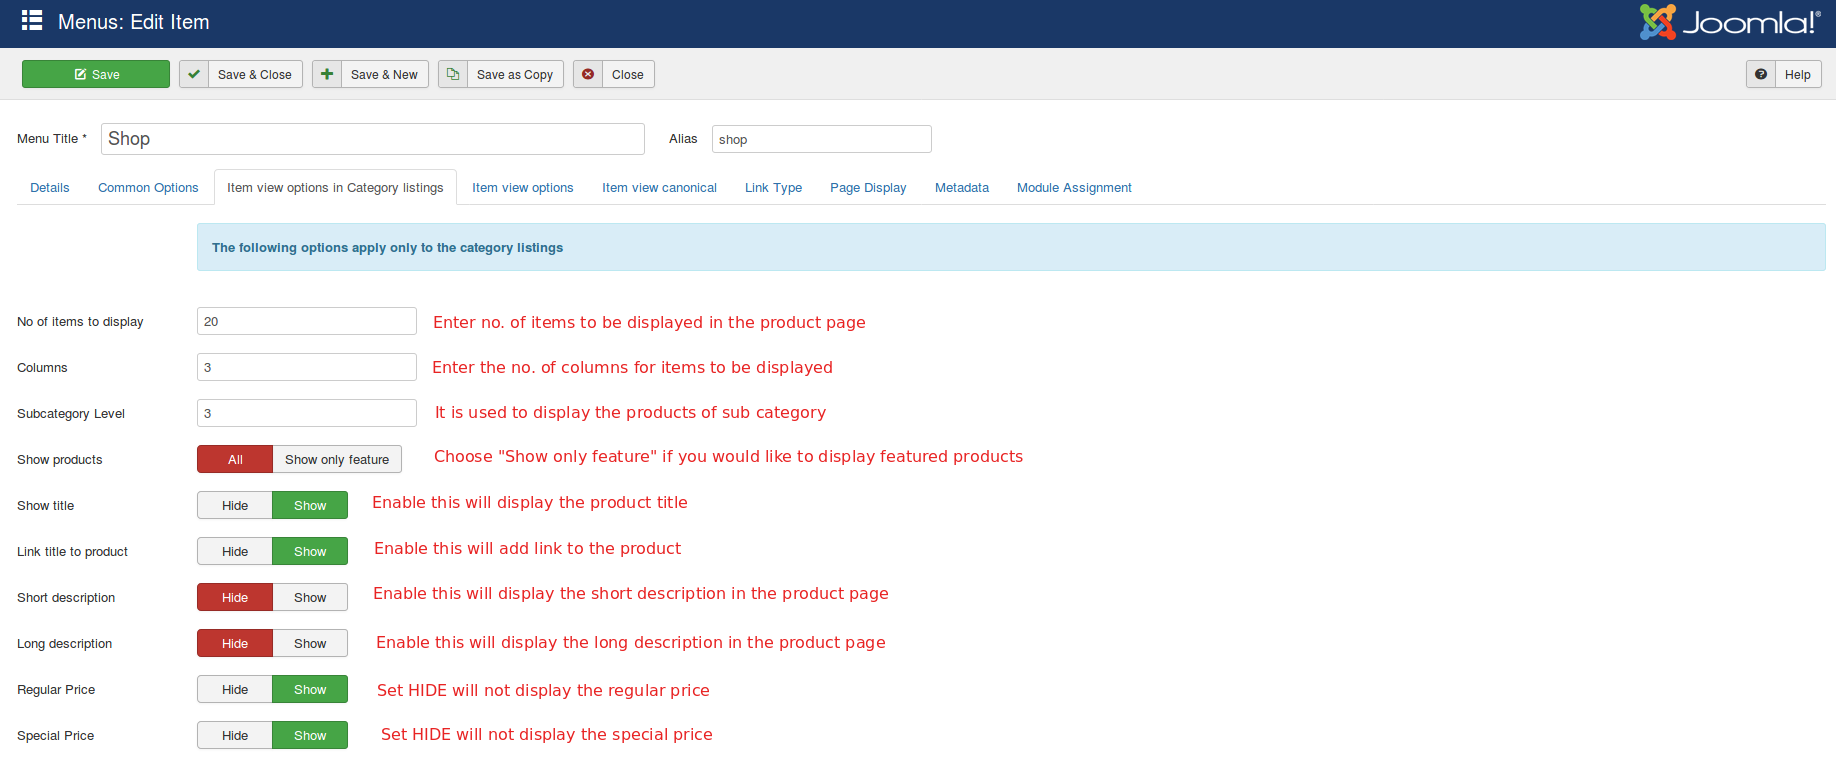
This tab allows you to configure the way the product will be displayed in the cart, as well as the options and features to show with products.
It is possible to show any number of products you want in the store. Set “No” to products which are going to be displayed in available text boxes, as well as how many columns where products display will be divided. When you set it as “No” at products increases, the size of the displaying image will be reduced.
Besides, you can choose other options (price, image size, image, etc) according to your requirements.
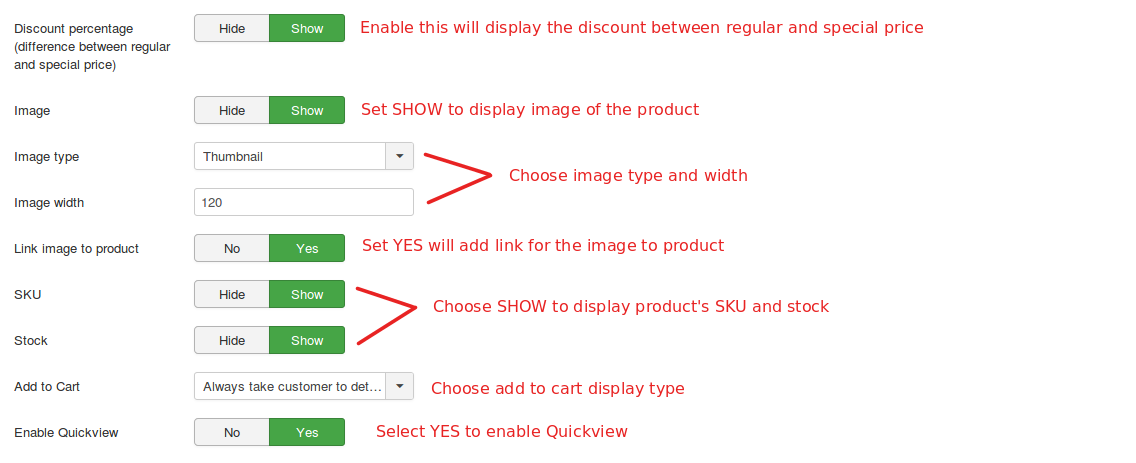
Important: The SKU Show/Hide setting might be changed in 2 places, which are at product layout and configuration set up. Product layout setting will be given a superior priority, for example, if you set SKU as Show in the configuration, it will be set as “Hide” in product layout. It will override the configuration setting and the SKU in product layout will be set to Hide. Finally, SKU will not display in frontend.
The filters showing like the image below:
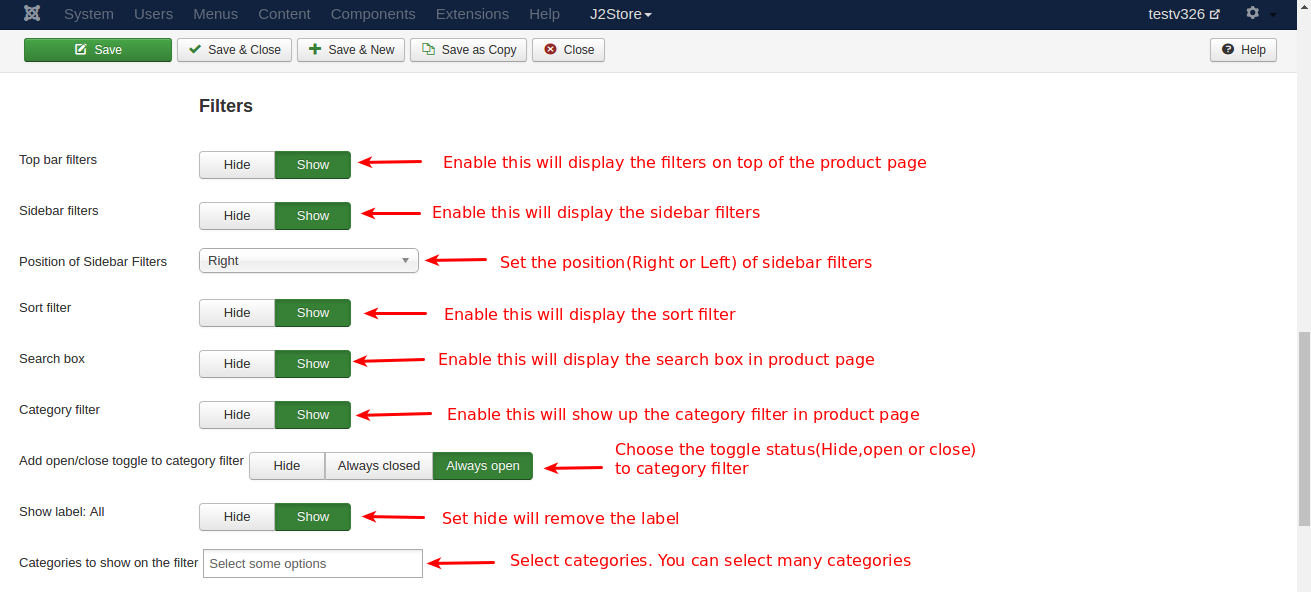
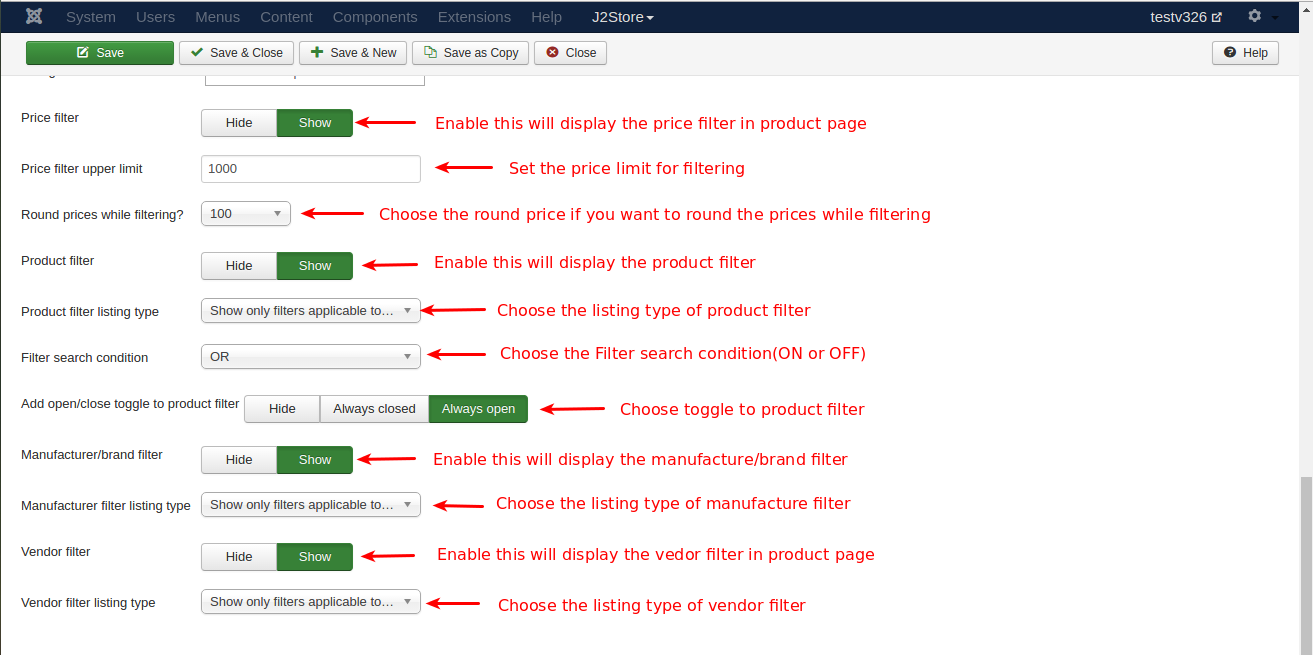
These filters help you easier to find a specific product. There are many filters provided for searching:
- Search Box
- Sort Filter
- Price Filter
- Manufacturer / Brand Filter
- Category Filter
- Product Filter
- Vendor Filter
Customers can apply multi filters as they want
Item View Options Tab
You can configure how to display product with price, image, description, etc.

Configuration options which will display along with the product. The available options are:
- Title
- Long Description
- Short Description
- Special Price
- Regular Price
- Discount Percentage
- Stock
- SKU
- Main Image
- Main Image Width
- Additional Images
- Enable Zoom Effect
- Additional Image Width
- Brand
- Cross-Sells
- Upsells
- No of columns for related products
- Show Specification
- Show link to product list
- Show description and specifications
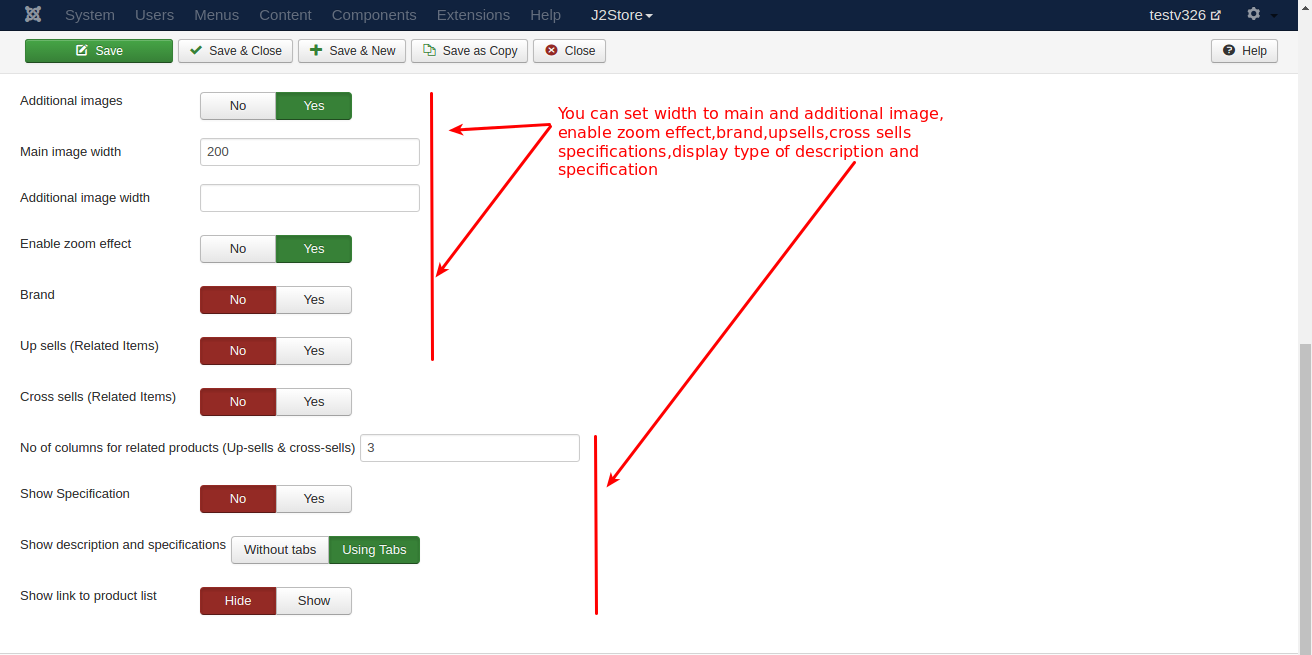
You can find the details and how it should be displayed in your store by using these parameters.
There are 4 more tabs which should be left as the default settings. Now, please click Save & Close button to see the screen like image below, where the newly created menu item listed with other menu items in the top. To see all products in your store, just click it.
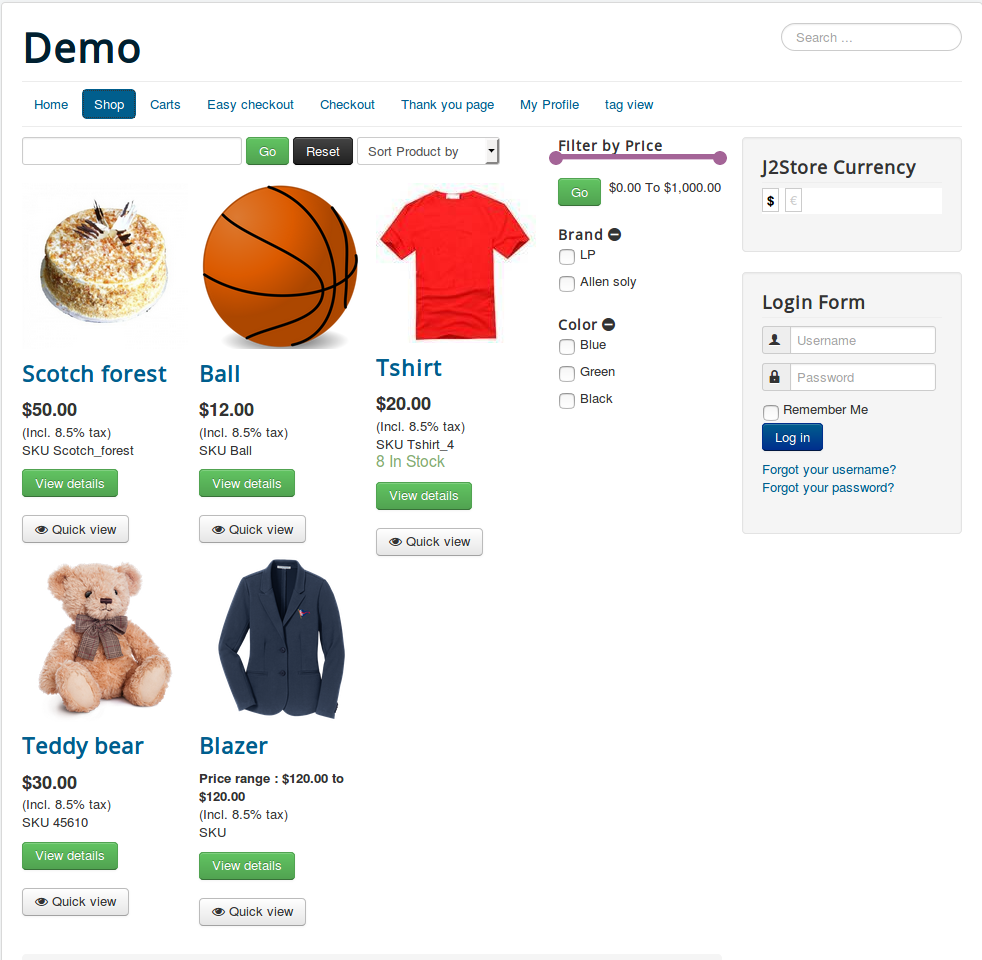
All the product layout features are listed. While the filters are on the right side according to selected choice, you also have options to filter by brand, price, vendor, and more. The special and regular prices will be displayed as well with discount percentage variation.
How to add images in the backend and how it displays in frontend?
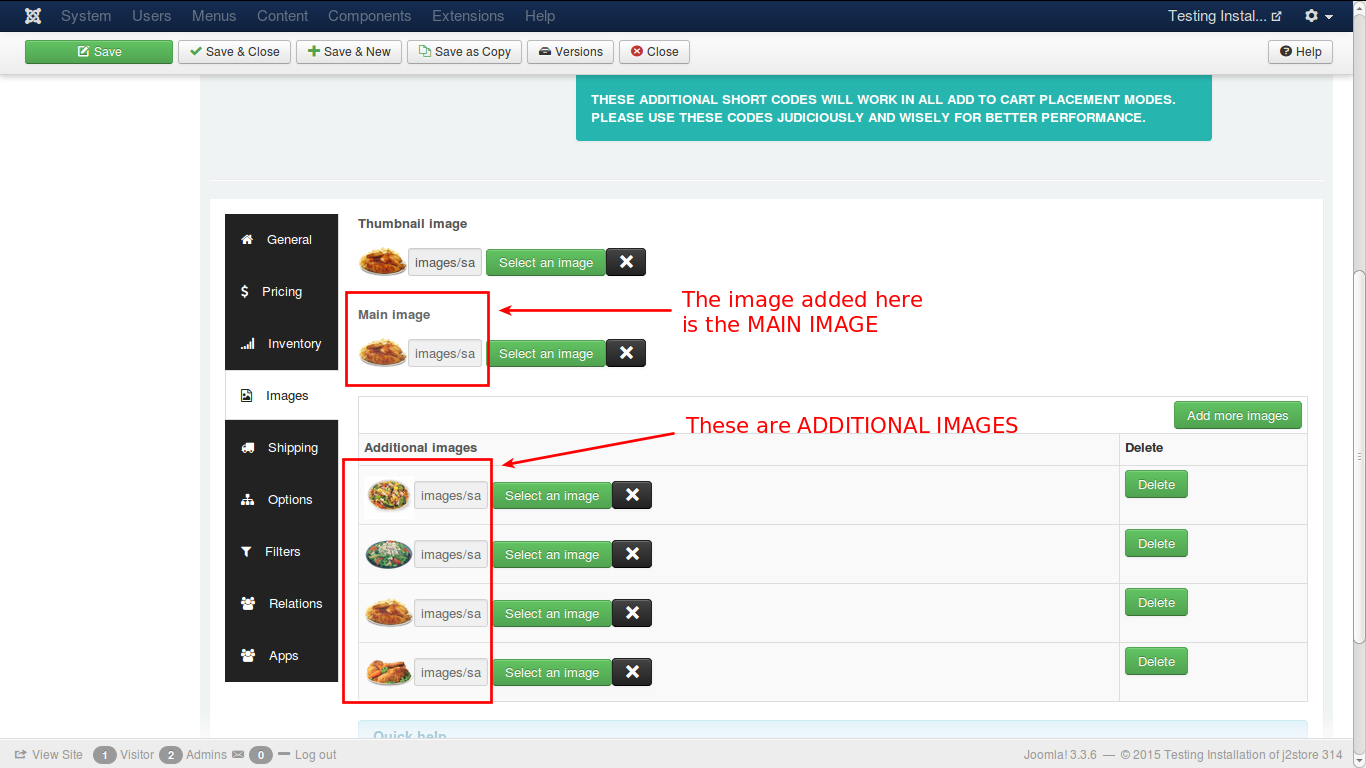
In the product configuration, you will see Additional and Main images that have been added. When you configure a product, you can add product images for the cart view, main view and also the additional images. Let’s see how it will display in frontend.
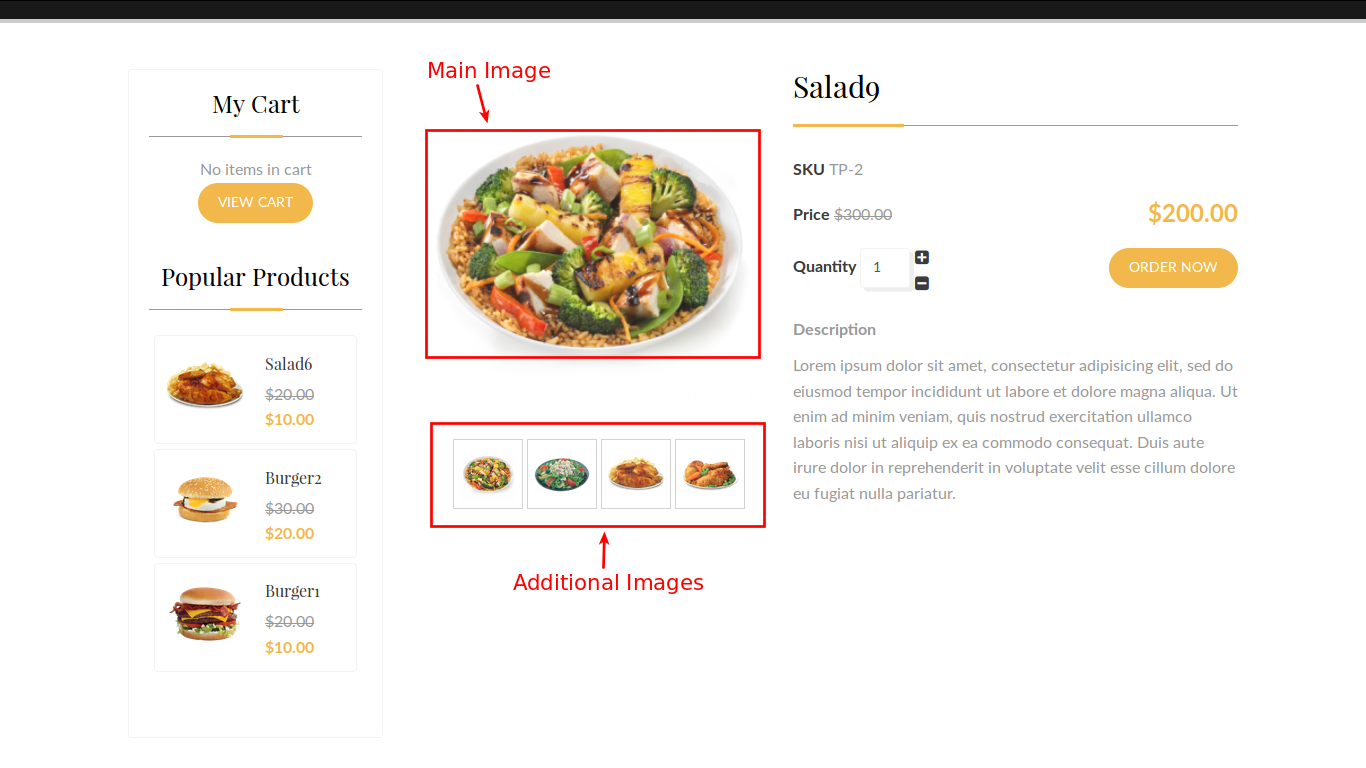
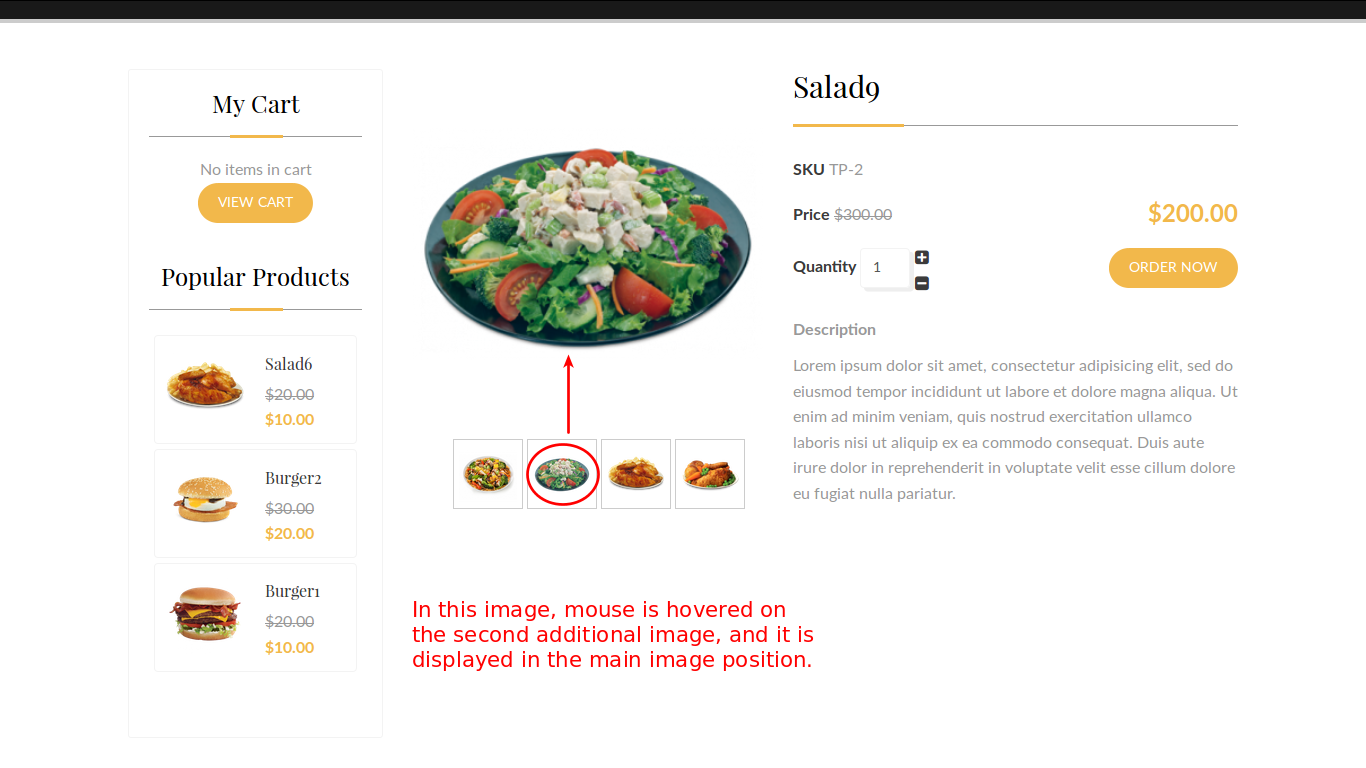
A large image and additional images in small sizes will be displayed when you click on the product. When you hover small images, they will replace the position of main image.
So it is possible for you to set different product layouts as you want.
Special Module Positions
There are many special module positions that J2store offers to place custom HTML module of Joomla:
- j2store-single-product-top – Top of product view layout
- j2store-single-product-bottom – Bottom of product view layout
- j2store-product-list-top – Top of product category listing page
- j2store-filter-left-top – Top of left filter
- j2store-filter-left-bottom – Bottom of left filter
- j2store-filter-right-top – Top of right filter
- j2store-filter-right-bottom – Bottom of right filter
- j2store-product-list-bottom – Bottom of product category listing page
- j2store-cart-top – Top of cart page
- j2store-cart-bottom – Bottom of cart page
- j2store-checkout-top – Top of checkout page
- j2store-checkout-bottom – Bottom of checkout page
How to prevent Zoom effect and open main image in popup
The first thing to do is going to Admin from backend and disable the zoom effect.
Disable zoom in J2store product layout
Step 1: Please go to Menu Manager and choose the menu linking to J2store product layout
Step 2: Move it to tab Item view options
Step 3: At the option Enable Zoom effect, set it as NO
Disable zoom in Category blog layout
Step 1: Go to Extensions > Plugins.
Step 2: Choose content’s type
Step 3: Open Content – J2Store plugin.
Step 4: at Enable Zoom effect, set NO in tab Item view.
Override view_images.php
When you have disabled the zoom effect, please follow the instruction below
Step 1: Copy /components/com_j2store/templates/default/view_images.php
to
/templates/YOUR_TEMPLATE/html/com_j2store/templates/default/view_images.php
Step 2: Open that file, find the code below around line 22:
<span class="<?php echo $class; ?>" id="j2store-item-main-image-<?php echo $this->product->j2store_product_id; ?>">
		  	 <img itemprop="image"
		  	 alt="<?php echo $this->product->product_name ;?>"
		  	 class="j2store-product-main-image j2store-img-responsive" src="/<?php echo $image_path.$main_image;?>"
		  	 width="<?php echo intval($main_image_width); ?>"
		  	 />
		  	 </span>
then change it to
 <span class="<?php echo $class; ?>" id="j2store-item-main-image-<?php echo $this->product->j2store_product_id; ?>">
		   <?php JHTML::_('behavior.modal', 'a.modal'); ?>
		  	 <a href="<?php echo $this->product->main_image;?>" class="modal"><img itemprop="image"
		  	 alt="<?php echo $this->product->product_name ;?>"
		  	 class="j2store-product-main-image j2store-img-responsive"
		  	 src="<?php echo $image_path.$main_image;?>"
		  	 width="<?php echo intval($main_image_width); ?>"
		  	 /></a>
		  	 </span>
Troubleshoots
Why does the Grid layout not work?
This might happen because of the wrong sub-template
How to solve: open the product list layout menu > Common options > set sub-template to Bootstrap3 > Save the change
If it is already Boostrap3, let’s change it to Default
Preview additional image after click
Please copy the file /components/com_j2store/templates/default/view_images.php
to
/templates/YOUR_TEMPLATE/html/com_j2store/templates/default/view_image.php
then edit the file and delete entire highlighted line.
How to add Category description in list view
Step 1: Create a new custom module then assign it to the menu linking to J2store product layout
Step 2: Set the module position to j2store-product-list-top
Step 3: Save.
That’s it! If you have any other questions, please let us know by leaving a comment below, we will reply as soon as possible!
Image Credit: J2store
- How to Configure Tax of EU Stores in J2store? - March 21, 2019
- How to Configure Tax for Canada Stores in J2store? - March 19, 2019
- How to Configure Tax for US Store in J2store? - March 19, 2019


Trackbacks/Pingbacks